Reference: L7|ESP Quick Start Guide
Summary
This document is intended to serve as a reference guide for ESP end-users. Please view L7 University materials to gain an in-depth understanding through self-paced Modules and/or registration with live MasterClass, or simply read about how other customers are using ESP in various white papers and case studies .
Login to ESP
Users should login to their ESP environment using the link provided by their organization
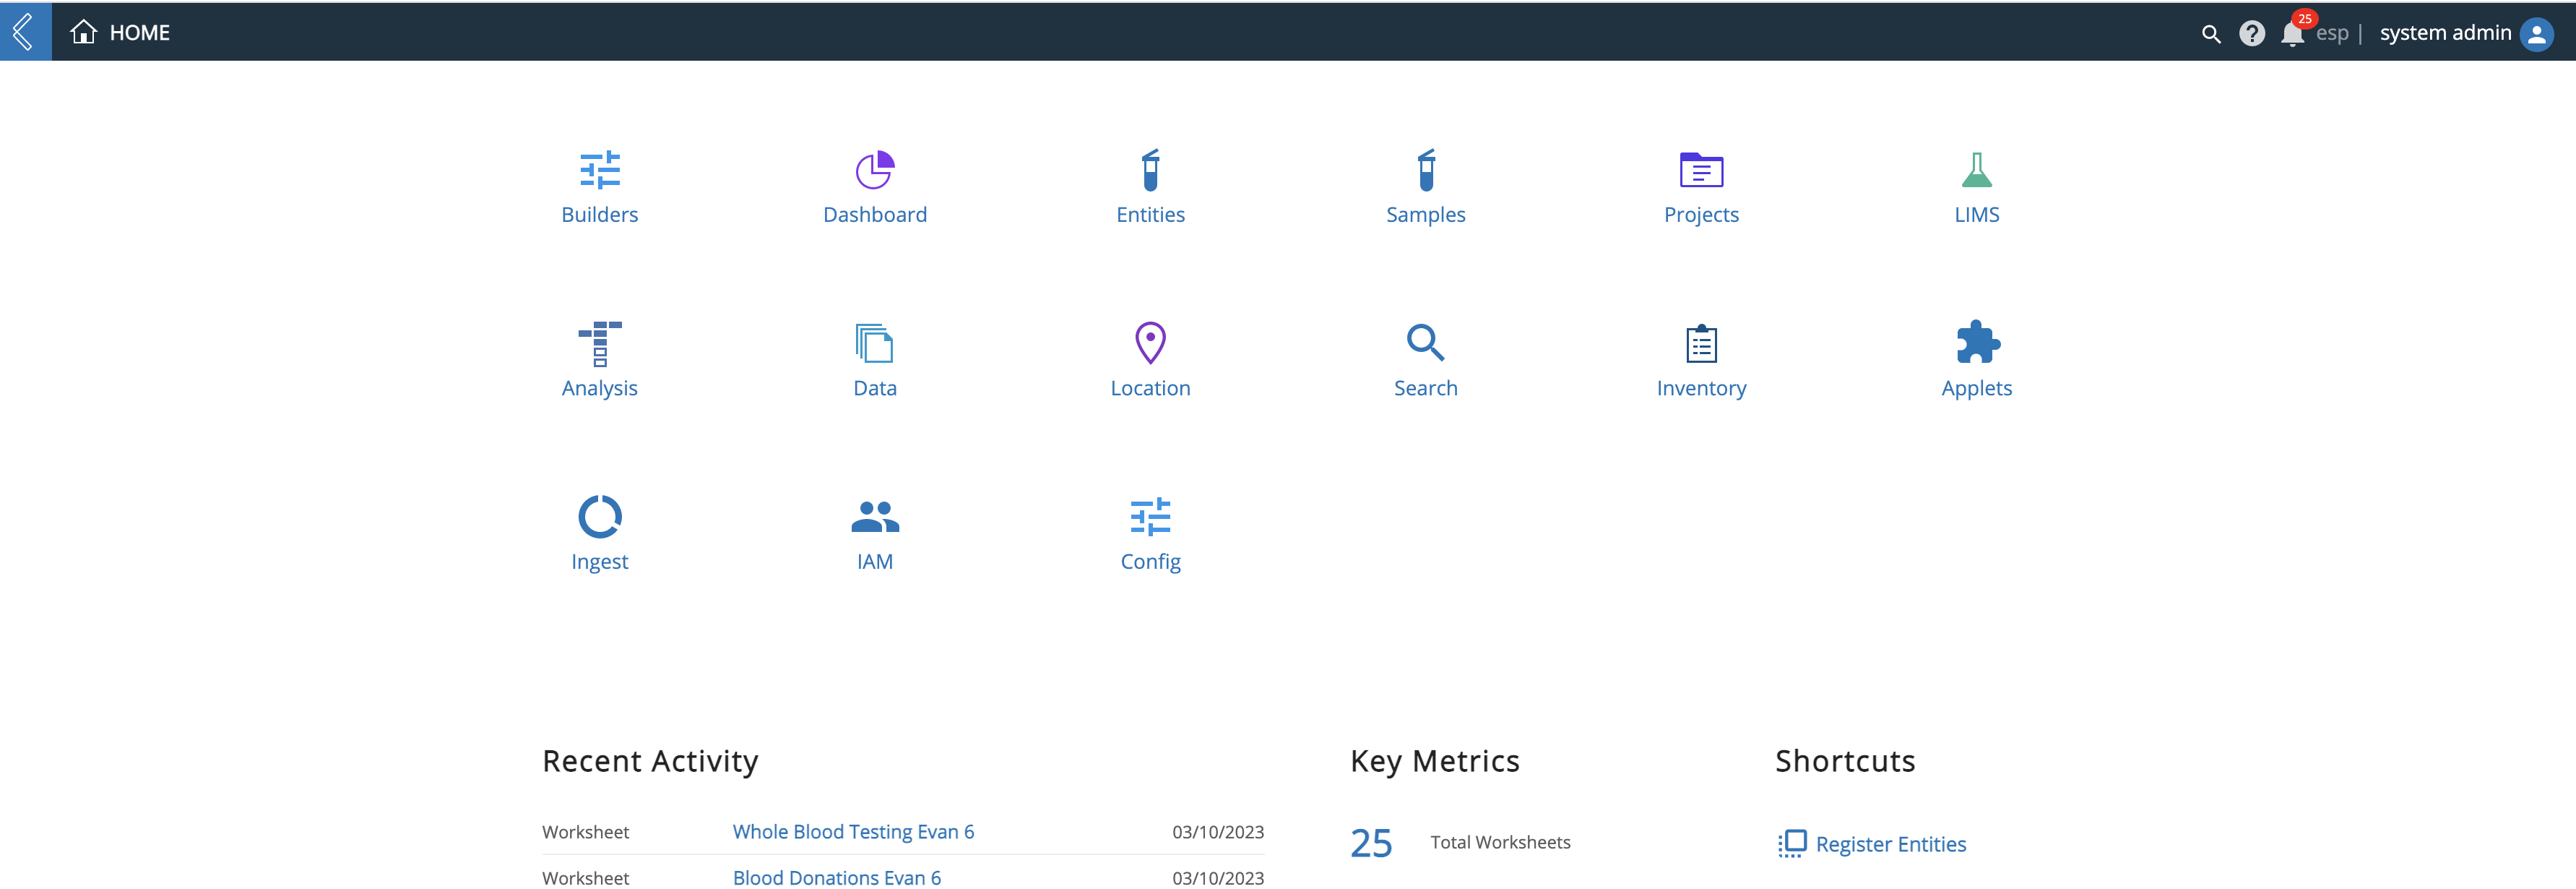
Home Landing Page – Four Main Areas (see screenshot below)
Viewing Window – main, middle portion of the screen, displays all ESP applications user has access to view
Recent Activity – lower, left-hand corner of the screen, allows user to quickly return to viewed pages/resources, e.g., Experiment Worksheet, Project, etc.
Key Metrics – middle portion of the lower screen, provides quick overview of instance metrics
Shortcuts – lower, right-hand corner of the screen, links to common pages/actions performed in ESP
 |
App Landing Pages – General Navigation
Apps Tray/Main Menu – blue arrow icon located in the top navigation bar/far-left corner, opens the “Apps Tray” which provides quick access to ESP apps listed on the Home page (users will only see what they have access to view), along with user’s Recent Activity
App name – capitalized white text located in the top navigation bar/left side, displays specific ESP name of the app the user is currently viewing
ESP header icons (see screenshot below) – images in top right bar provide quick access to the following:
Search (magnifying glass) – global search results provide link(s) to documentation and resources based on search terms
Content Help (circle with question mark) – provides general information about current page being viewed
Notifications – red alert will notify users when general and/or user-specific alerts are available
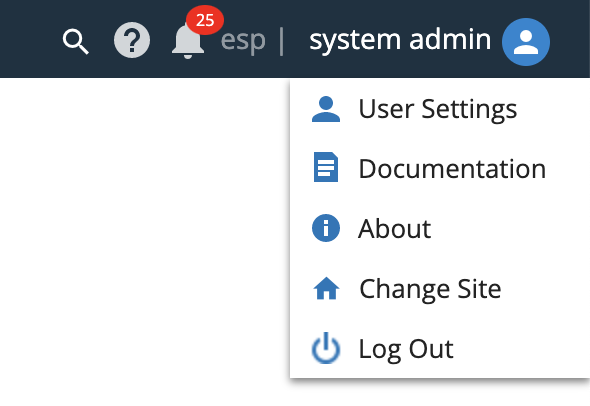
Username – selecting the username displays a dropdown with the following options:
User Settings – selecting the User Setting option displays a dropdown with the following options:
Profile – most of this information is controlled by an Administrator; however, if single sign-on has not been enabled the User may change password here
Security – API key
Sessions – active web session(s)
Documentation
About
Change Site – this is used to switch between ESP instances, only applies to customers with multiple instances
Log Out
 |
ESP Apps Overview
Entities App
Entities – objects or resources that can be run through a scientific process
They are instances of Entity Types, for example Potential Donors and Whole Blood, which can be organized into Entity Classes, such as Patients and Samples
All Samples are Entities, but not all Entities are Samples
Filters panel – located on left side of the screen, this panel displays resource attributes that can be used to filter resources displayed in the viewing window
Viewing window – main, middle potion of the screen, complete list of active resources managed by the app the user is currently viewing
Inspector panel – located on the right side of some app screens, this panel displays a summary of selected resource’s details such as tags, time stamps, and linked resources
Users may click on the blue linked resources to view details (e.g., when looking at the Entities main landing page, users can clink on an Entity name to view details)
When user is on Entity details page, users may select the “Parents & Children” tab to see what relationship, if any, the current Entity has with other Entities in the database
“Tree” view displays all generations
“Table” view displays parents and children
Projects App
Projects App is used to create and manage Projects and their associated Experiments
Projects and Experiments can be created from both the Projects and Experiments tabs
The landing page of the Projects app displays the complete list of Projects in an ESP instance
The “Experiments” tab displays all Experiments and their details in an ESP instance
Experiments can be grouped by Project, Workflow, or Owner
Select the name of an Experiment to view details
Administrators can use the “Planner” tab to view and better understand a timeline for a business process and compare that to the time it took the end user to execute it
Notes about the Calendar view on the “Planner” tab:
White blocks represent expected execution time for each Workflow in the Workflow Chain
Blue blocks represent actual time it takes to complete each Workflow
Overarching blocks of text are umbrella blocks, and they represent the entire Workflow Chain Instance
Editing one Workflow will automatically adjust the plan for all subsequent Workflows in the Workflow Chain Instance
Builders App
Used to create and manage content in ESP
Data – types of business objects (e.g., Entity Class, Service Types, and Vendors)
Processes – building components of an end-to-end business operation (e.g., Protocols, Workflows, and Workflow Chains)
Extensions – Applets and Doclets
Doclets – interactive documentation that assist ESP users learn and accomplish a task in ESP
Applets – customizable, HTML scripts that often serve as interactive reports and process-driven extensions
Applets can serve a variety of purposes but are primarily used to create customer-specific interactions or automate manual actions in ESP
Applets have their own application in ESP, the Applets App
LIMS App
The LIMS app is used to process Experiments through the creation of Worksheets
Analysis App
Allows users to create, manage, and monitor Pipelines
Pipelines – collection of Tasks
The landing page of the Analysis app, offers the “Monitor” tab which displays all executed Pipeline Instances and their status in an ESP instance, sorted by start time and listed in descending order
Selecting the empty space next to a Pipeline Instance populates details in the Inspector panel on the right side of the page
Pipeline reports are also available in this view for further analysis
Data App
Displays complete list of imported and exported files in an ESP instance
Files can be uploaded as Protocol in the LIMS app, Entity in the Entities apps, or in an ad-hoc fashion in the Data app
Location App
Used to manage and track Containers and their contents, and metadata
Container – any physical location (e.g., freezers, racks, boxes, and multi-well plates)
Containers are instances of Container Types, which are created and managed in the L7|MASTER app, and can store other Containers, Entities, and Items from the Inventory
Container nesting allows users to model location hierarchies
There are two ways to view Containers on the landing page, Tree view and List view
Inventory App
Used to manage and track Items and their details, and usage history
Item – registered consumable, reagent, or kit component that the user wants to track
Items are created and managed in the L7|MASTER app
The landing page of the Inventory app displays the complete list of Items in an ESP instance, and items are grouped by Item Type, with the total number of nested Items displayed in parentheses
Reorder Thresholds can be assigned to Item Types in the L7|MASTER app
When the total quantity of the Items that belong to that Item Type are equal to or less than the assigned threshold, they will appear on the “Items Requiring Reorder” widget in the Dashboard app
Dashboard App
Offers users two tabs, “Dashboards” and “Reports”
“Dashboards” tab provides operational metrics that summarize events in ESP
The displayed widgets are automatically updated
“Reports” tab compliments metrics displayed in the “Dashboards” tab
ESP comes with stock reports, but custom reports and/or custom widgets can be created by an L7 representative or code-based content creator
Identity and Access Management (IAM) App
Used by Administrators to manage User access and permissions through Roles and Workgroups
Add/remove users
Modify roles and workgroups
If the organization uses single sign-on (SSO), ESP users cannot set their own password, as this would be linked to their main sign-in password
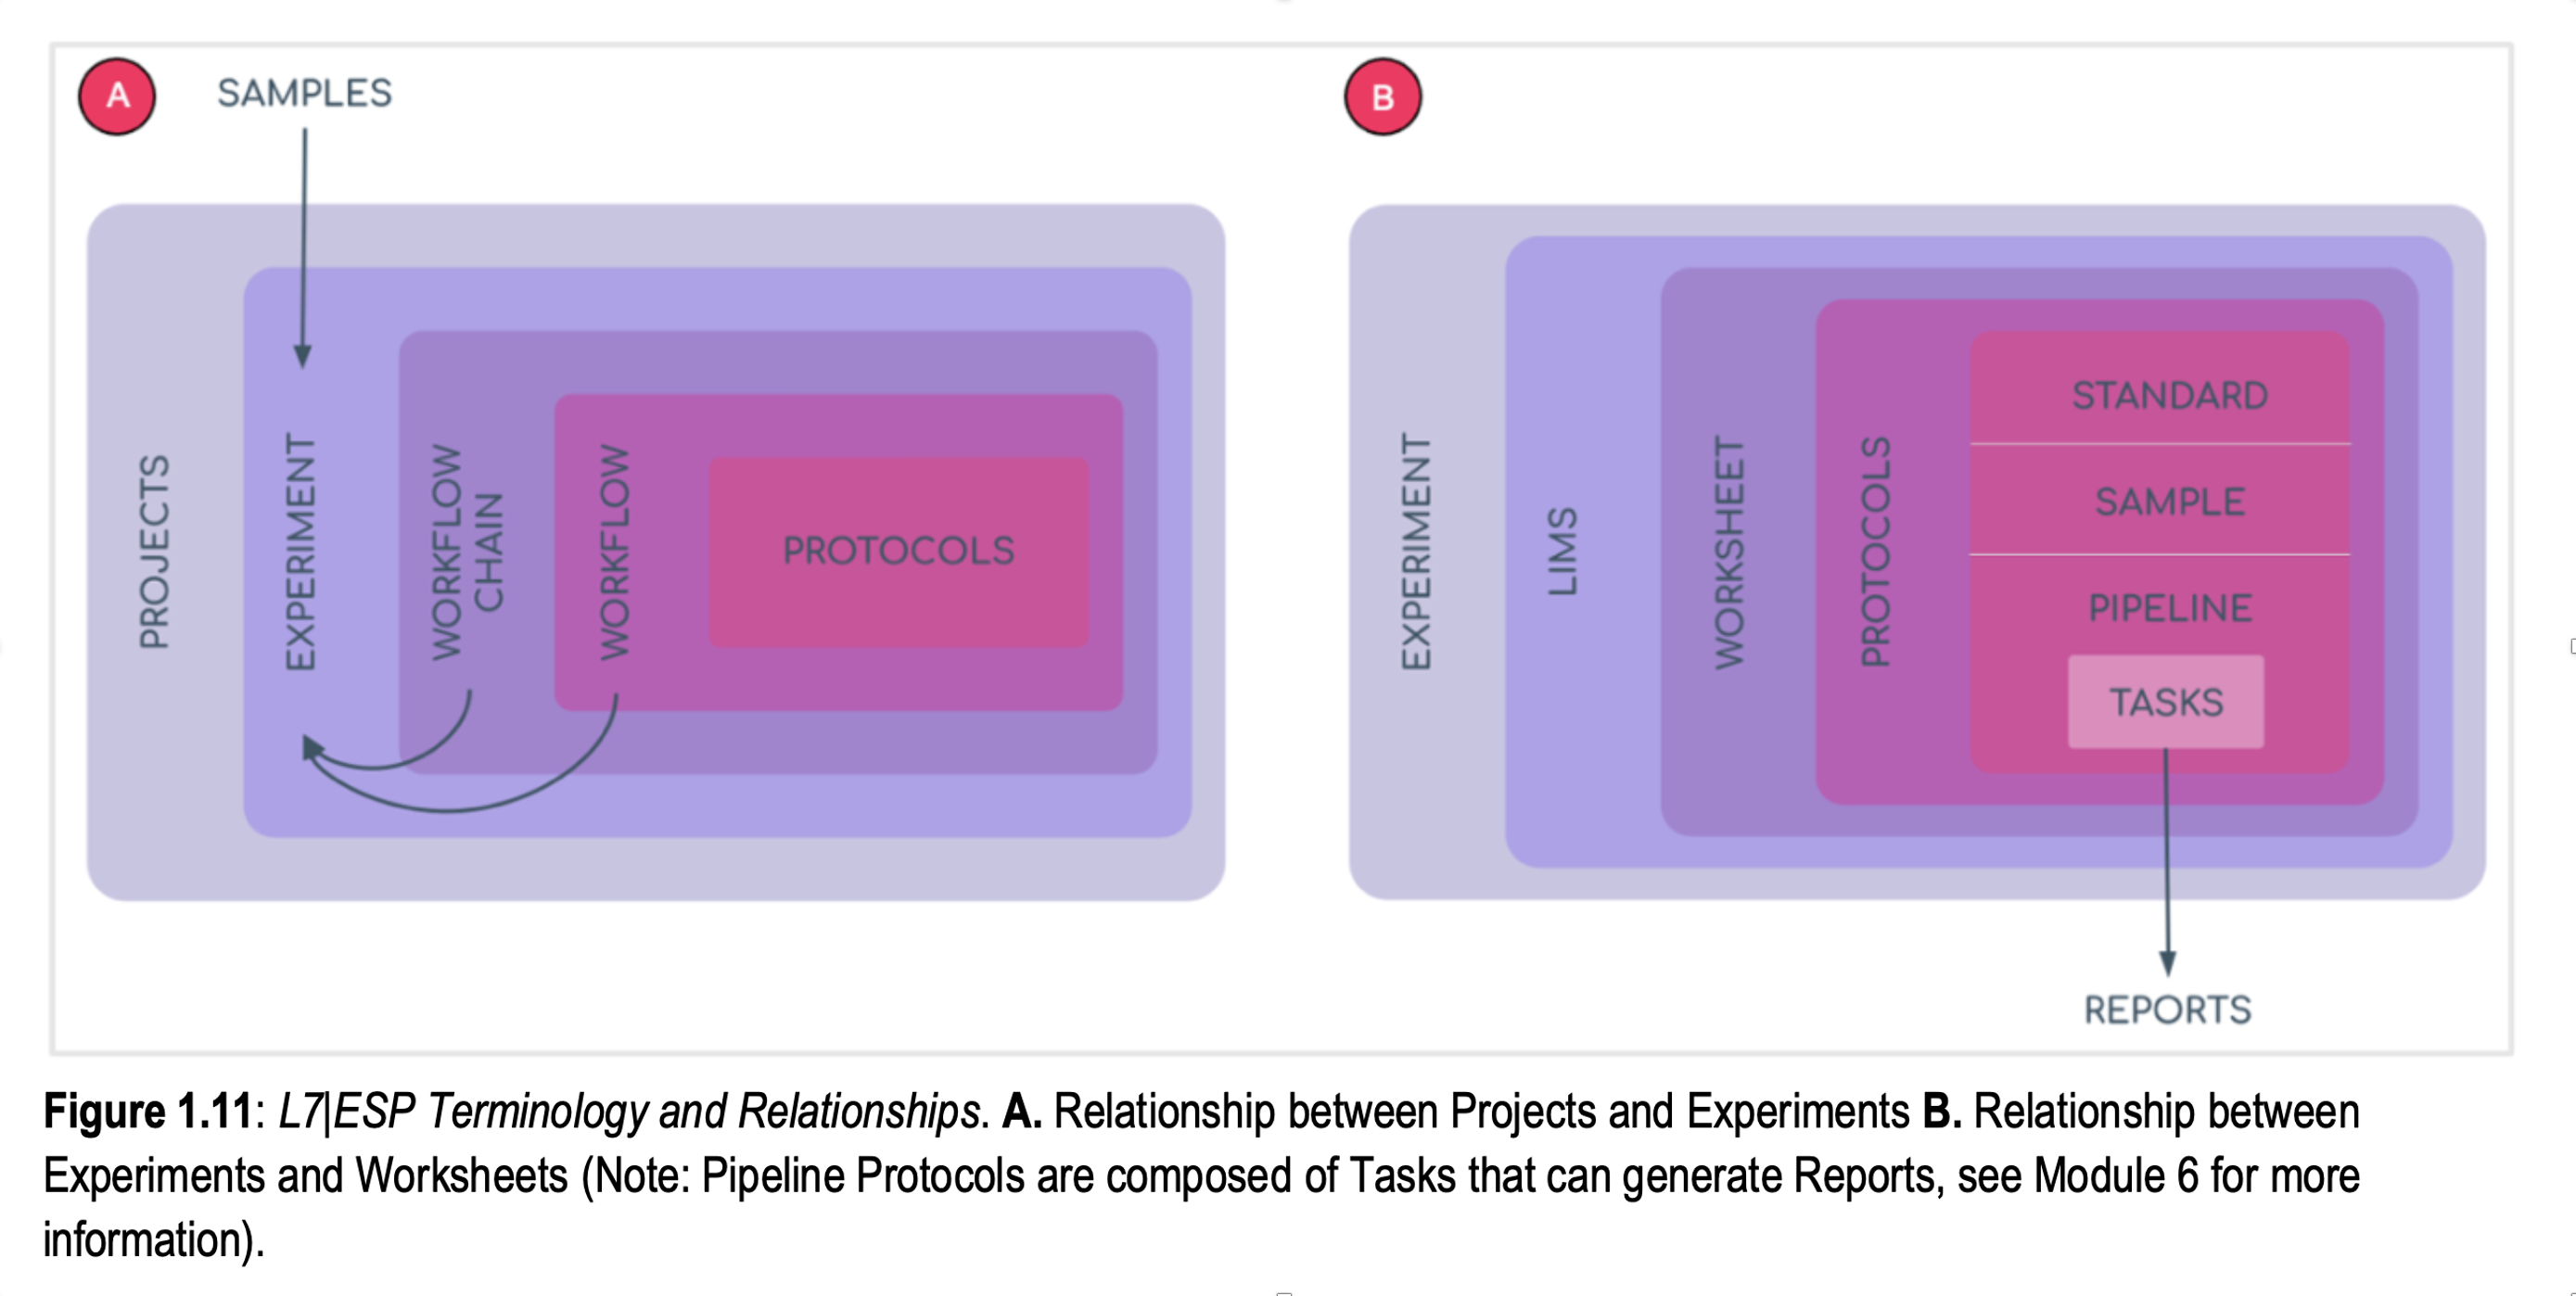
ESP Terminology (see Figure 1.1 below)
Projects are created first, these are used to kick-off Experiments and their associated Worksheets
Users progress through pre-developed Workflows and Workflow Chains
Pipelines and Protocols are the building blocks to generate Workflows
Protocols can be either Sample or Standard
Pipelines are bundles of automated tasks that complete multiple tasks behind the scenes
Finally, multiple Workflows can be combined to create Workflow Chains
Standard Protocol – associates experimental data with an Entity
Sample Protocol – create child Entities of the same or different Entity Type
Pipeline Protocol – launches a Pipeline
Pipeline – collection of Tasks (shell scripts) run on compute resources
