Modeling Entity Classes and Entity Types
Goals
Understand the relationship between Entity Class, Entity Type, and Entity.
Understand the relationship between Product and Batch.
Understand design considerations and best practices for modeling Entities.
Know how to create new Entity Classes and Entity Types.
Key Terms
Term | Definition |
Entity | A resource that is submitted to or a component of a business process. Entities are instances, or occurrences, of Entity Types. |
Entity Type | Defines the attributes of an Entity, including its custom fields and ID Sequence(s). |
Entity Class | A categorical way of grouping different Entity Types. Each Entity Class will receive its own app in L7|ESP, useful for managing access with Roles in L7 Identity and Access Management (IAM). |
L7 MES Products and Batches
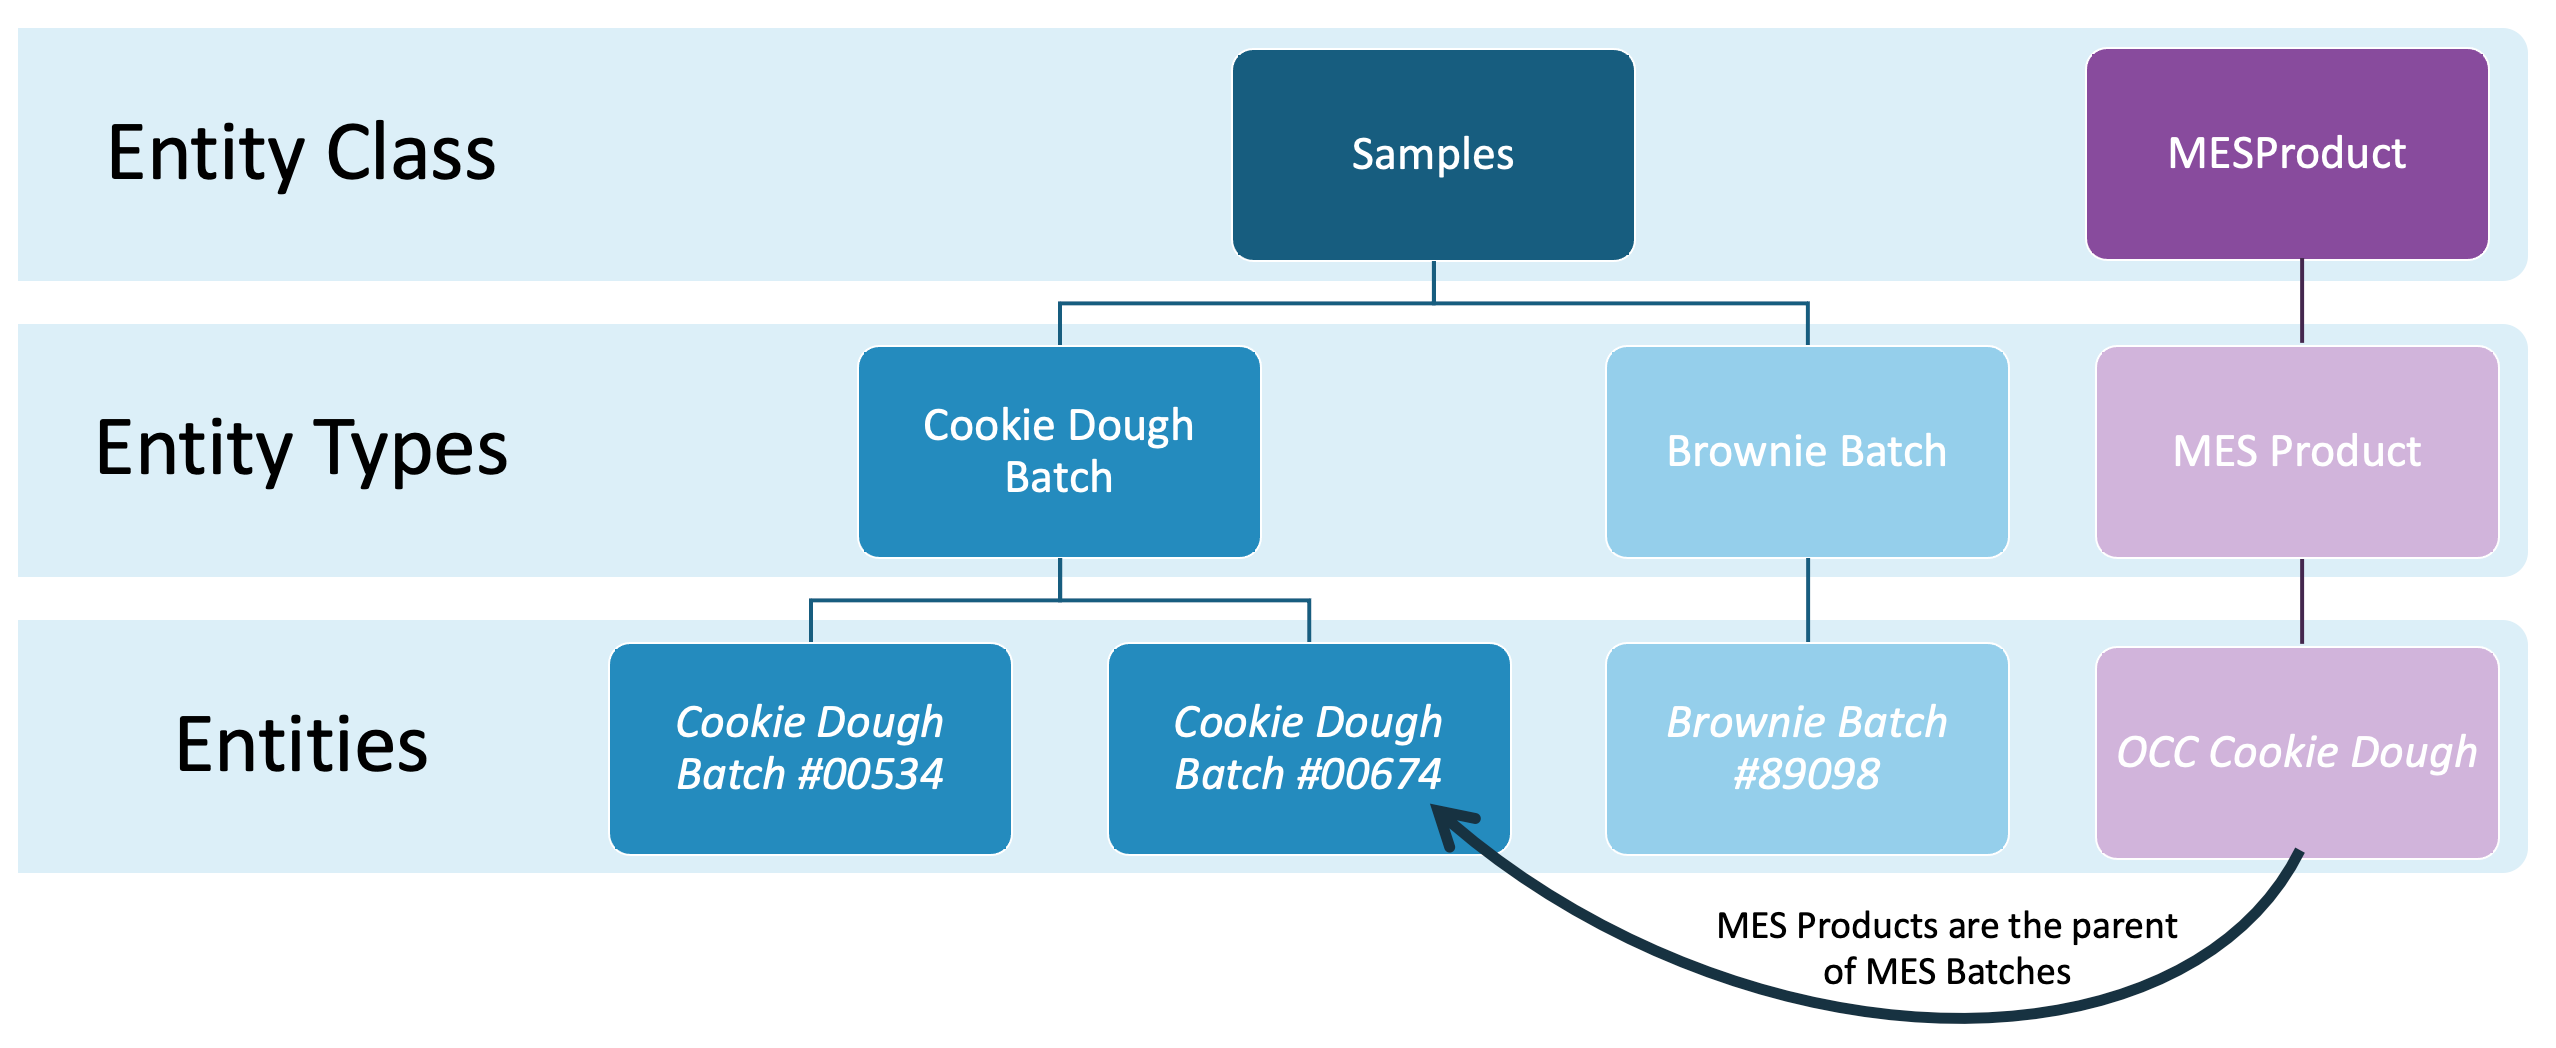
In L7 MES, the Recipe (Workflow Chain) represents the manufacturing process for a Product. The Batch is a child of the Product, and records the steps taken to create the Product.
L7|ESP has a core Entity Class and Entity Type for Products:
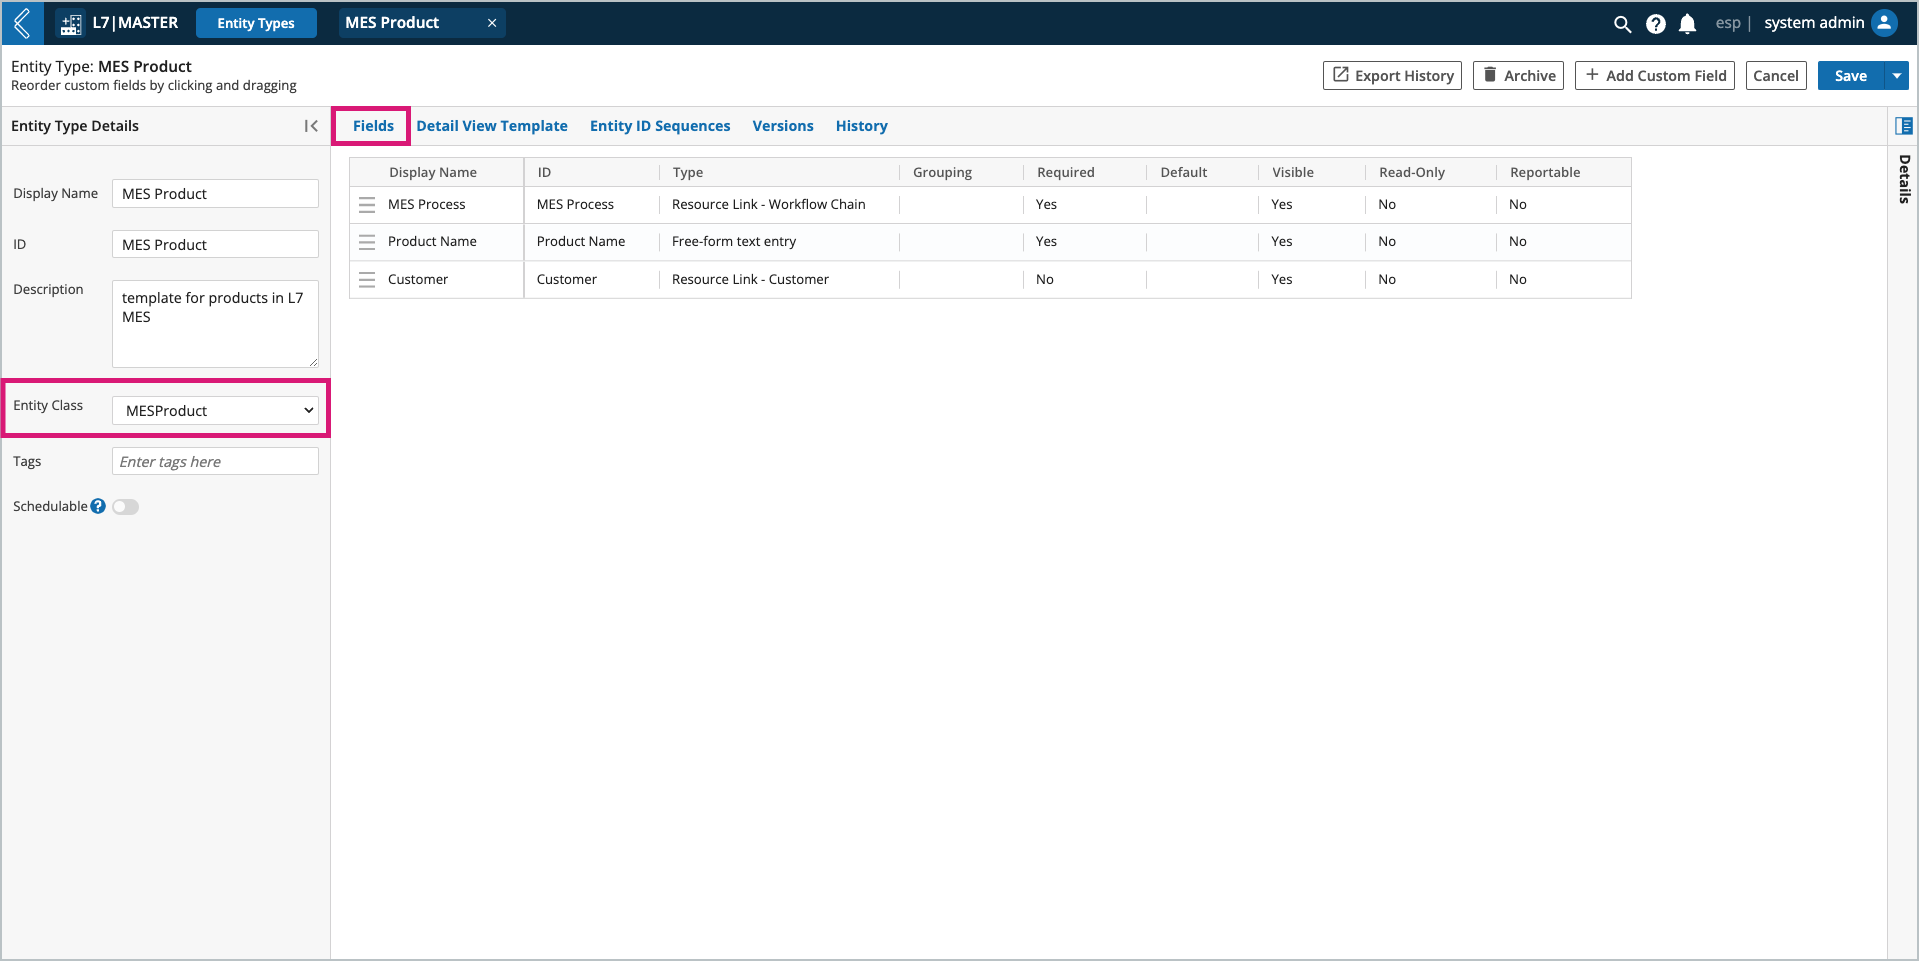
Entity Class – MESProduct
Entity Type – MES Product
However, Super Users can create their own Entity Types for Products, but they must be assigned to the MESProduct Entity Class and have at least two (2) custom fields:
Field Name | Field Type |
MES Process | Resource Link to a Workflow Chain. |
Product Name | Free-form text entry. |
Customer* | Resource Link to a Customer. |
Note
* The Customer field is used to pull logos for L7 MES reports. The L7 logo is used by default, but a company logo or a customer-specific logo can be assigned for CDMOs.
Logo configuration is covered in more detail here.
A generic Batch Entity Type can be created for all Products, or Product-specific Batch Entity Types can be configured. There are no custom field requirements for Batch Entity Types, but these fields can be used to collect Batch level data like Kit assignments. This data is collected during Batch creation, not in the Batch Record itself.
Products are created in L7 Entities or the MESProduct app, while Batches are created in L7 MES. Recall that the Batch is a child of the Product, so the Product must be created first. Batch Entity Types cannot be based on the MESProduct Entity Class.
What does an Entity look like for an End User?
When an End User selects an Entity, they see:
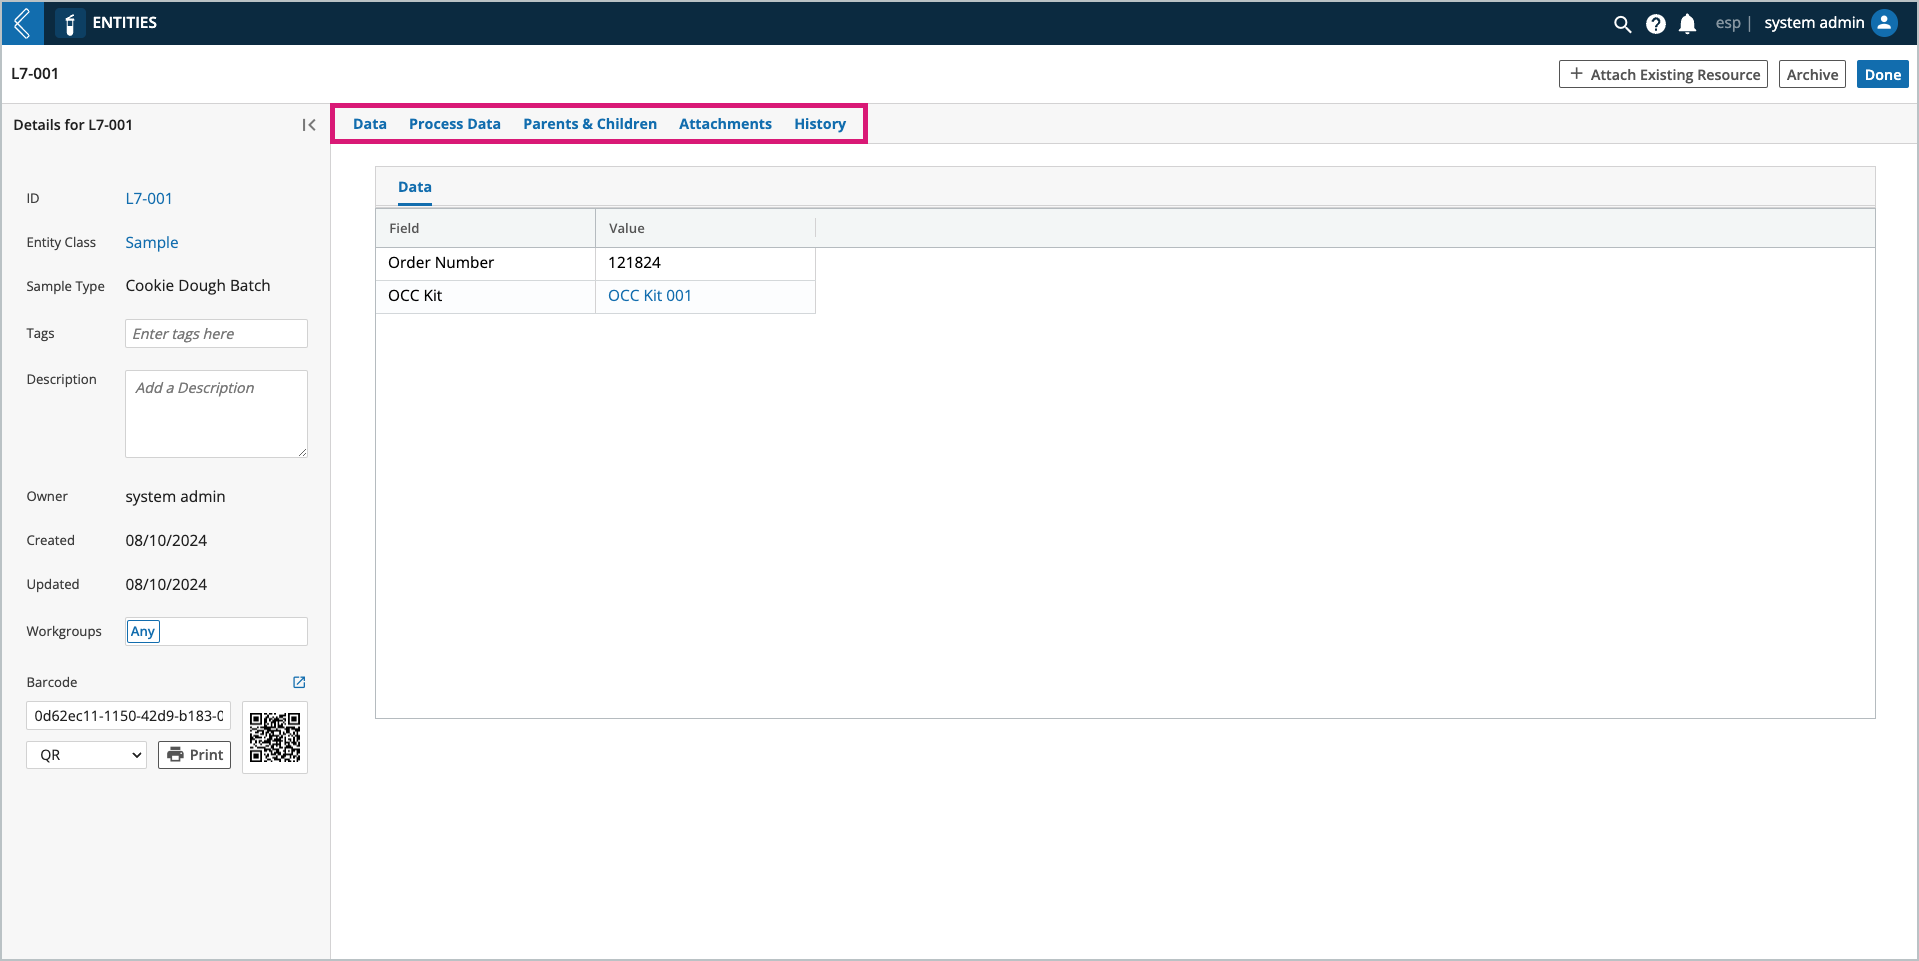
The Entity’s metadata (Data tab).
Production data associated with the Entity (Process Data tab).
The Entity’s relationship to other Entities (Parents & Children tab).
The files the Entity is associated with (Attachments tab).
The Entity’s history (History tab).
How to Model Entities
Entities are at the center of all processes modeled in L7|ESP, and the reason L7|ESP is agnostic to any business process in the life sciences and healthcare.
When to create a new Entity Class?
If more than one (1) Entity Type can be organized into the same category.
If you want to restrict access to a category of Entities.
When to create a new Entity Type?
If you have a resource that you wish to register and track as part of a business process.
Containers and Items have their own data models in L7|ESP.
If two (2) Entities have different custom fields.
More than one (1) ID Sequence can be assigned to the same Entity Type, assuming these different Entities share the same custom fields.
Design Considerations:
When in the process will this Entity Type be created?
Is there any data that needs to be attributed to this Entity Type?
How will this data be collected?
Can a Sequence ID be attributed to this Entity Type?
If so, what sequence format should be used to name these Entities?
Are there legacy Entities that need to be migrated into L7|ESP?
Does this Entity Type require a custom view?
Should this custom view be applied to all Entity Types in the assigned Class?
How to create new Entity Classes
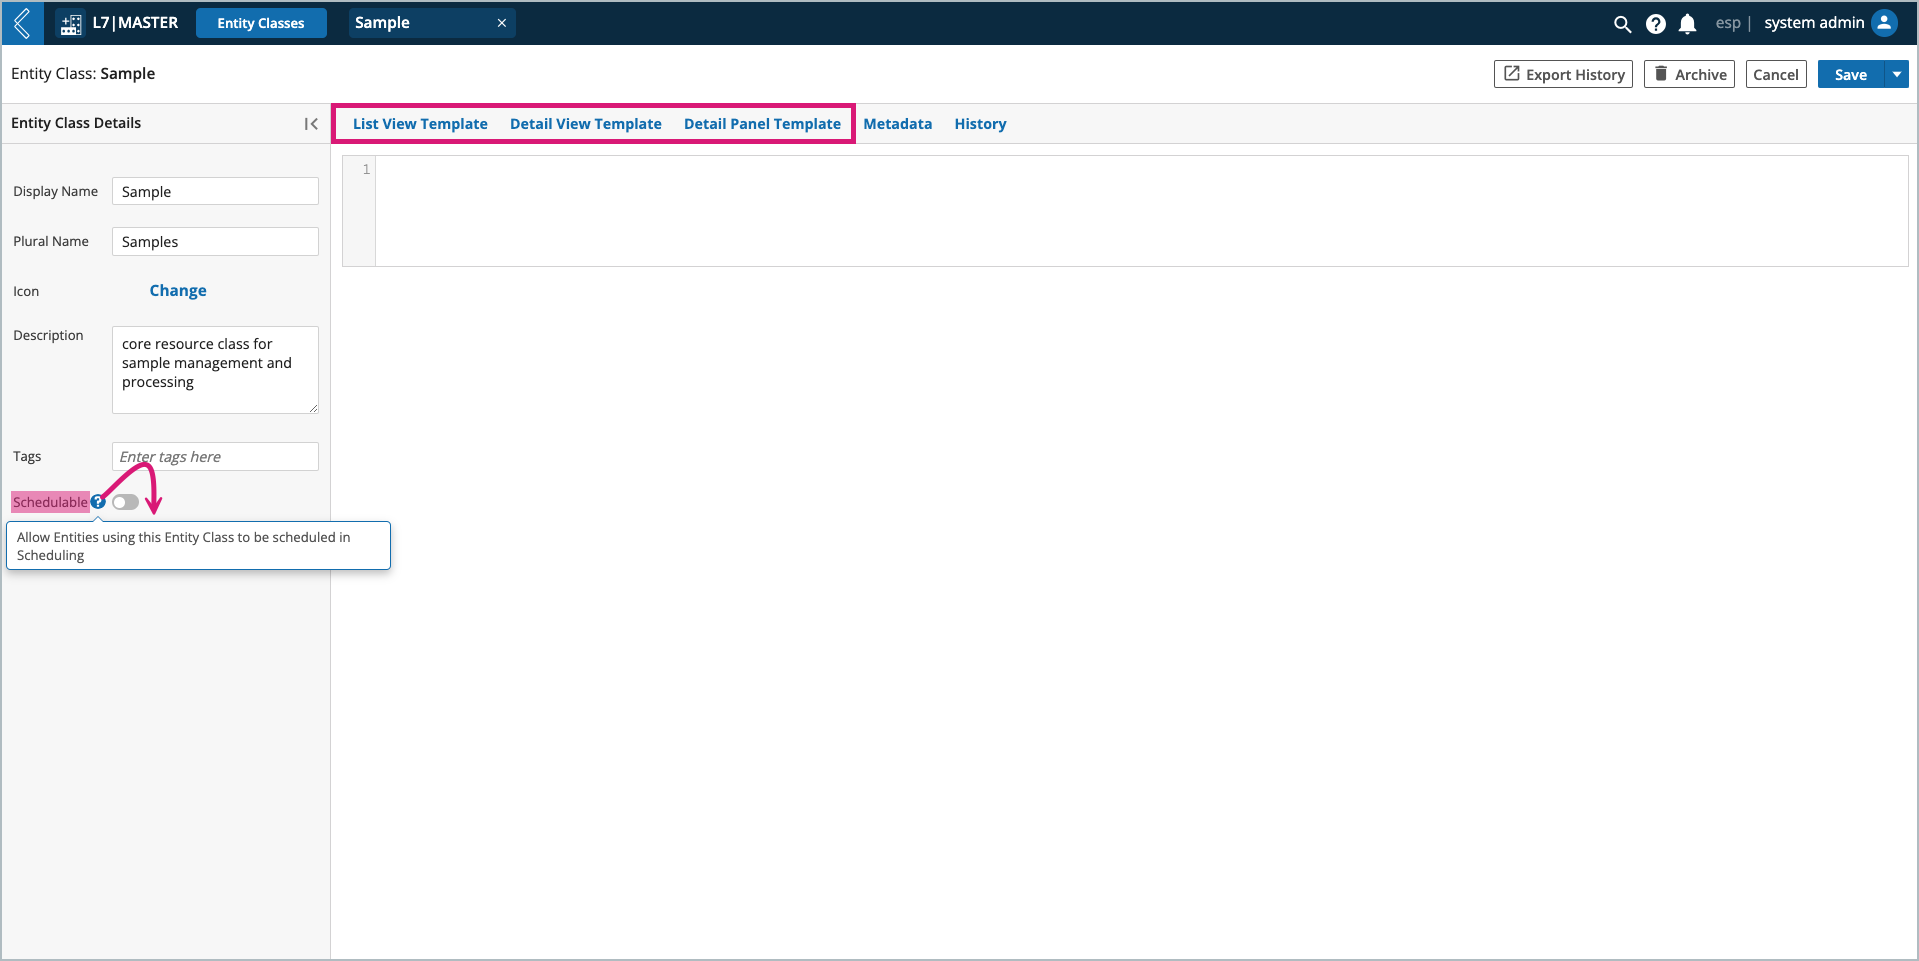
Go to: L7|Master → Entity Classes → + New Entity Class
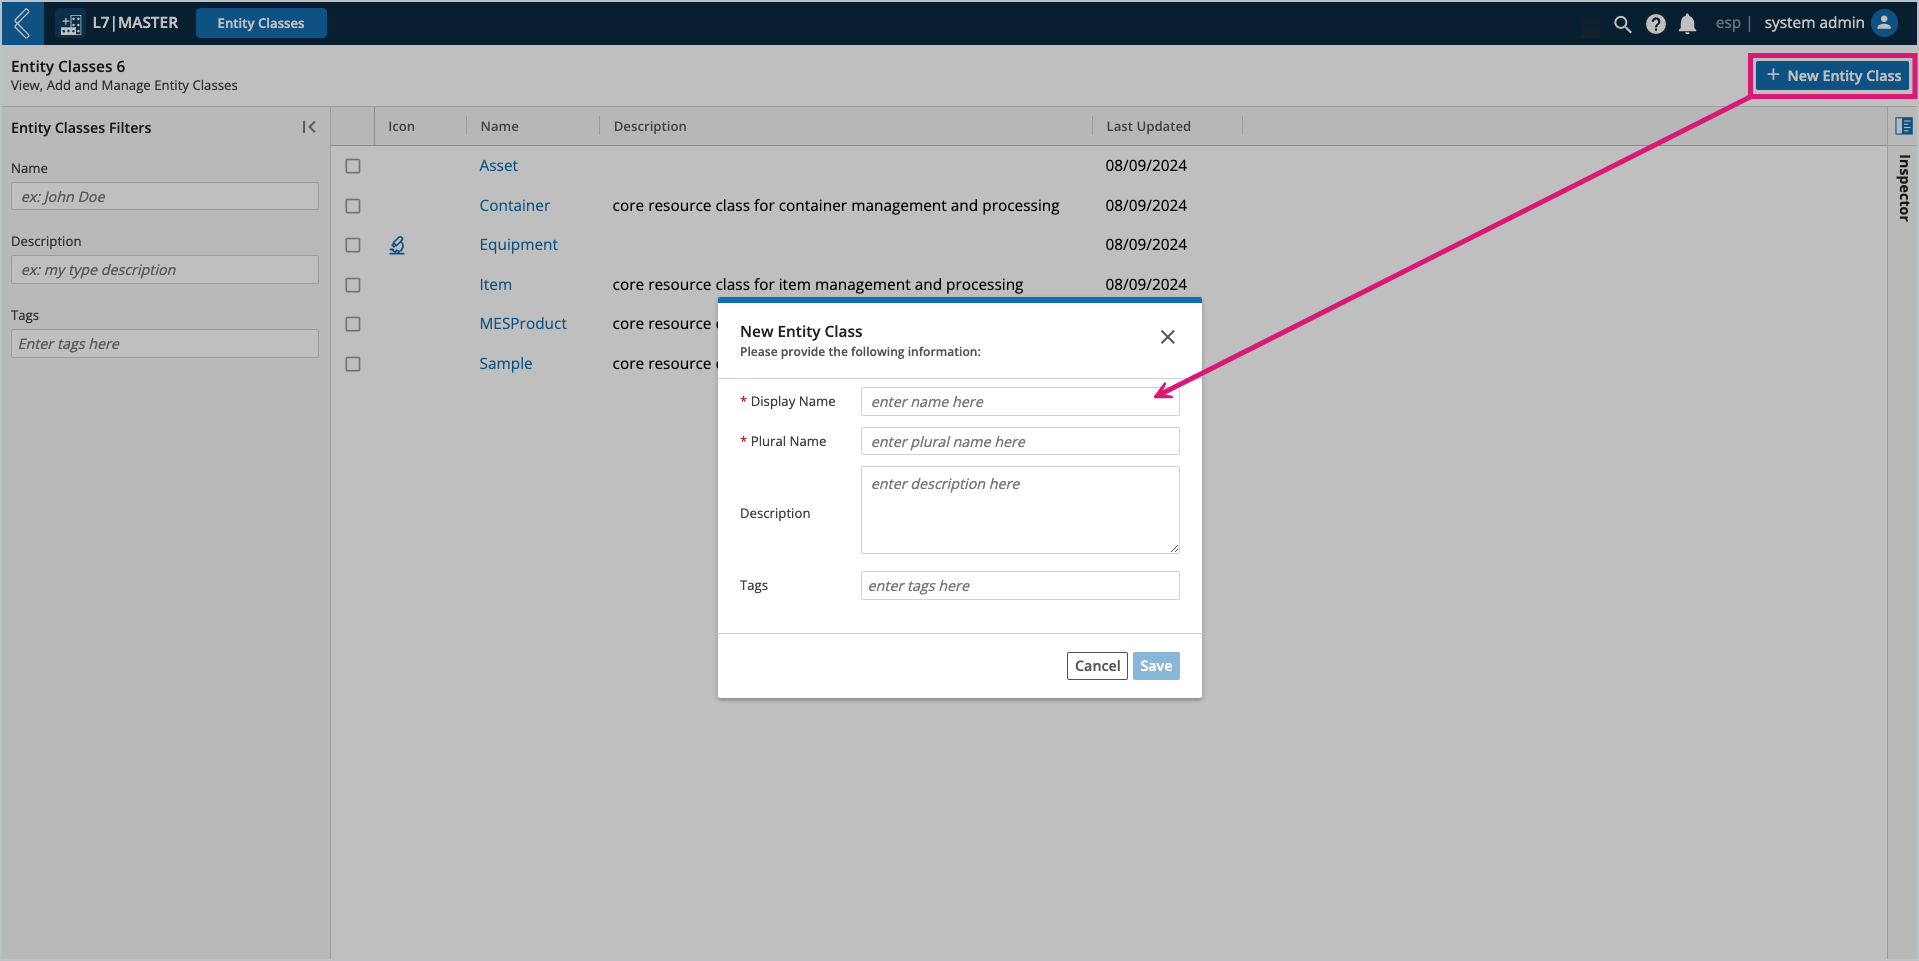
Once created, custom views can be assigned to the Entity Class, and scheduling can be enabled for all Entity Types in the Class. Scheduling can subsequently be disabled for individual Entity Types in the Entity Types builder.
Note
Use the following links to learn more about custom views and scheduling.
How to create new Entity Types
Go to: L7|Master → Entity Types → + New Entity Type
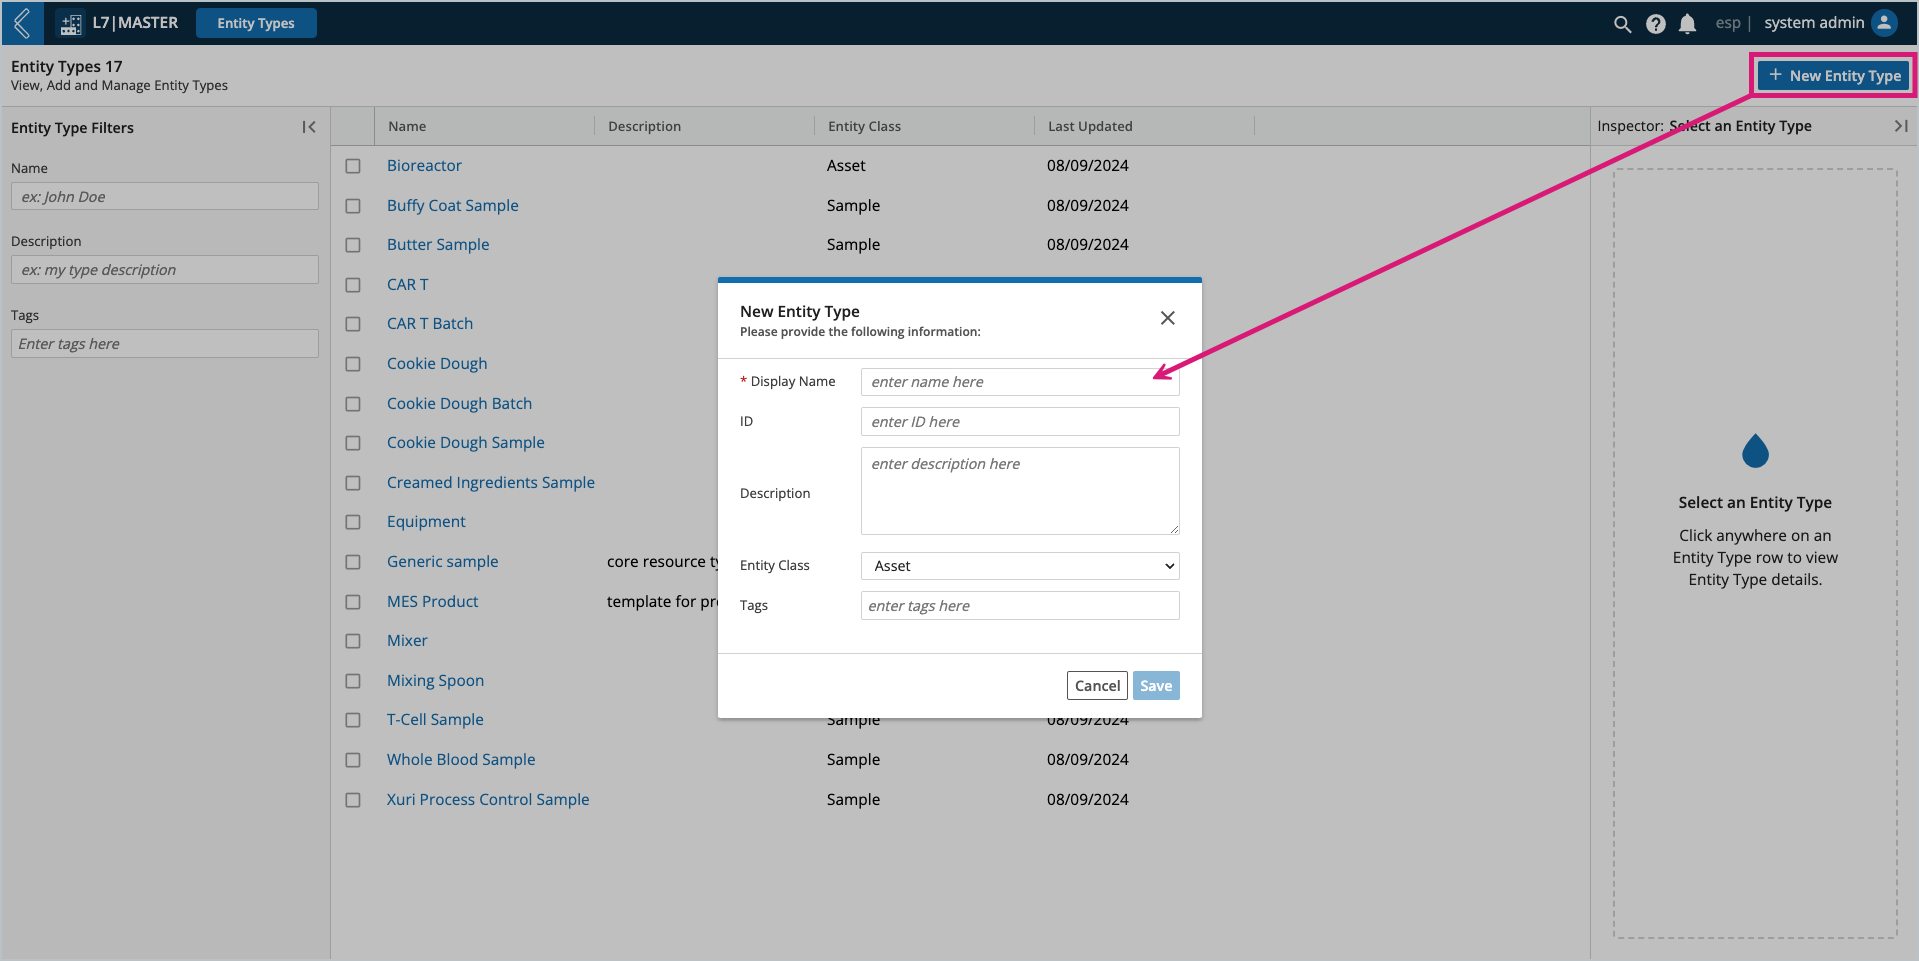
Display Name and Entity Class are required fields.
Note that the Entity Class must be created first to appear as an option.
Note
Display Name vs. ID: Display Name is the name that appears in the user interface (UI). ID is a fixed value used to reference the resource. This differentiation ensures stability when changing the name of a resource (i.e., Entity).
L7|ESP will set the Display Name as the ID if the User does not define the ID themselves.
Entity Class: L7|ESP has five (5) core classes: MESProduct, Sample, Equipment, Container, and Item. Containers in L7 Location and Items in L7 Inventory automatically belong to class Container and Item, respectively.
Newly created Entity Types cannot be assigned to these two (2) classes.
How to add custom fields to Entity Types
Go to: L7|Master → Entity Types → select the Entity Type → + Add Custom Field
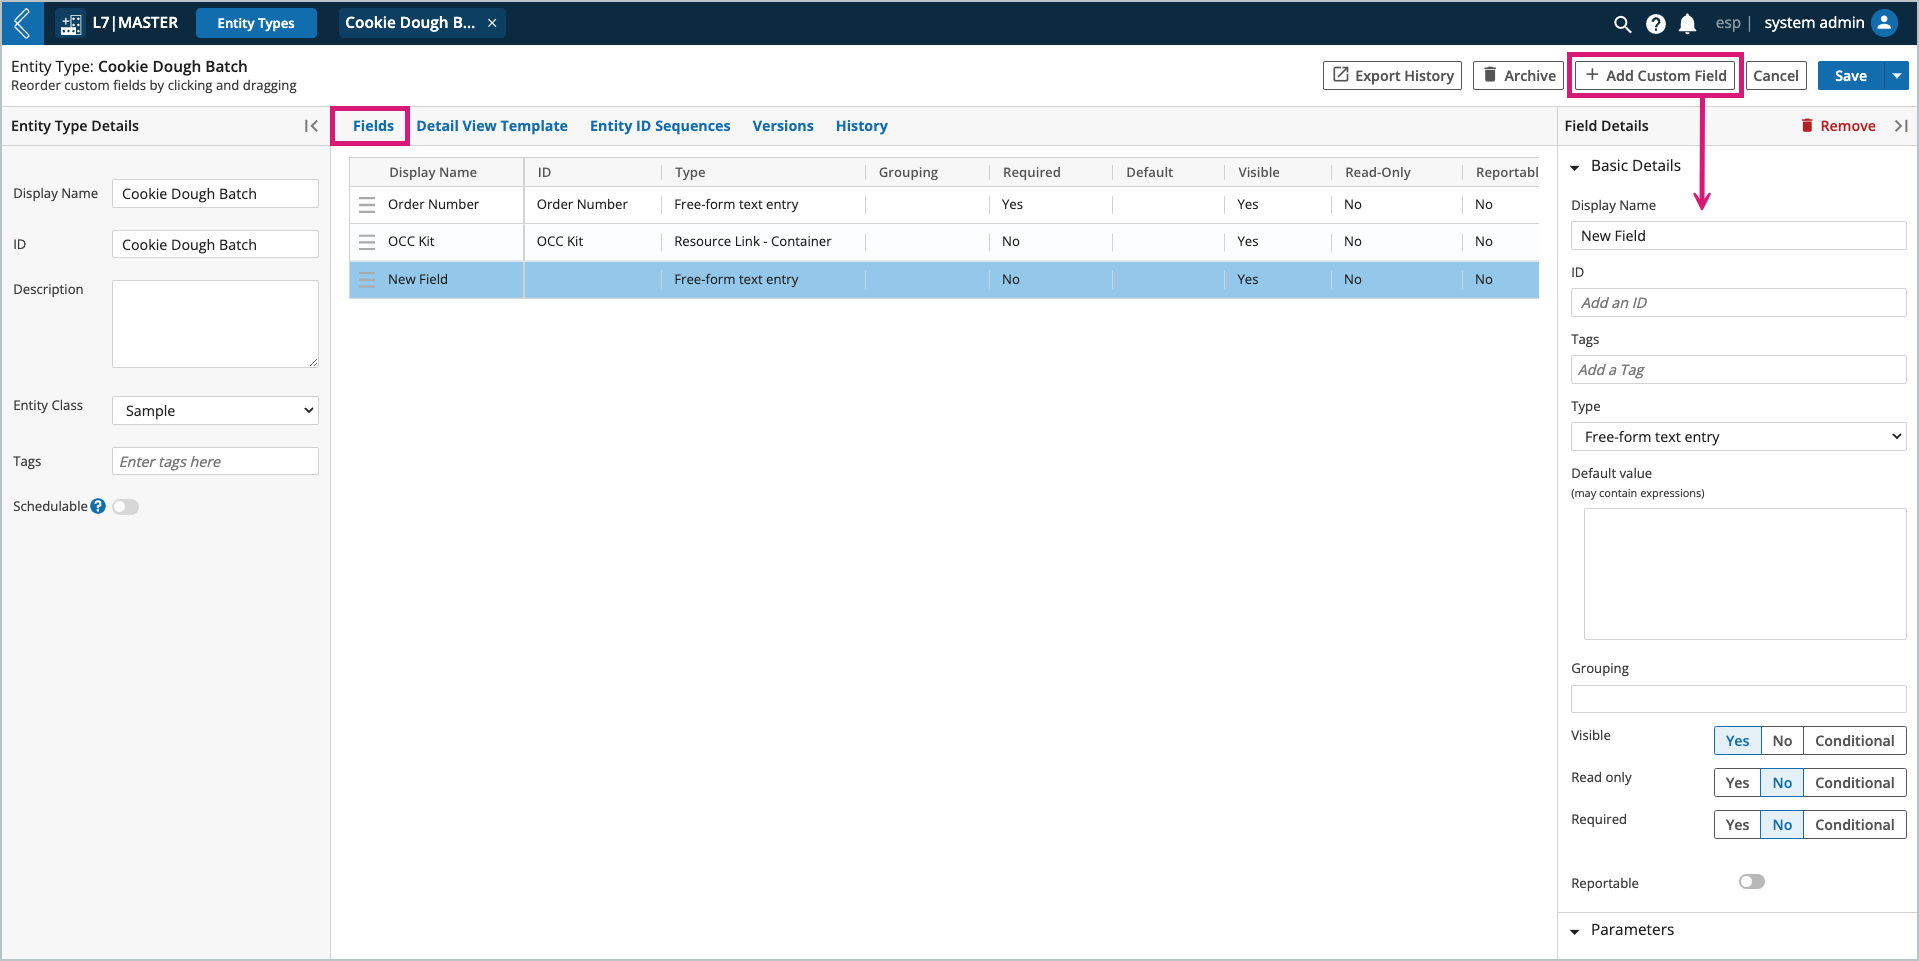
Custom fields define the immutable properties of an Entity Type.
Field type options include:
Type | Purpose |
Free-form text entry | Enter any character (both text and numbers allowed). |
Numbers only allowed | Enter any number (parameters defined below). |
Picklist | Select one (1) or more options. |
Date/Time | Select a date and/or time in predefined or custom formats. |
Checkbox | Boolean true or false. |
Attachment | Attach a file. |
Barcode | Capture data as a barcode (1D, mini data matrix, or QR). This data does not become the resource’s barcode. |
Resource Link | Link to another L7|ESP resource. If the Link Type is Entity Class, Container, Item, or Service Type, a multi-select picklist will appear to restrict to the selected:
|
Grouping organizes custom fields into groups when viewing the details of an Entity (Data tab).
Reportable fields are used in L7|Intelligence.
Note
Enable entity_data_view → table_grouping in the feature_flags Configuration for grouping to work.
Conditionally required, read-only, visible
These conditions can only be configured by referencing the value of another custom field associated with the same Entity using the entity_value expression.
Example
For In-Process Control Samples, Sampling Reason is a picklist with options Stability, Sterility, and Research. If the latter is selected, another custom field named Indication should be displayed. This is accomplished by making Indication conditionally visible using the expression:
{{ entity_value('Sampling Reason') == 'Research' }}
Numeric fields
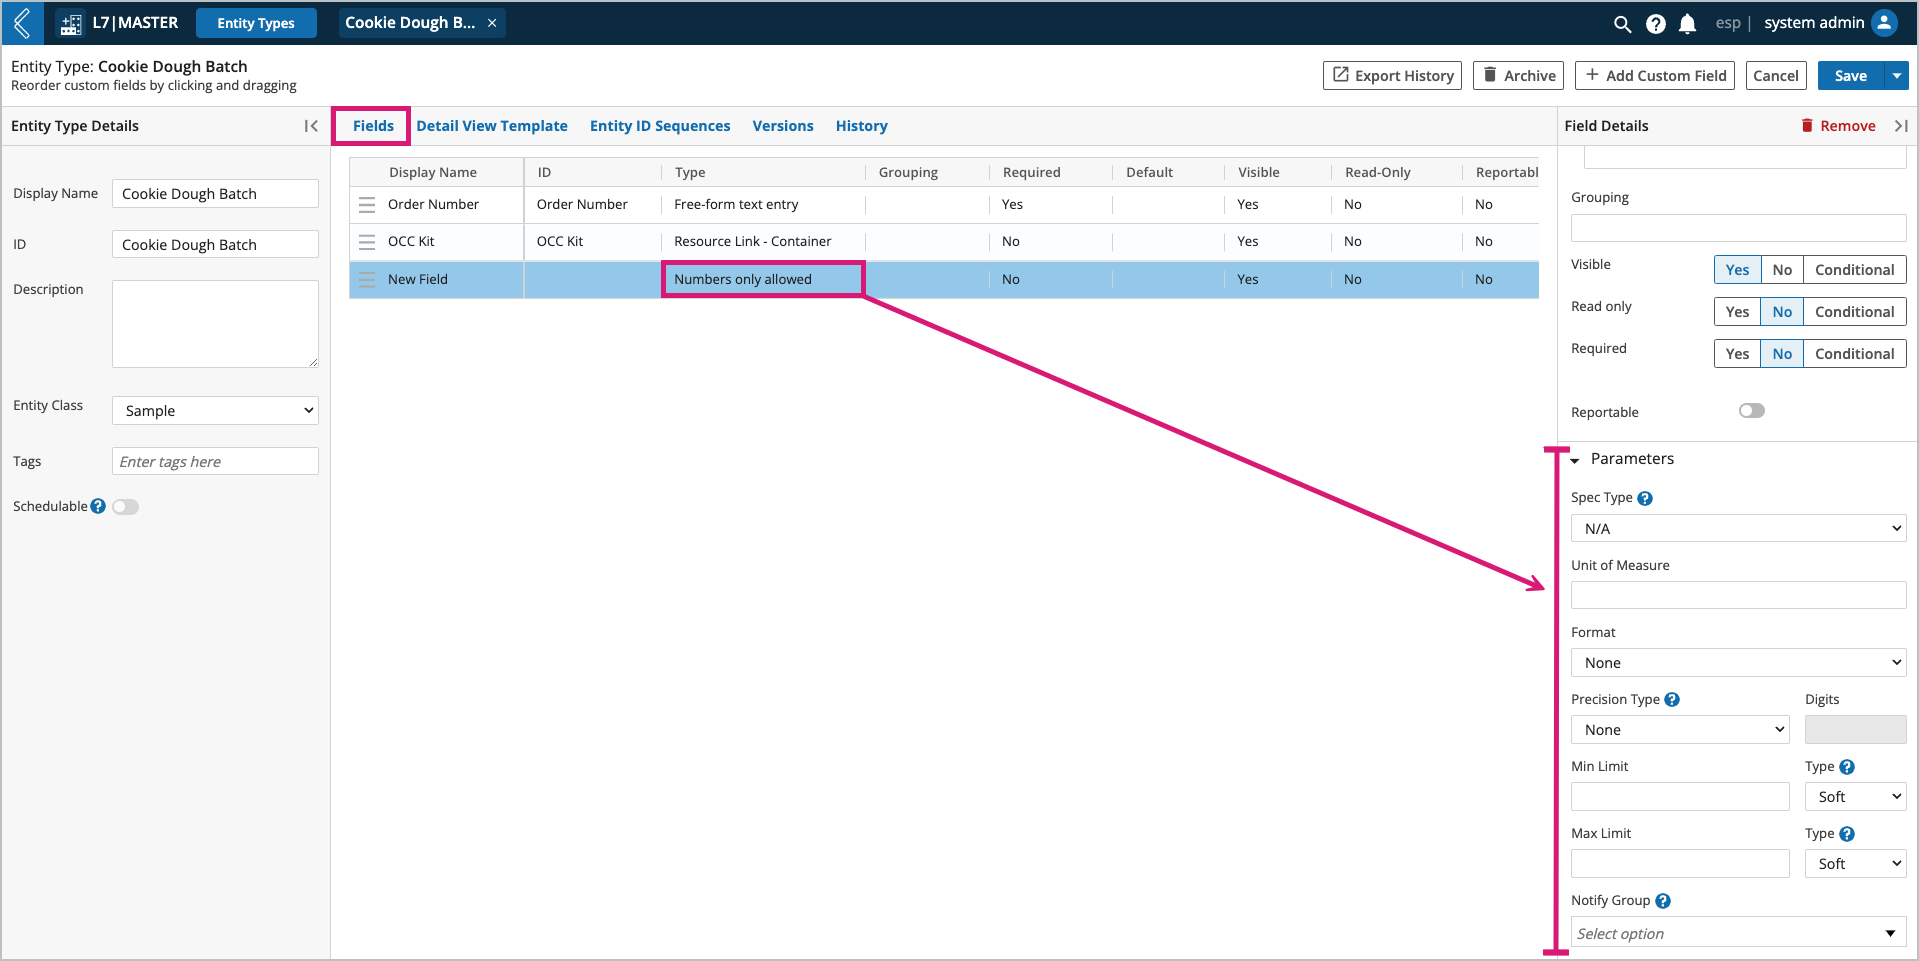
Values for numeric fields are not formatted by default, but can be rendered as a percentage or currency.
Note
Percentages should be recorded as decimal values. L7|ESP will automatically convert 0.85 to 85%.
Note
Spec Type and Unit of Measure are only supported in Protocols.
The three-letter currency code dictates precision, whereas percentages and unformatted values can be formatted to a specified number of decimal places or significant figures.
Note
Precision only impacts the displayed value. The underlying value is not changed.
A min and max limit can be applied to all numeric fields, regardless of format.
If a hard limit is exceeded, L7|ESP will automatically adjust the value to the most recently saved in range value. This includes null if no in range value has been saved yet. An error message will also appear in the bottom-right corner of the screen.
If a soft limit is exceeded, the field will be colored orange and the error will be replaced with a warning. These errors and warnings are only visible to the logged-in user, but can be sent as an L7|ESP notification to one (1) or more Workgroups.
How to manage Versions
Any changes you make to an Entity Type will be saved as a separate version with the option to migrate existing Entities of the same type. Otherwise, the saved changes will only apply to newly created Entities.
Warning
Changes to Entity ID Sequences cannot be migrated to existing Entities.