Modeling Recipes (Workflow Chains)
Goals
Understand what Workflow Chains are and when they are used
Understand design considerations and best practices for modeling Workflow Chains
Know how to create new Workflow Chains using:
Workflow Library
Node Editors
Swim Lanes
Know what Transition Strategies are and how to use them
Know what Transition Rules are and how to use them
Know the difference between virtual and non-virtual transitions
Key Terms
Term | Definition |
|---|---|
Workflow Chain (Recipe) | Ordered collection of Workflows, representing an end-to-end business process. |
Workflow Library | List of all Workflows registered in the system. |
Node | Visual representation of a Workflow in a Workflow Chain. |
Swim Lane | Provide a way to visually organize nodes into discrete categories. |
Transition Strategy | Dictates which Entities will transition to the next Workflow in a Workflow Chain. |
Transition Rule | Determines when Entities will transition to the next Workflow in a Workflow Chain. |
What are Workflow Chains?
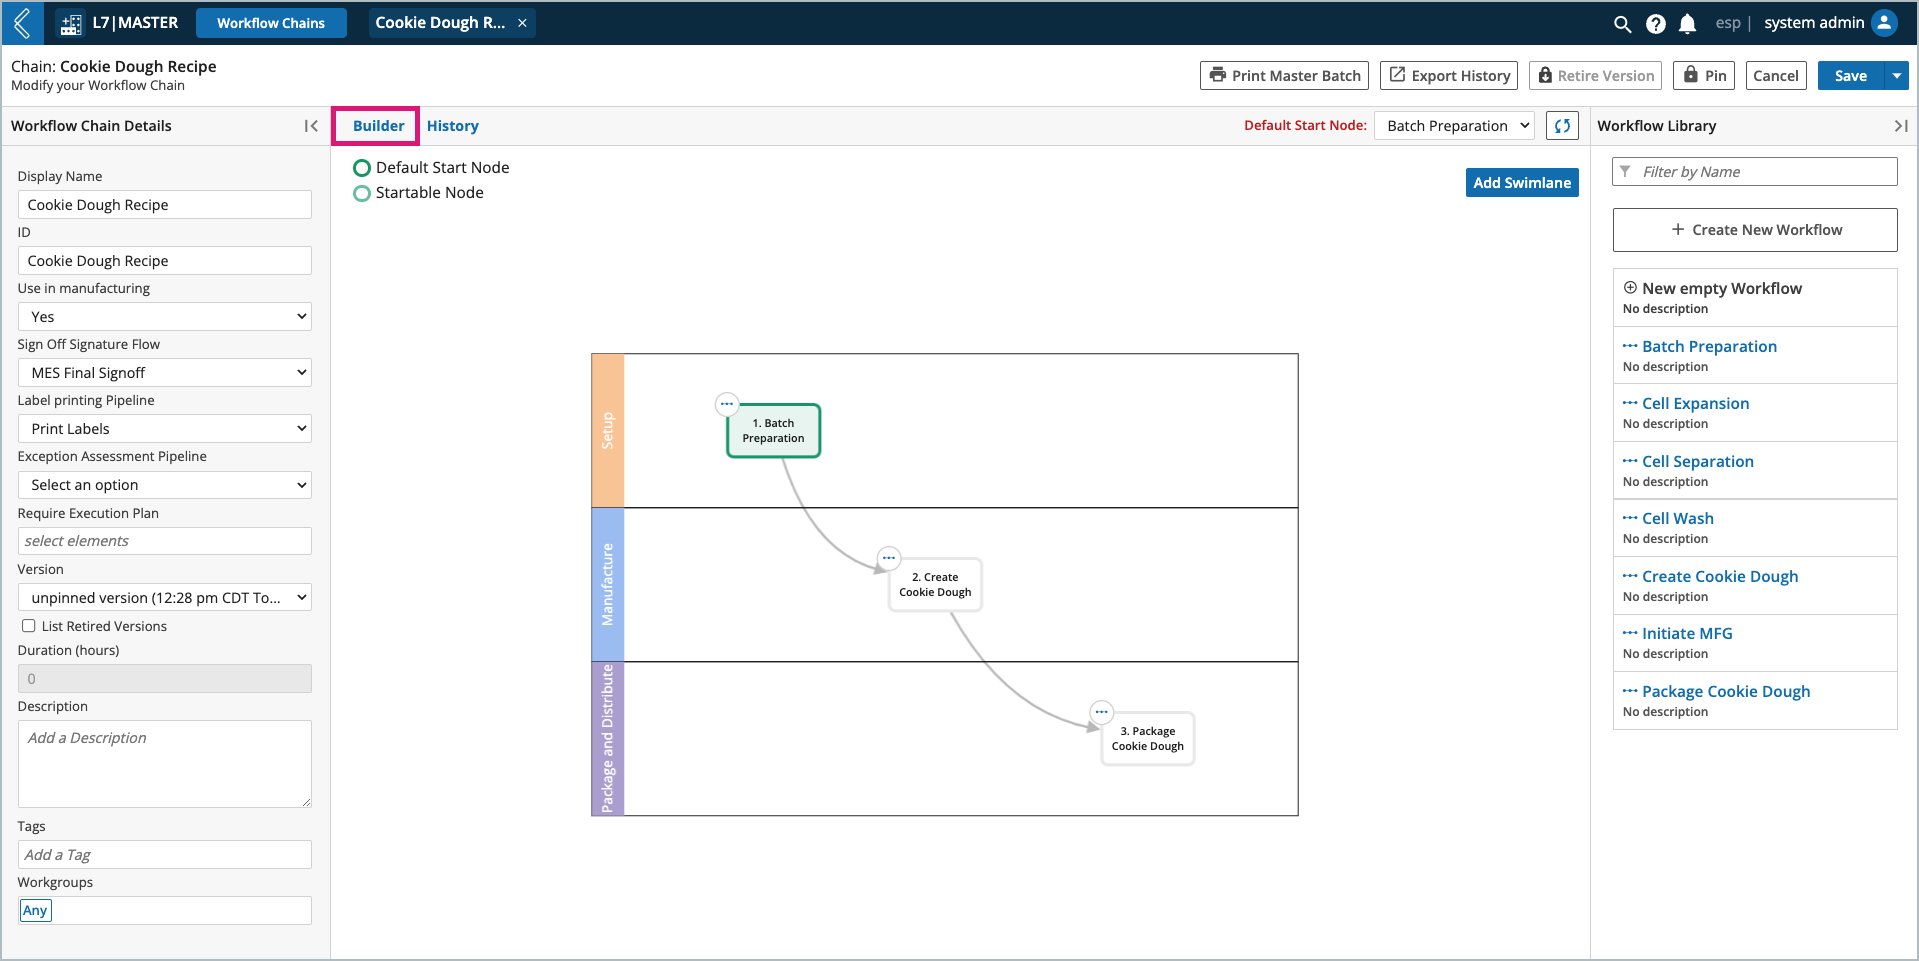
A Workflow Chain (Recipe) is an ordered collection of Workflows (Sections), connected to model a Batch process in L7 MES. Recipes are flexible and powerful tools that allow an organization to track the resources (Entities, Containers, Items, Files, etc.) associated with these complex operations.
Rules for Workflow Chains in L7 MES:
The Workflow Chain can only have one (1) startable node.
Workflow Chain transitions can only send one (1) Entity (Batch) to the next Workflow.
The first Workflow in the Workflow Chain must be restricted to the Batch Entity Type.
This Entity Type cannot be assigned to the MESProduct Entity Class.
The Workflow Chain must be assigned a Signature Flow for Batch Sign Off.
When to create a new Workflow Chain:
Discrete business processes.
Design considerations:
Who should have access to this Workflow Chain?
What version(s) should End Users have access to?
How to create new Workflow Chains
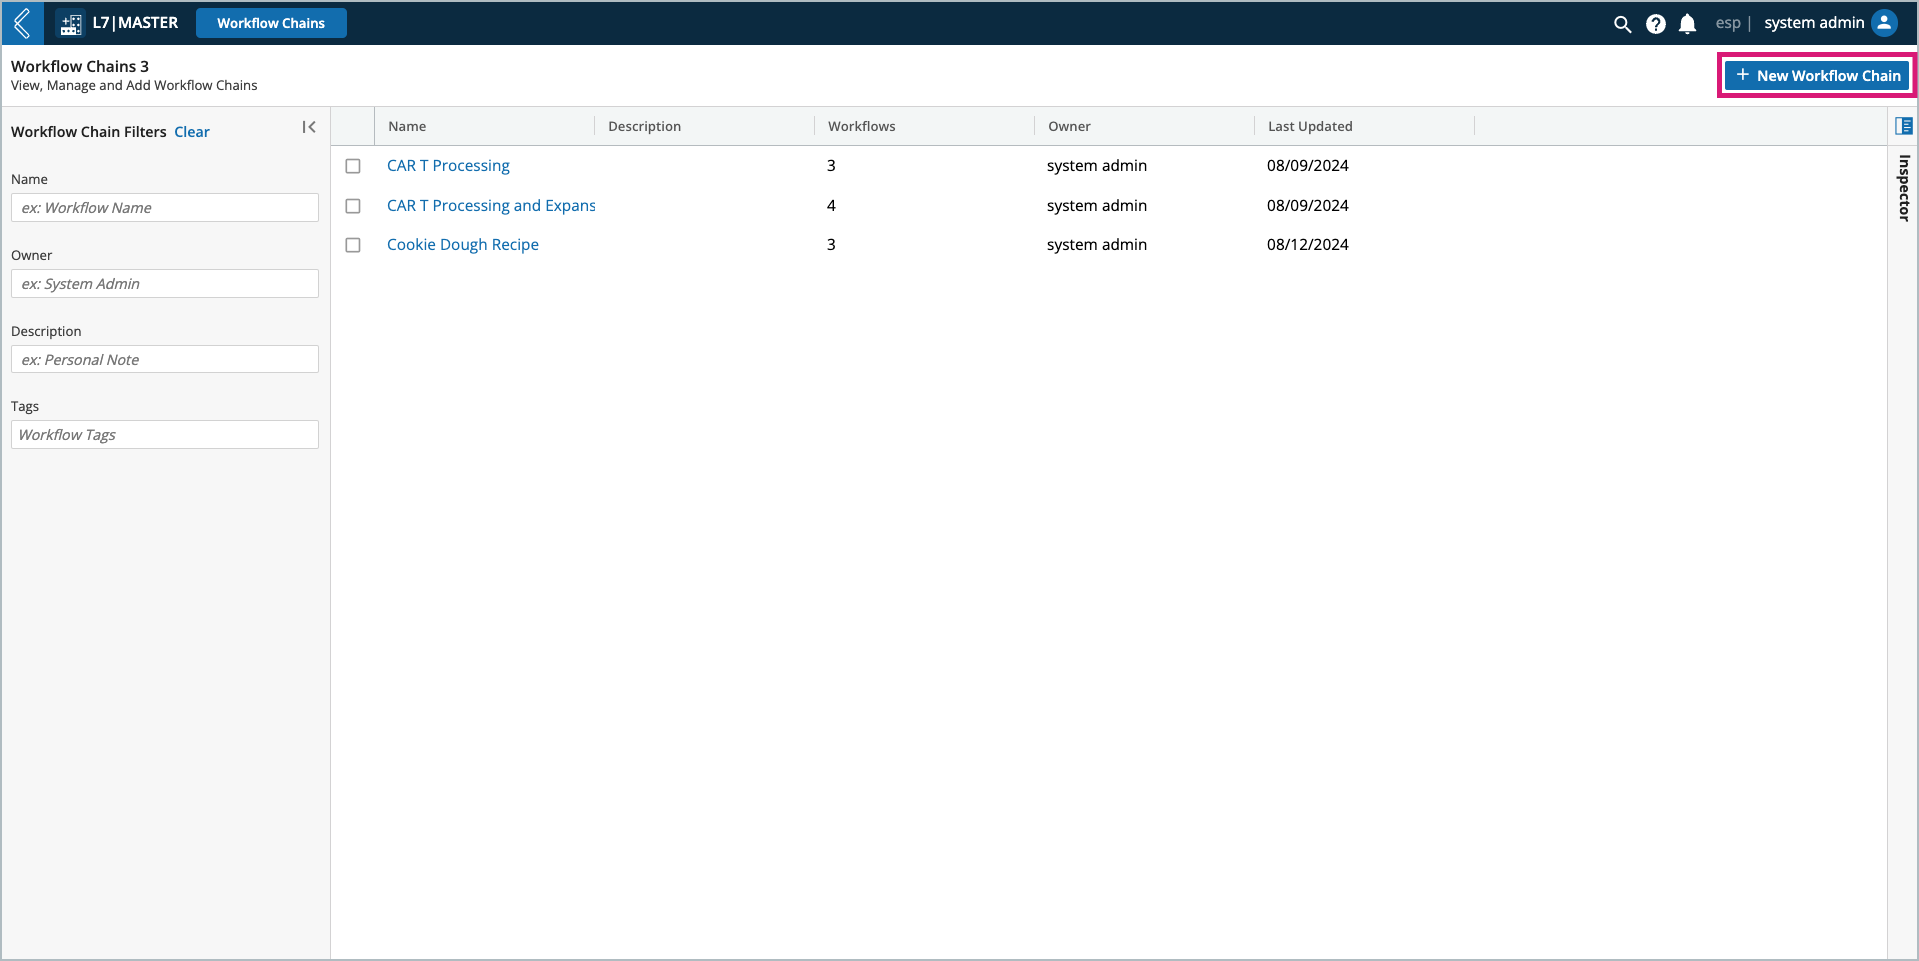
Go to: L7|Master → Workflow Chains → + New Workflow Chain
Workflow Chain Details
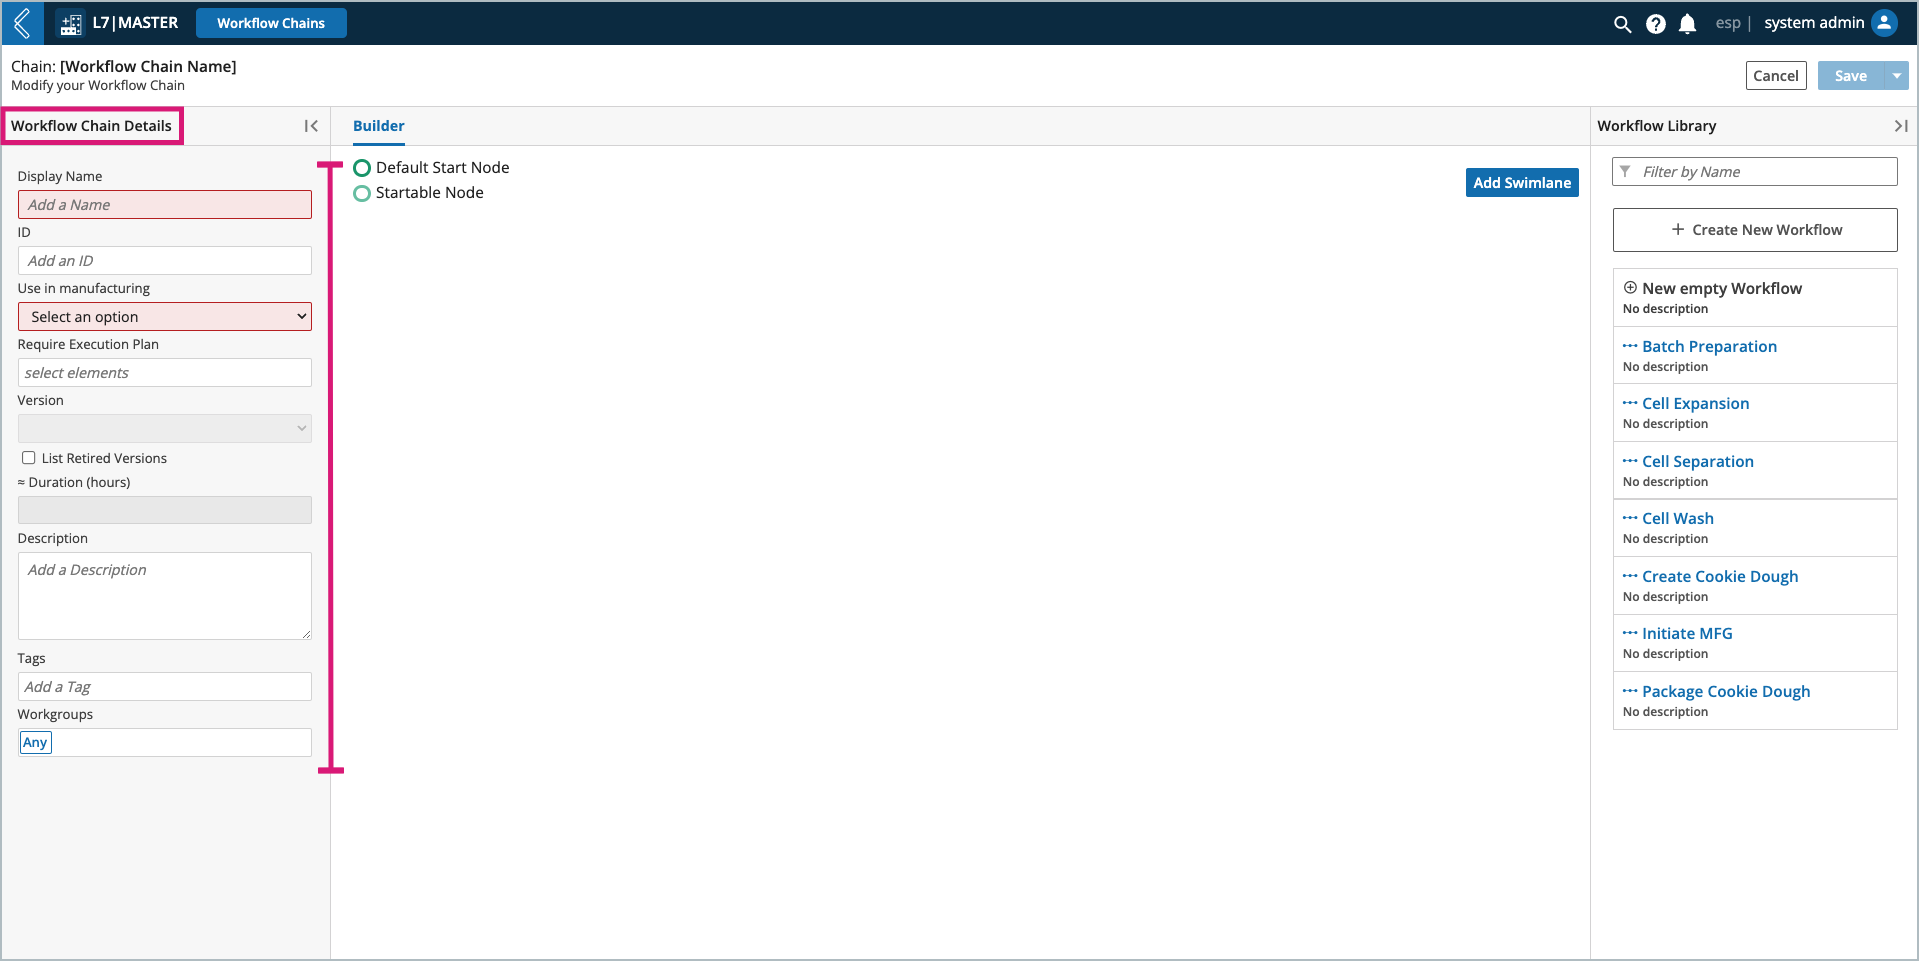
Use in manufacturing – should be set to “Yes” for Workflow Chains that will be used in L7 MES.
Sign Off Signature Flow – required to complete Batch Sign Off.
Label Printing Pipeline – optional to print labels in the Sample Plan tab.
Additional criteria for printing sample labels can be found here.
Exception Assessment Pipeline – optional to push exception assessments to your QMS.
Require Execution Plan – ensures a Dynamic Execution Plan (DEP) is selected when creating a new Batch.
DEPs provide alternative parameters for custom fields without changing the underlying Protocols in the Workflow Chain.
Version – a new version of the Workflow Chain is created each time it is saved.
Pin – locks the Workflow Chain into a previously saved collection of Workflows and Protocols.
Pinned versions can be retired, which will remove them from the list of versions when creating a new Experiment.
Retired versions can be re-activated or included in this list by selecting "list retired versions".
Duration (hours) – the time it takes to complete each Workflow and transition in the Workflow Chain. These details are used in L7 Scheduling.
Workgroups – restricts who has access to the Workflow Chain in L7|MASTER and L7 MES when creating a new Batch.
L7 MES is configured by default to only use pinned Recipes, which is strongly recommended for compliance in a production environment.
However, it can be helpful to work with unpinned versions during development.
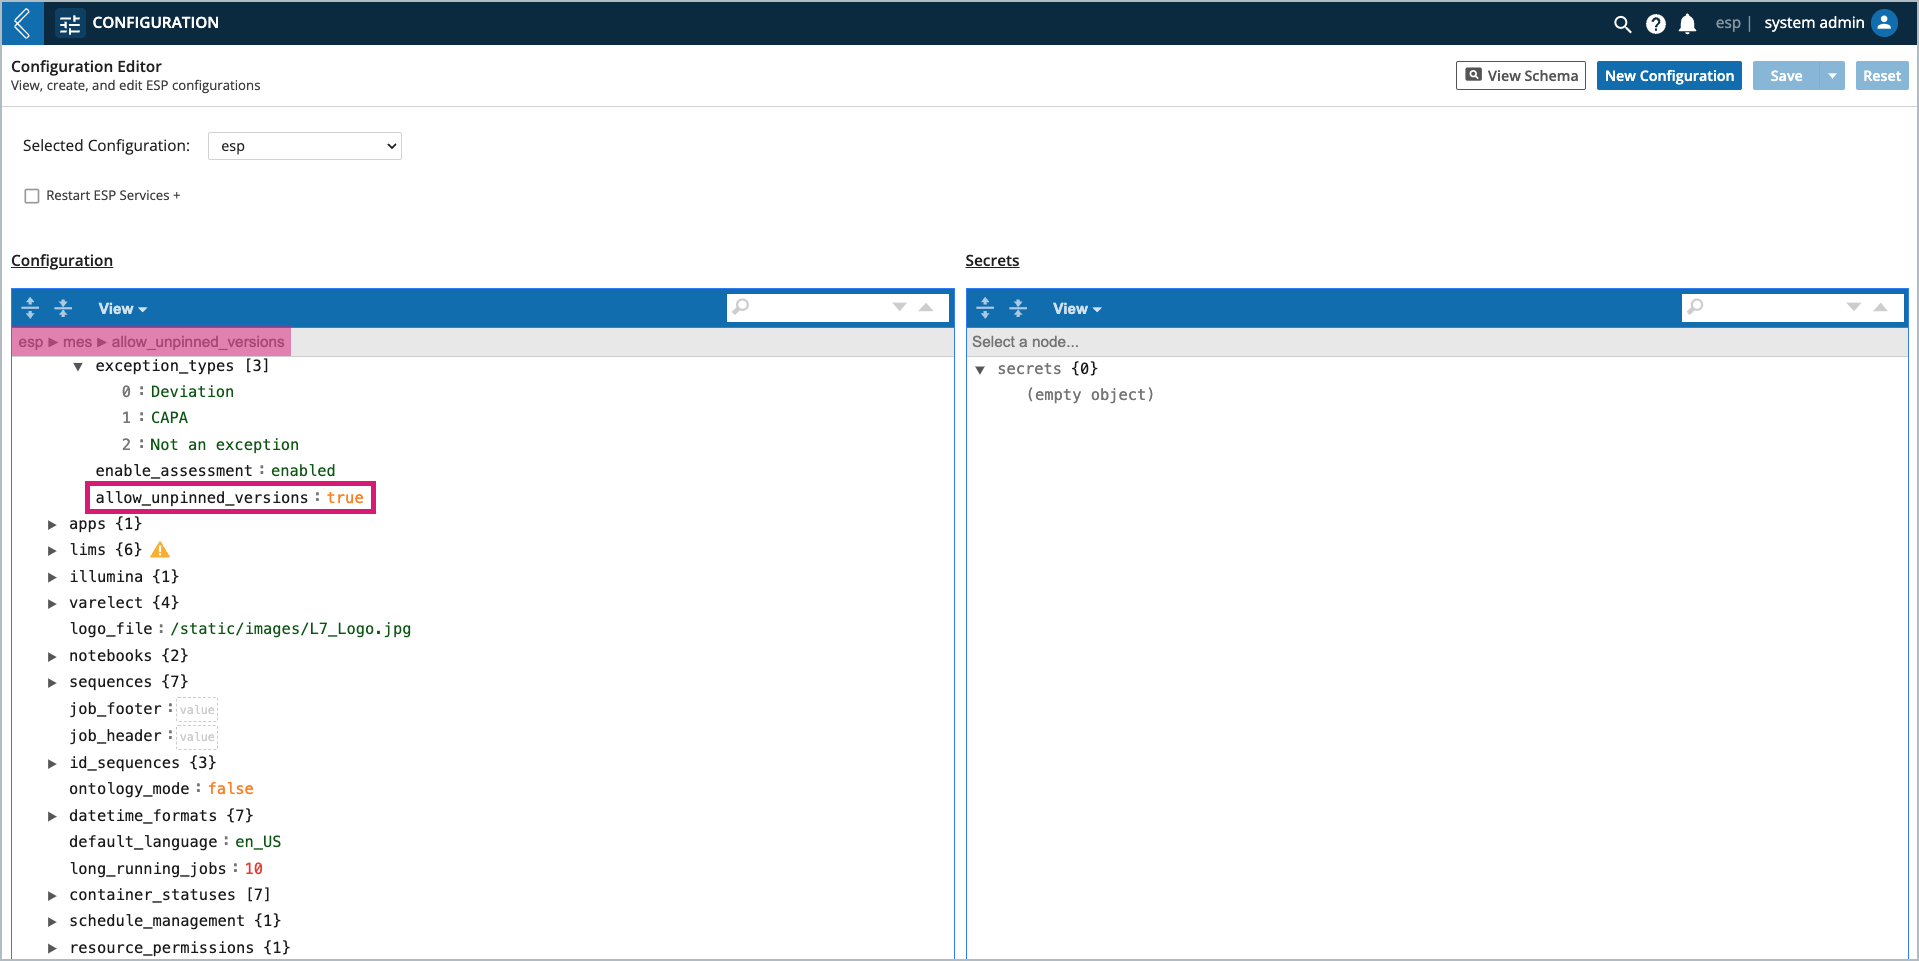
To allow access to unpinned Recipes:
Go to L7 Configuration.
Select the esp Configuration.
Switch to "code view".
Under
mes, set the value forallow_unpinned_versionsto true.Save the Configuration.
Workflow Library
The Workflow Library displays all Workflows registered in the system. Once a Workflow is moved into the main viewing window, it can be connected to other Workflows to form a Workflow Chain.
Note
Workflows in the Workflow Chain builder are referred to as Nodes.
Using the Workflow Library, you can:
Create new Workflows (+ Create New Workflow)
Placeholders can be added to the Workflow Chain using “New Empty Workflow”. When ready, you can edit this node to build the Workflow and its Protocols.
Construct the WorkflowChain by selecting a Workflow from the Library, then drag and drop it into the main viewing window. As additional Workflows are added, you can rearrange their position.
Drag and drop Workflows back into the Library to remove them from the Workflow Chain.
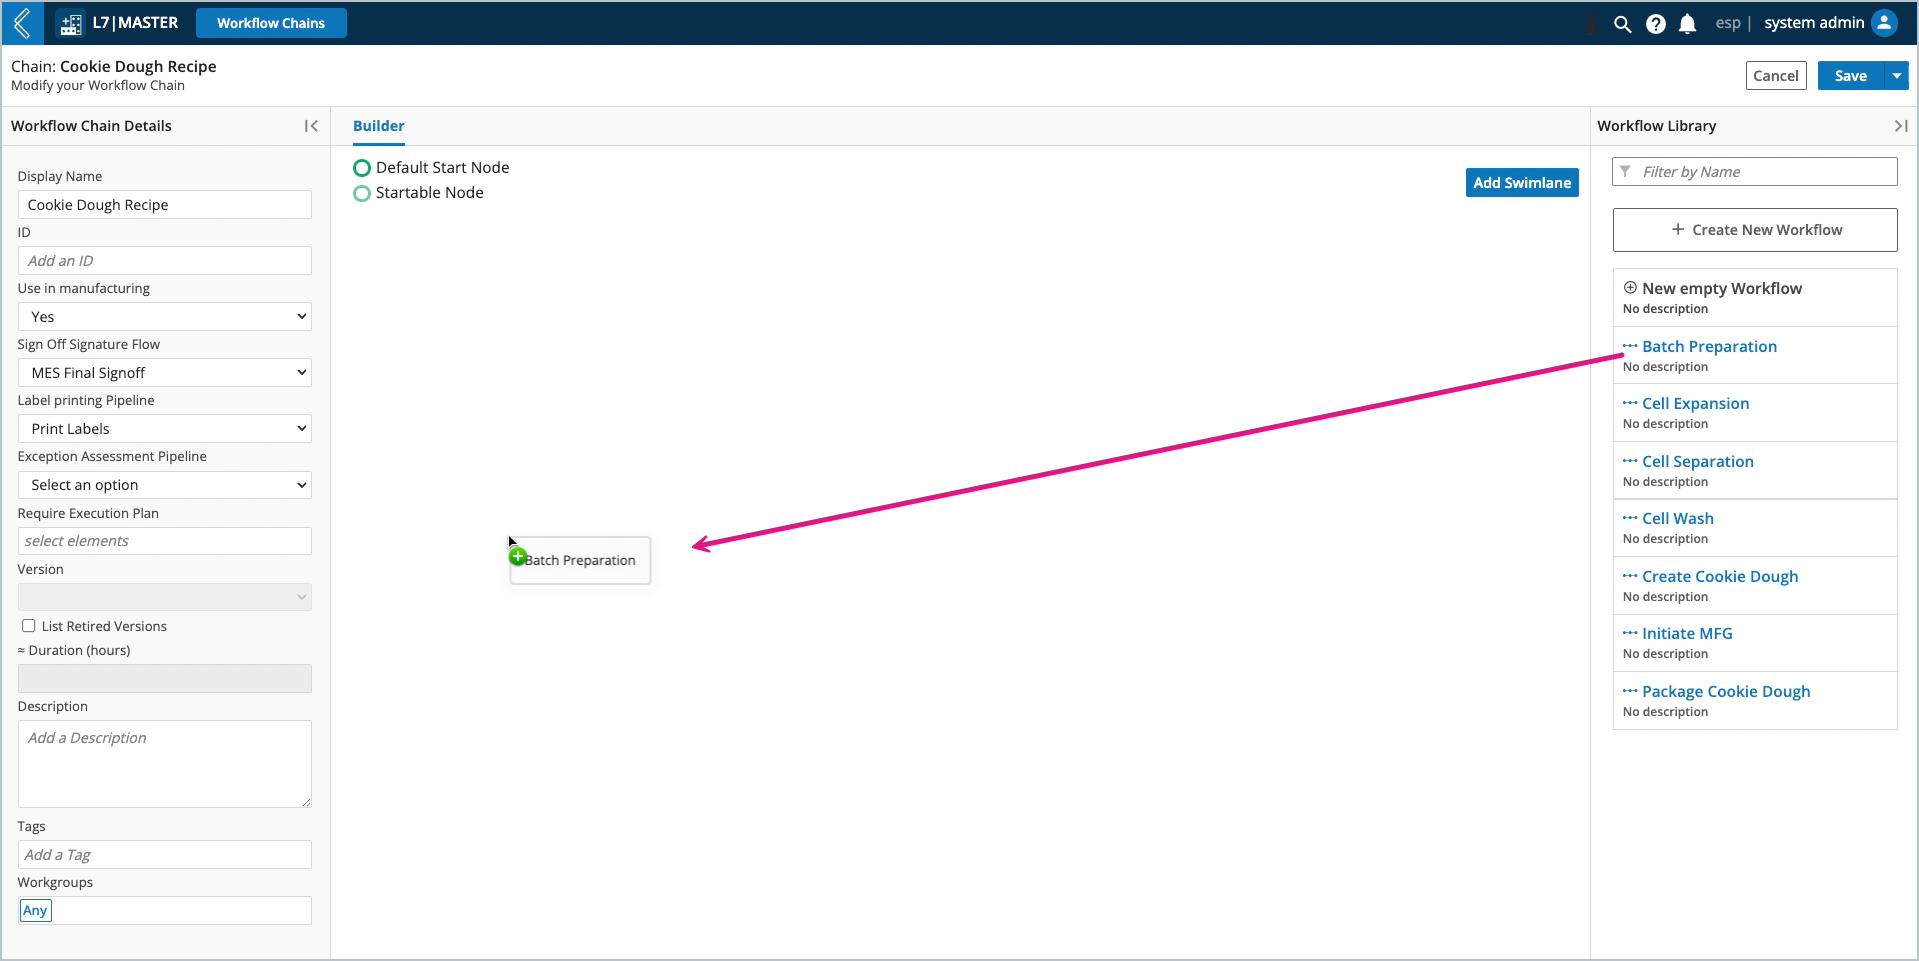
To create a Workflow Chain, drag and drop the first Workflow in the main viewing window. If this is where the Batch process begins, right-click the Workflow (node) and select “Edit Node”.
In the Workflow Node Editor, select the startable checkbox.
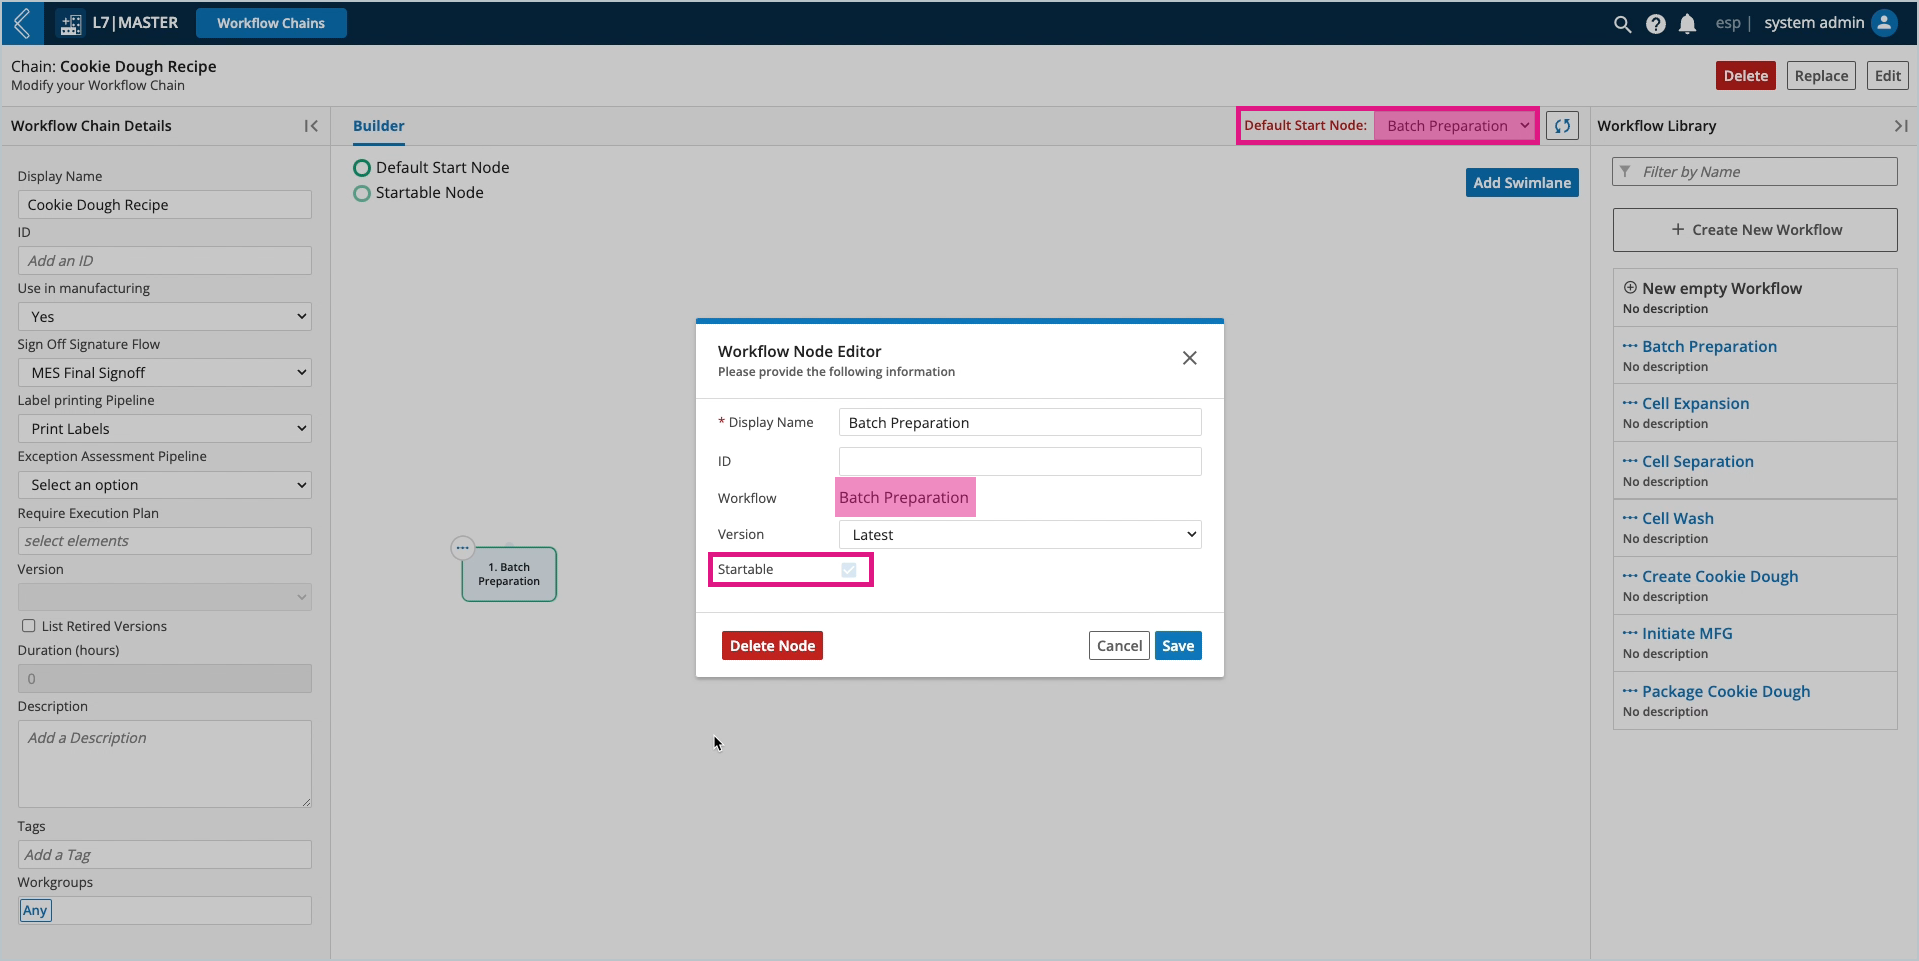
Once a node has been marked as startable, a dropdown menu will appear in the top-right corner of the main viewing window to select the Default Start Node.
Note
Workflow Chains can have more than one (1) startable node, but L7 MES only supports chains with one (1) startable node. This should be the node at the beginning of the Workflow Chain.
The Display Name, ID, and version of each node can also be changed in the Workflow Node Editor.
By changing the Display Name, the same Workflow can be used more than once in the same Workflow Chain, or a generic Workflow can be given a process-specific name.
Note
If a Workflow is used more than once in the same Workflow Chain, the same version of that Workflow must always be used. By default, the latest version will be used, but all pinned versions will also be available.
To continue building the Workflow Chain, hover over the first Workflow and …
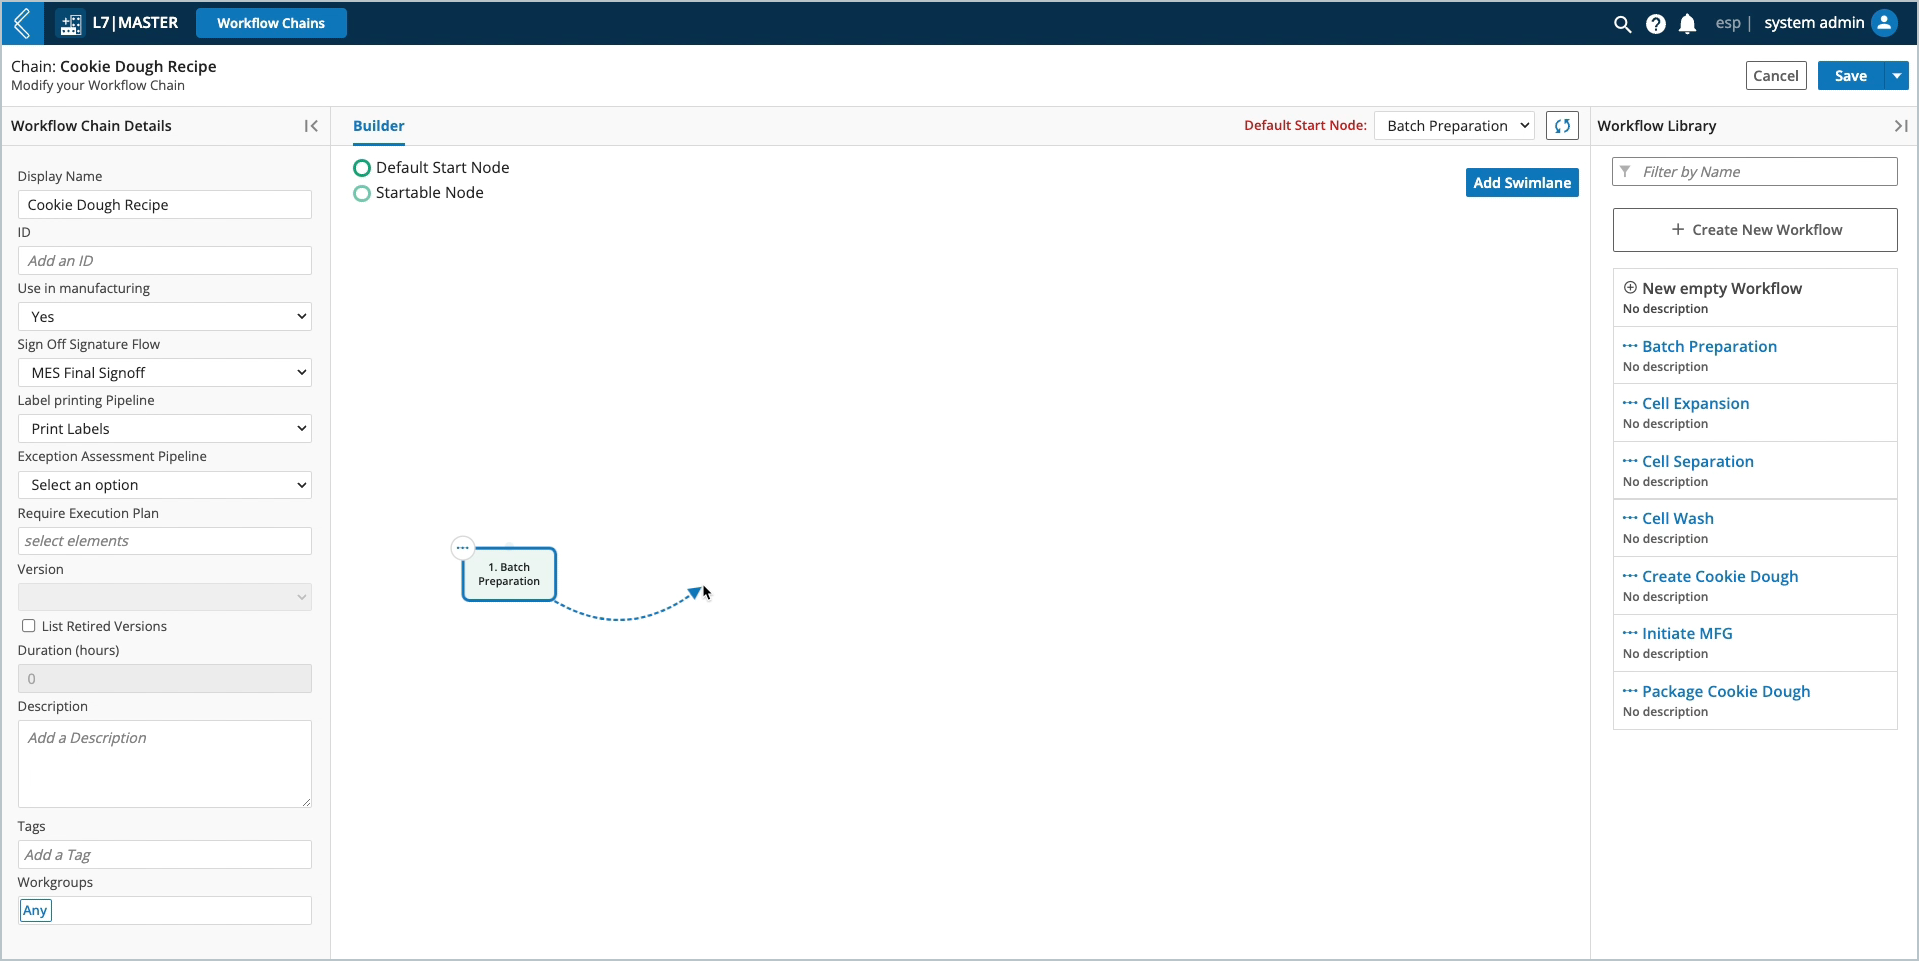
Select the light blue dot at the top of the node and drag the arrow to an empty space in the builder.
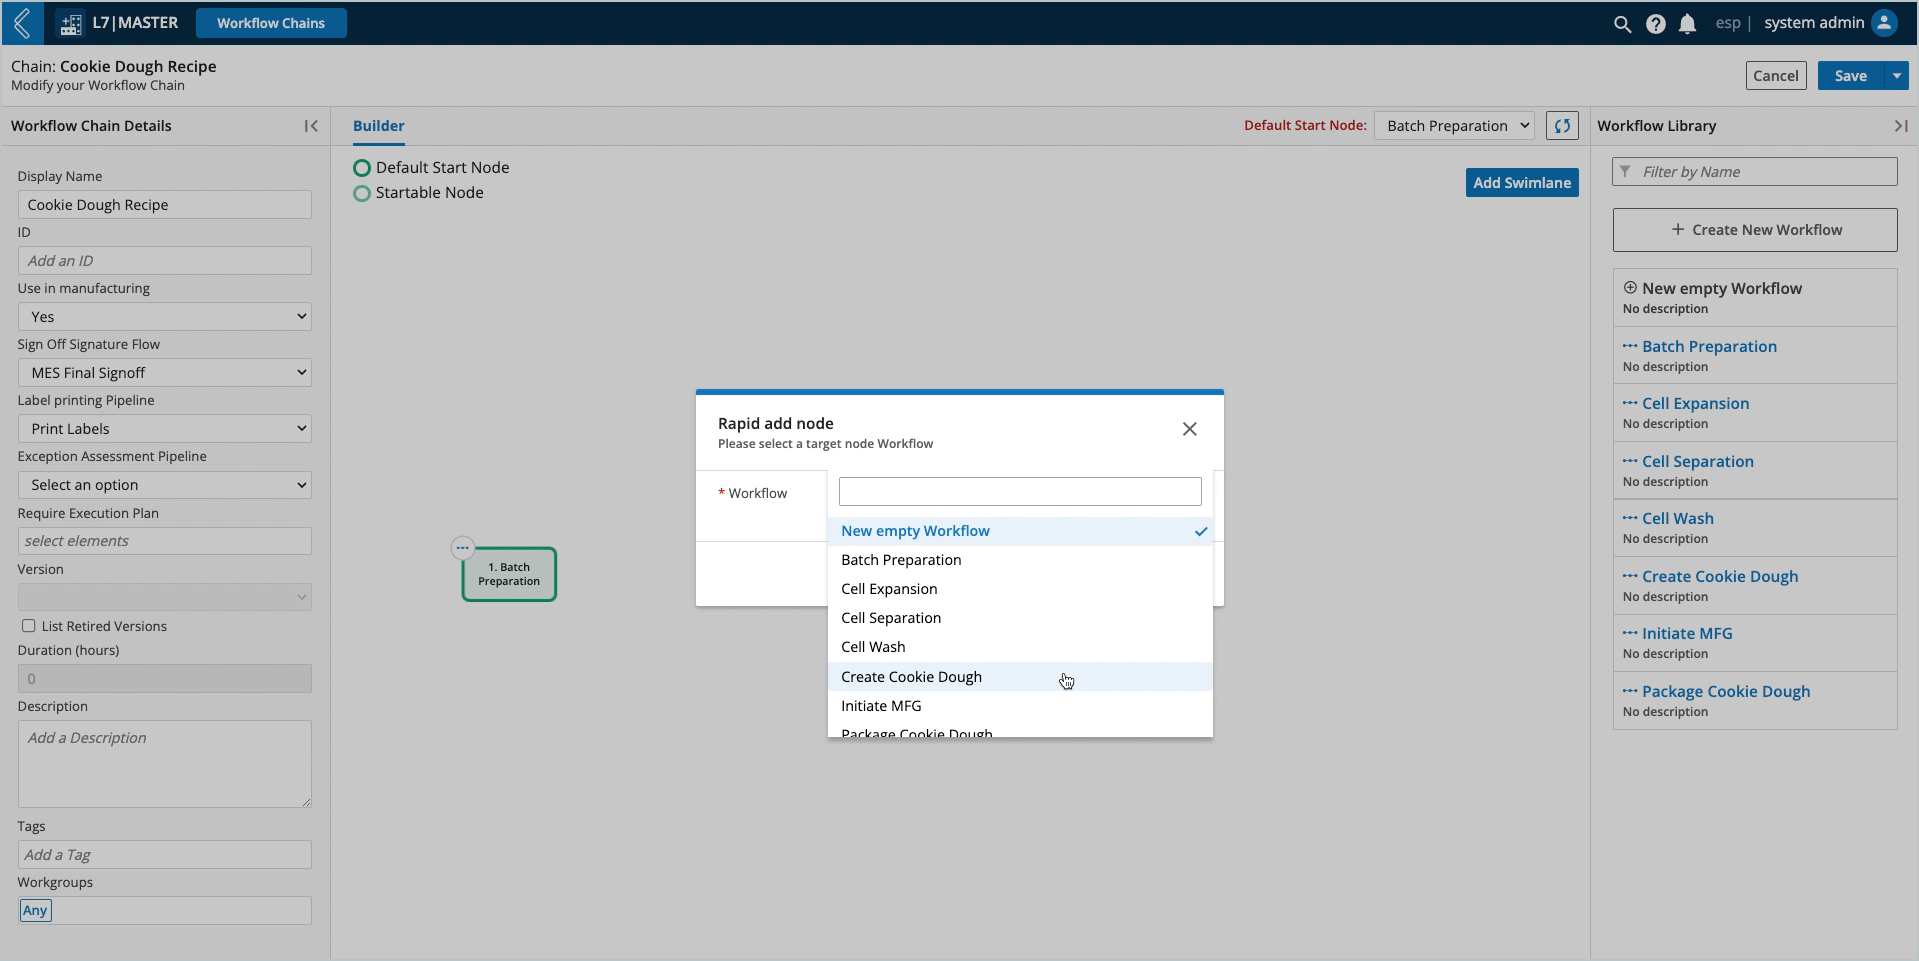
Then select the next Workflow from the dropdown menu in the Rapid Add Node Editor.
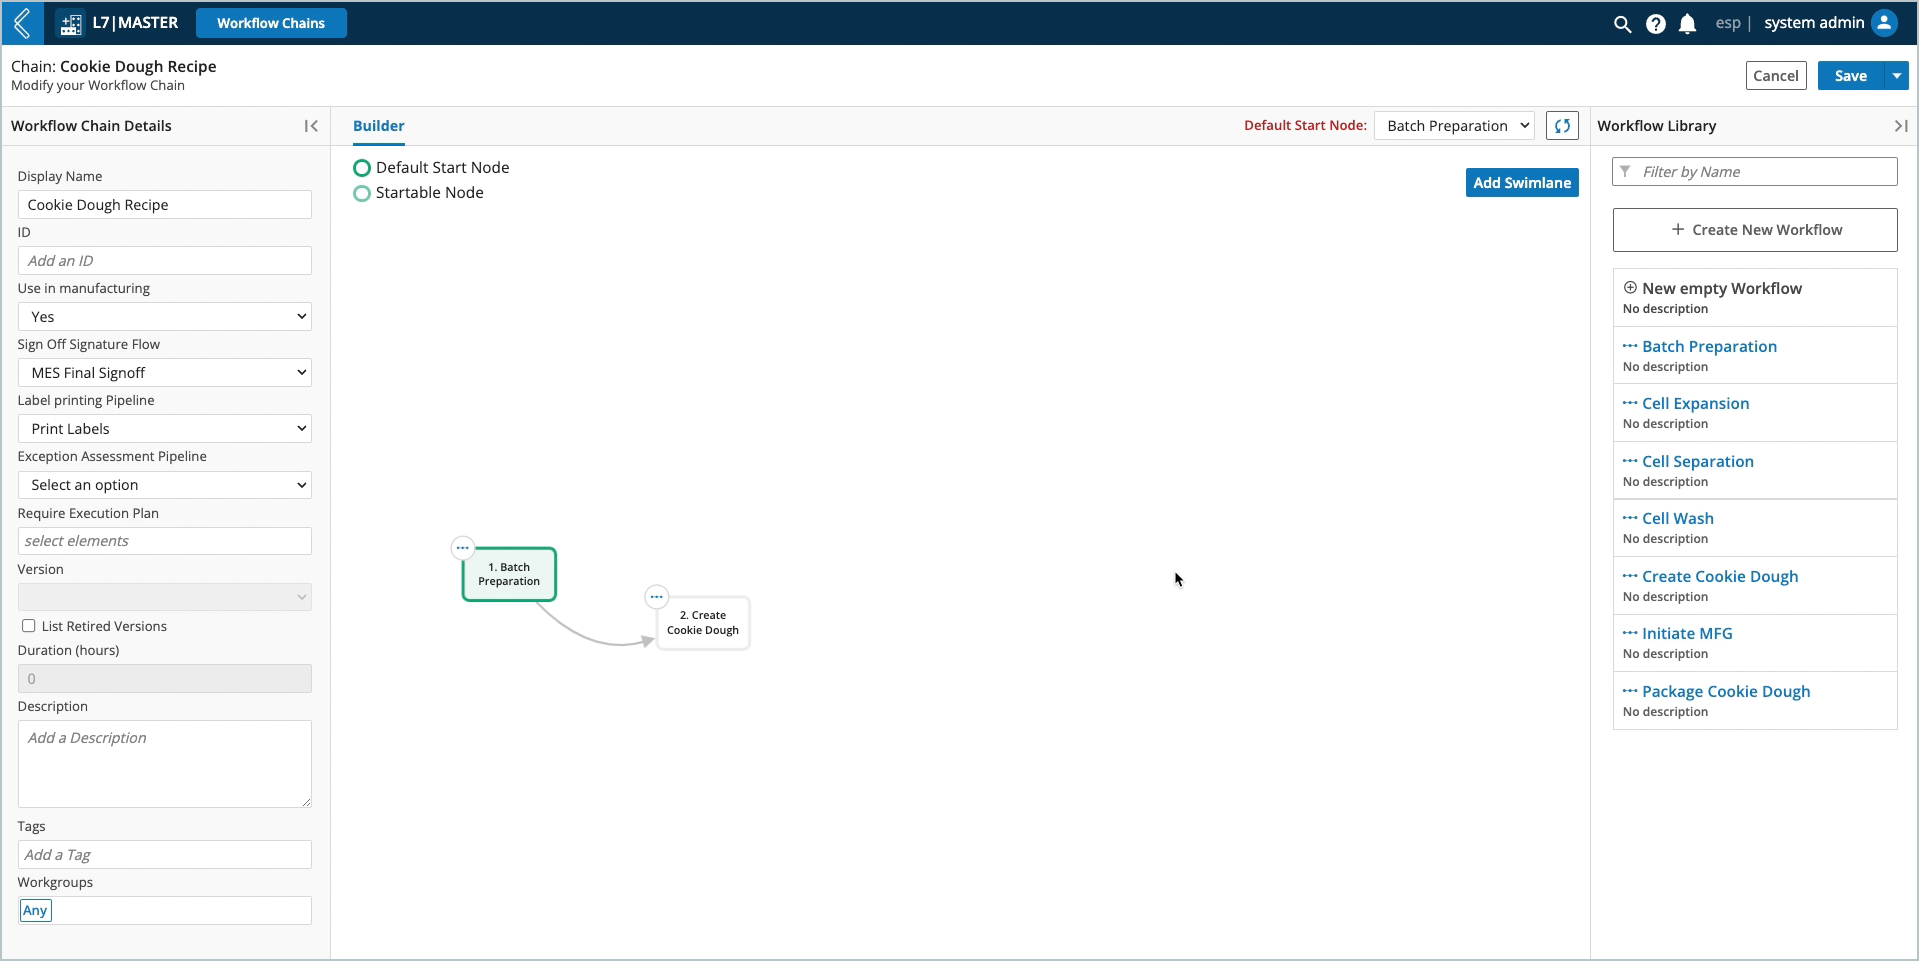
Alternatively, drag the next Workflow into the main viewing window and connect it to the first by selecting the blue dot at the top of the first node and connecting the arrow to the second Workflow.
Manually connecting nodes already present in the Workflow Chain builder will open the Transition Editor.
How to edit a Workflow Chain
To edit a Workflow in a Workflow Chain, right-click the Workflow and select the appropriate action:
Edit – opens the Workflow builder, where both the Workflow and its Protocols can be edited.
Double-click a Protocol in the Workflow builder to edit its details in the Protocol builder.
Replace – opens the Replace Workflow modal displaying all registered Workflows.
Select the desired Workflow as a replacement.
Note
Replacing a Workflow in the Workflow Chain will not update the Workflow’s Display Name or ID.
Double-click on the node to update these values.
Delete – removes the Workflow from the Workflow Chain.
Alternatively, after selecting a node, you will see the Delete, Replace, and Edit buttons appear in the top-right corner of the screen.
Node Numbering
The setting Use in manufacturing should be set to Yes for all Protocols, Workflows, and Workflow Chains that will be used in L7 MES. At this time, this setting has limited functional significance, however it does number each node in the Workflow Chain.
L7|ESP uses the following rules for numbering Sections, Steps, and Sub-Steps in the Batch Record:
The start node is assigned the number one (1), with the following nodes assigned the next number in succession.
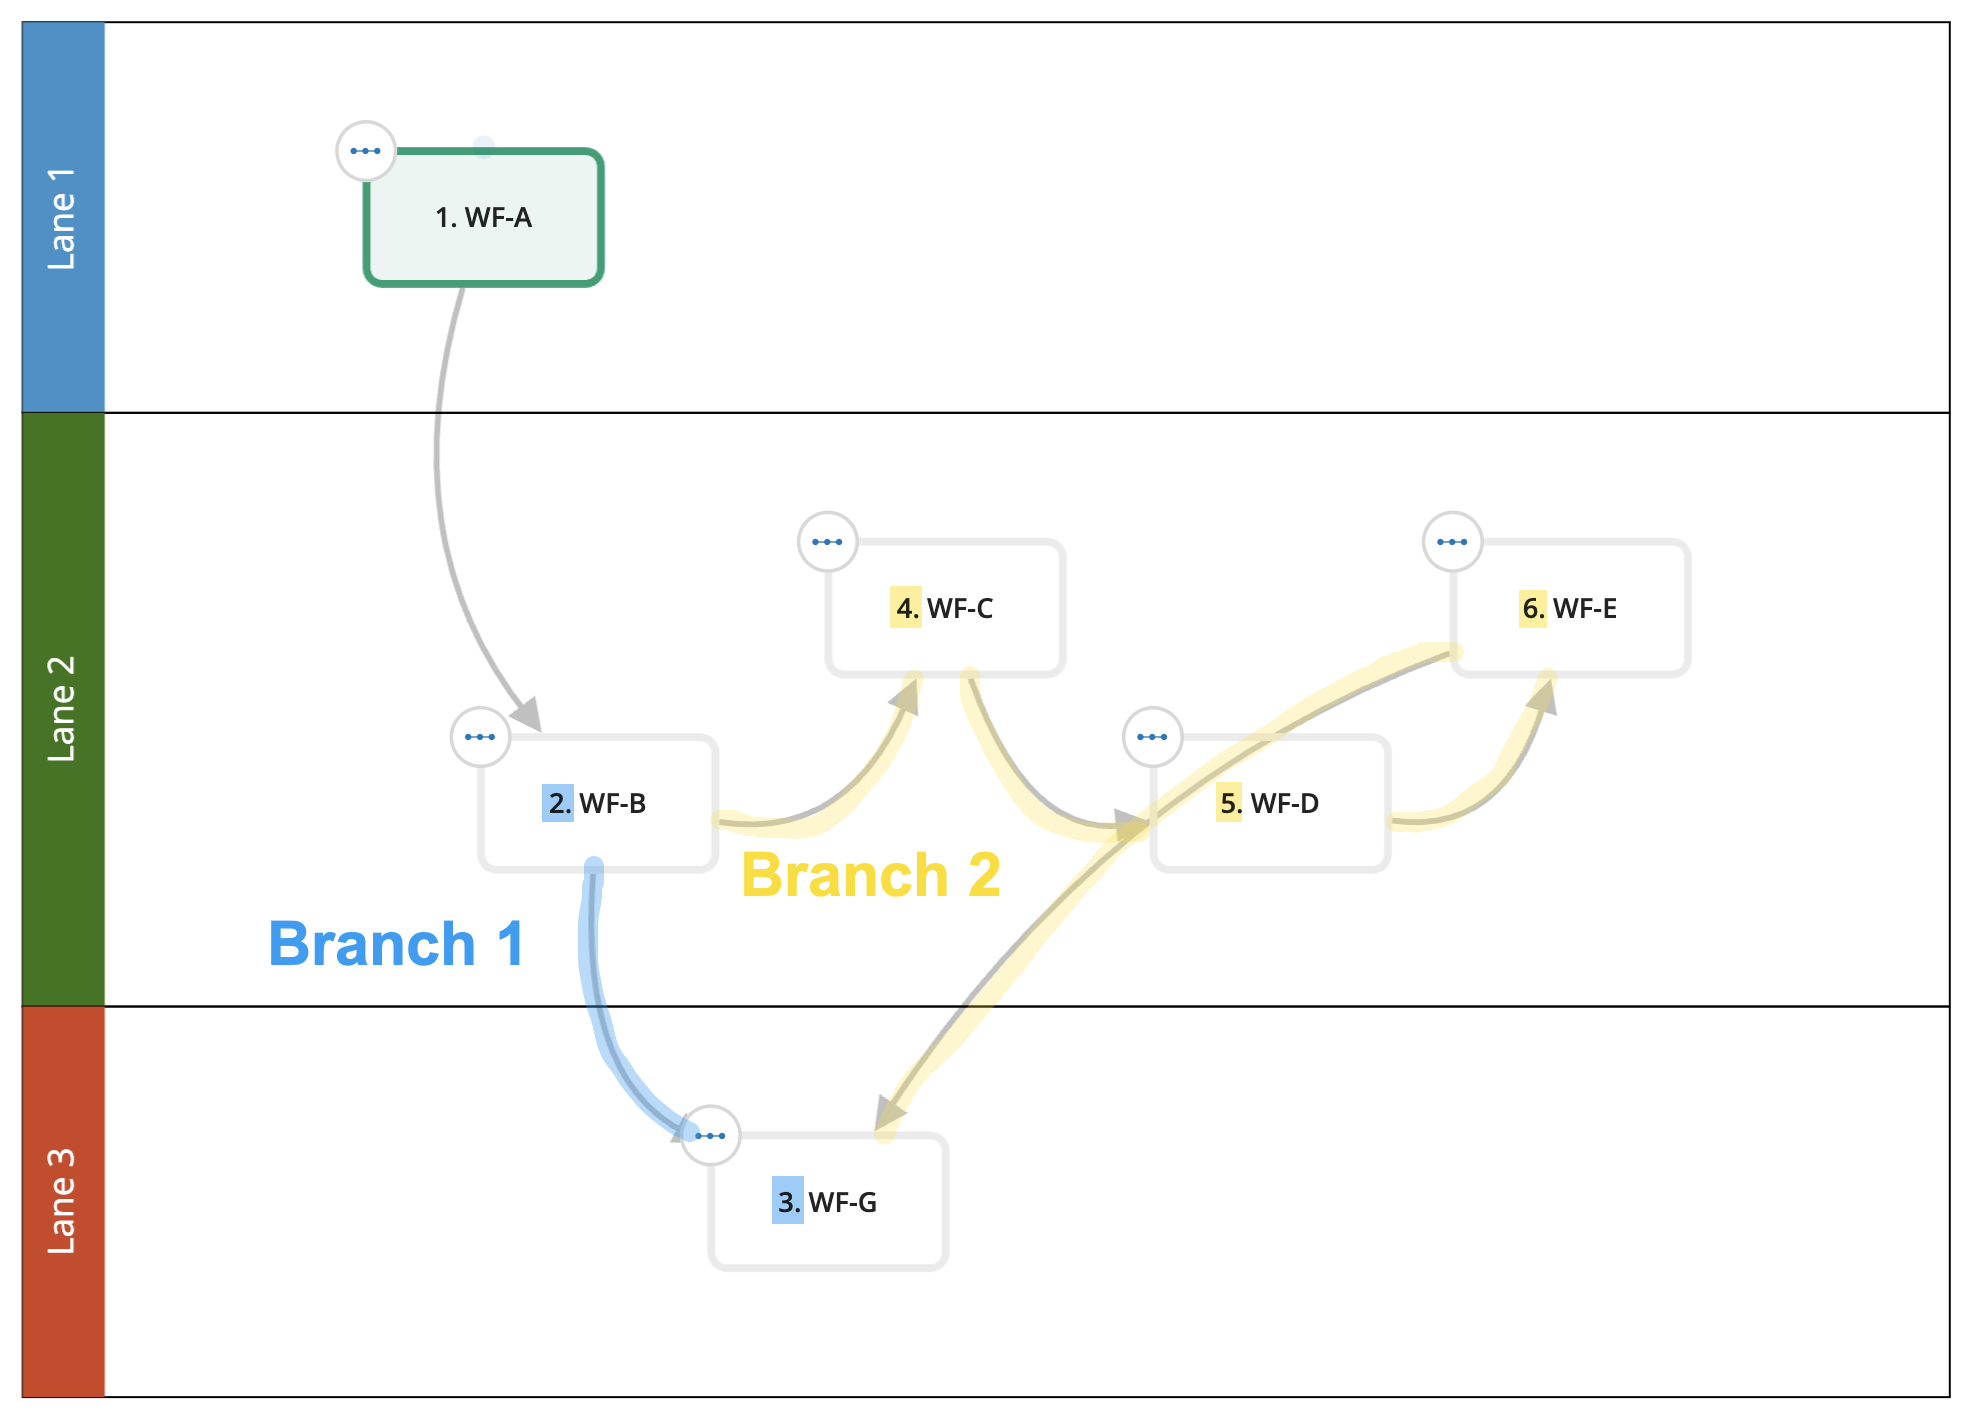
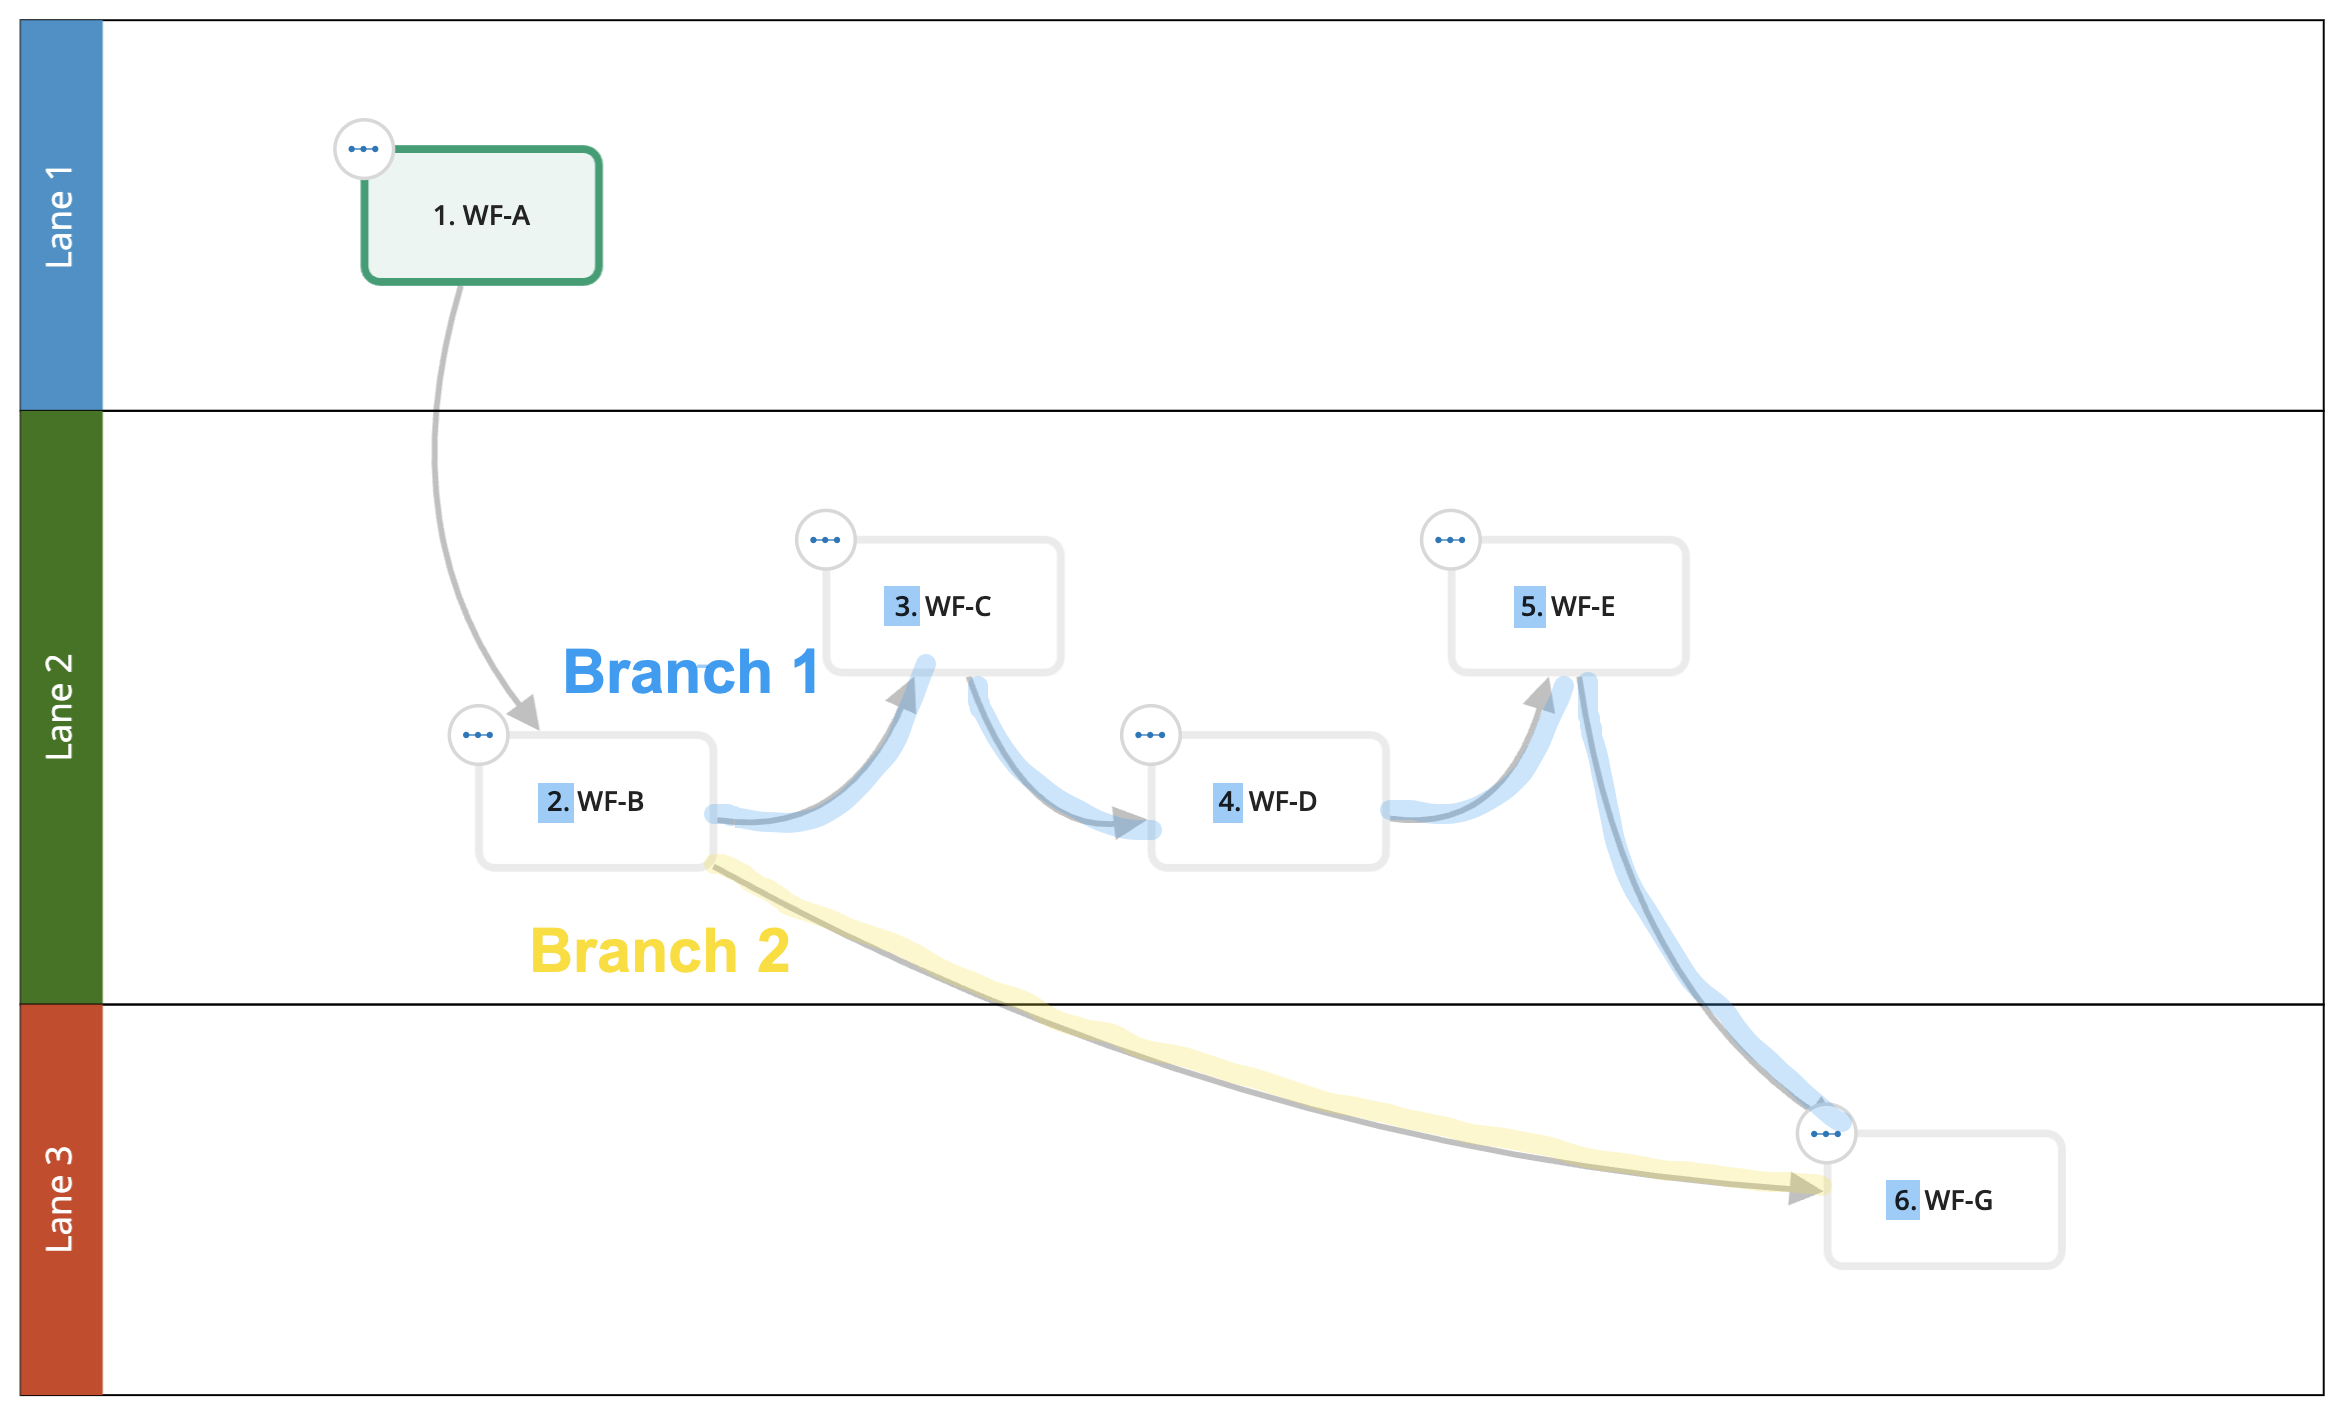
Numbering traverses each branch to the end, then travels back to the root before traversing the next branch in order.
The branch furtherest to the left is numbered first.
Workflows (Sections) are assigned the number “N”.
“N” is the number displayed in the Workflow Chain builder.
If Sections are repeated, their numbering will be updated to append a letter to the Section number each time the node is executed (i.e., 1 → 2 → 2A → 2B → 3).
Protocols (Steps) are assigned the number “N.X”.
“X” is the order of the Protocols in the Workflow.
Sub-Steps (contiguous fields with the same Var Group) as assigned the number “N.X.Y”.
“Y” is the order of the fields in the Protocol.
In this example node #2 has two branches. Since WF-G is to the left of WF-C (regardless of vertical placement), it is numbered as #3. After traversing branch 1, the numbering resumes at the start of branch 2.
If WF-G is moved to the far right, then the numbering changes.
Swim Lanes
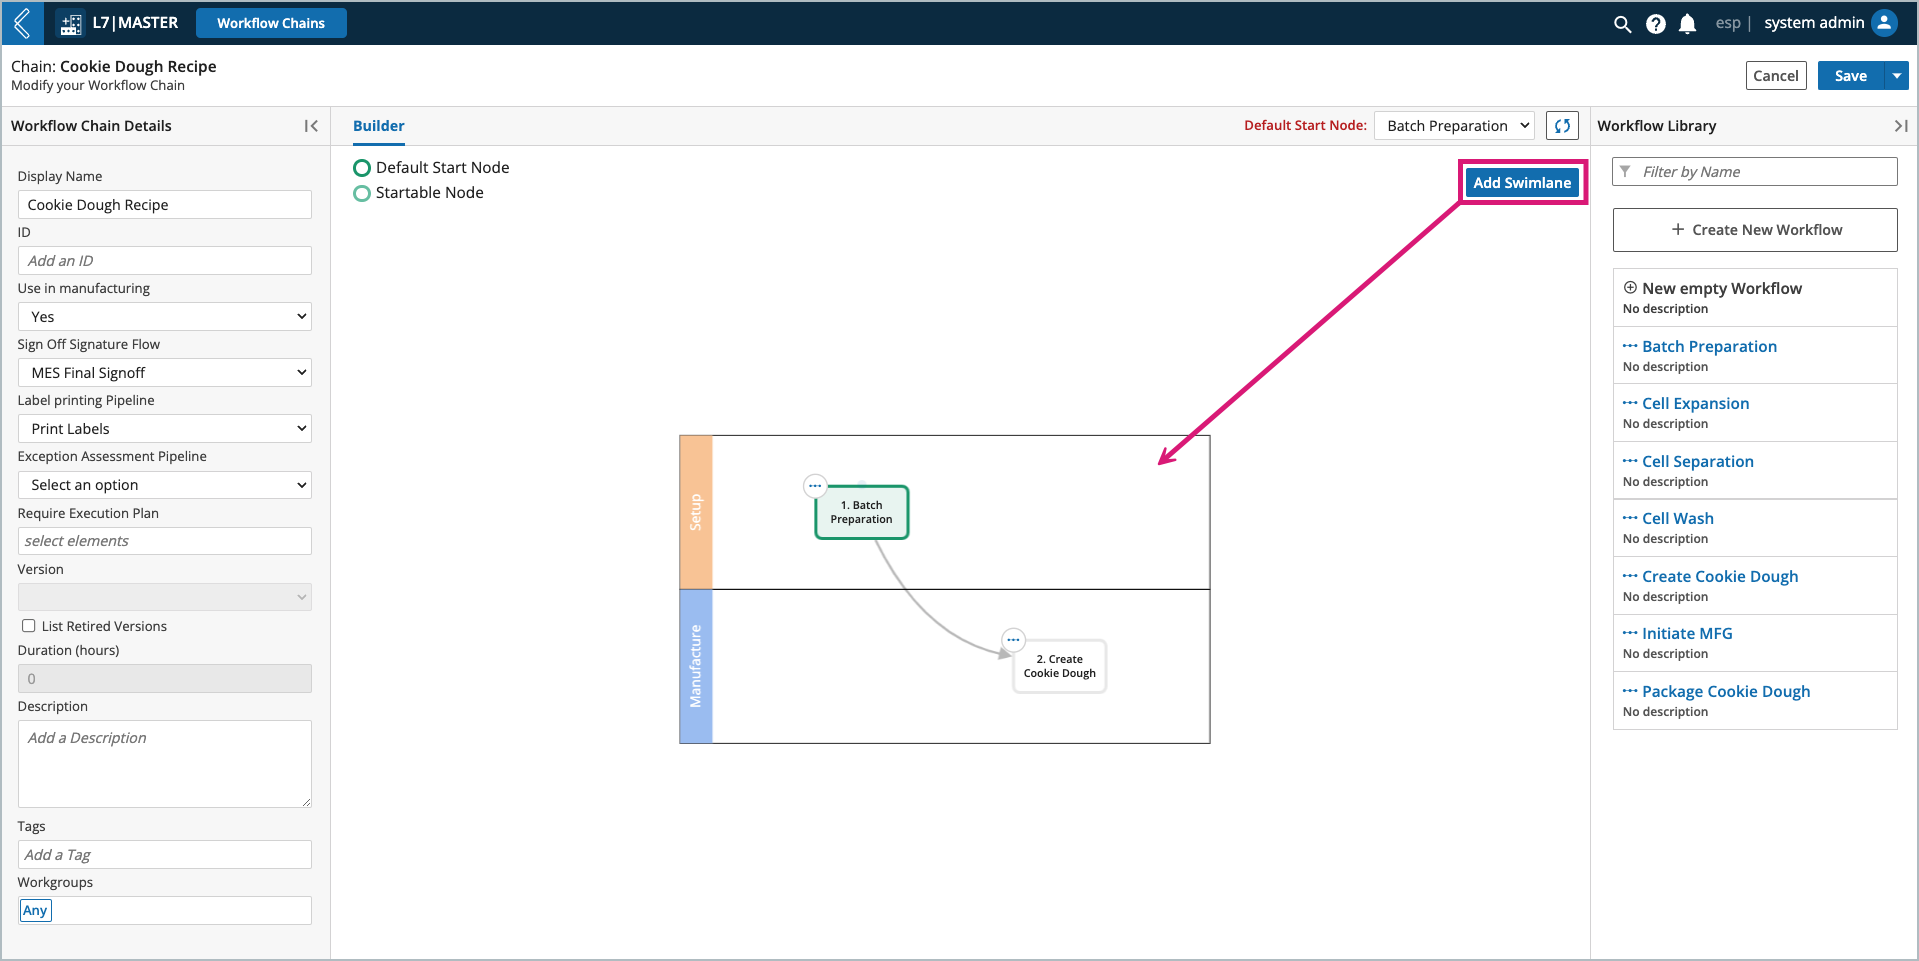
Swim lanes provide a way to visually organize nodes into discrete categories. To create a swim lane, select the Add Swimlane button in the top-right corner of the main viewing window.
In the modal, enter a display name, and select a color and position for the lane.
Each node in the Workflow Chain can then be assigned to a lane.
Workflow Chain Transitions
What is the Transition Editor?
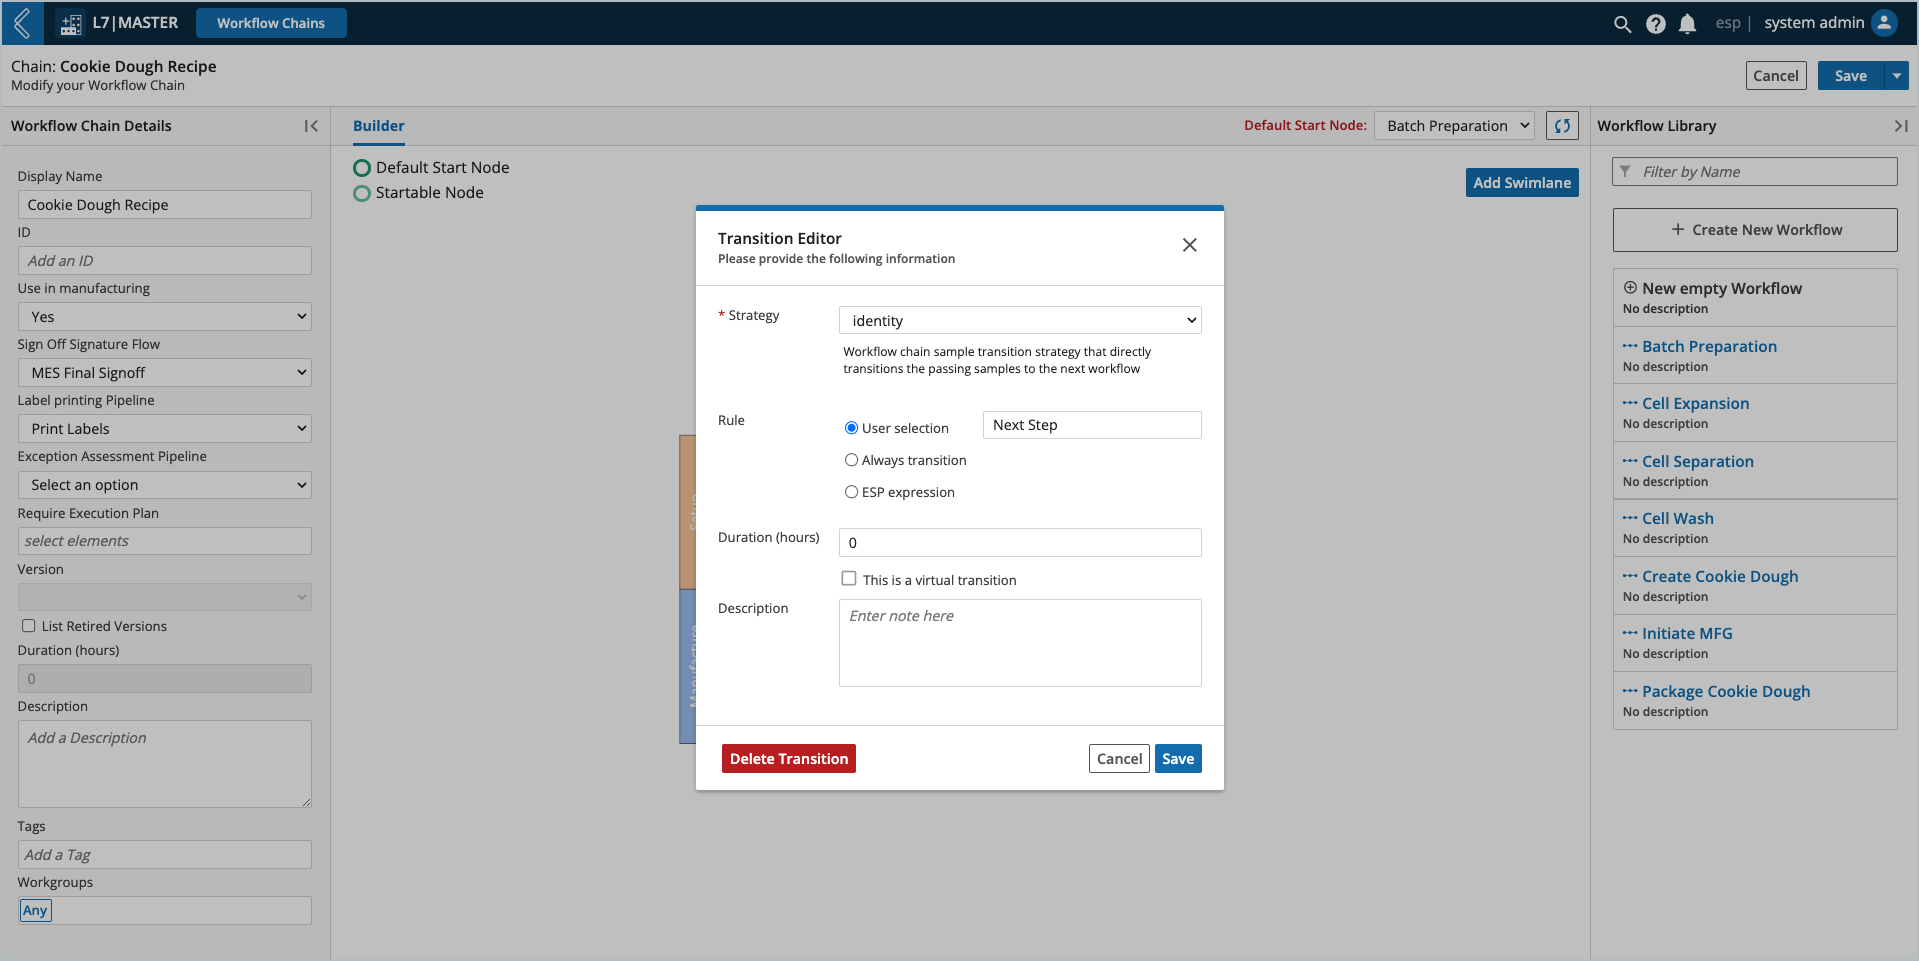
The Transition Editor is the modal used to define how Entities move through a Workflow Chain. To access the Transition Editor, select a transition (arrow) in the Workflow Chain.
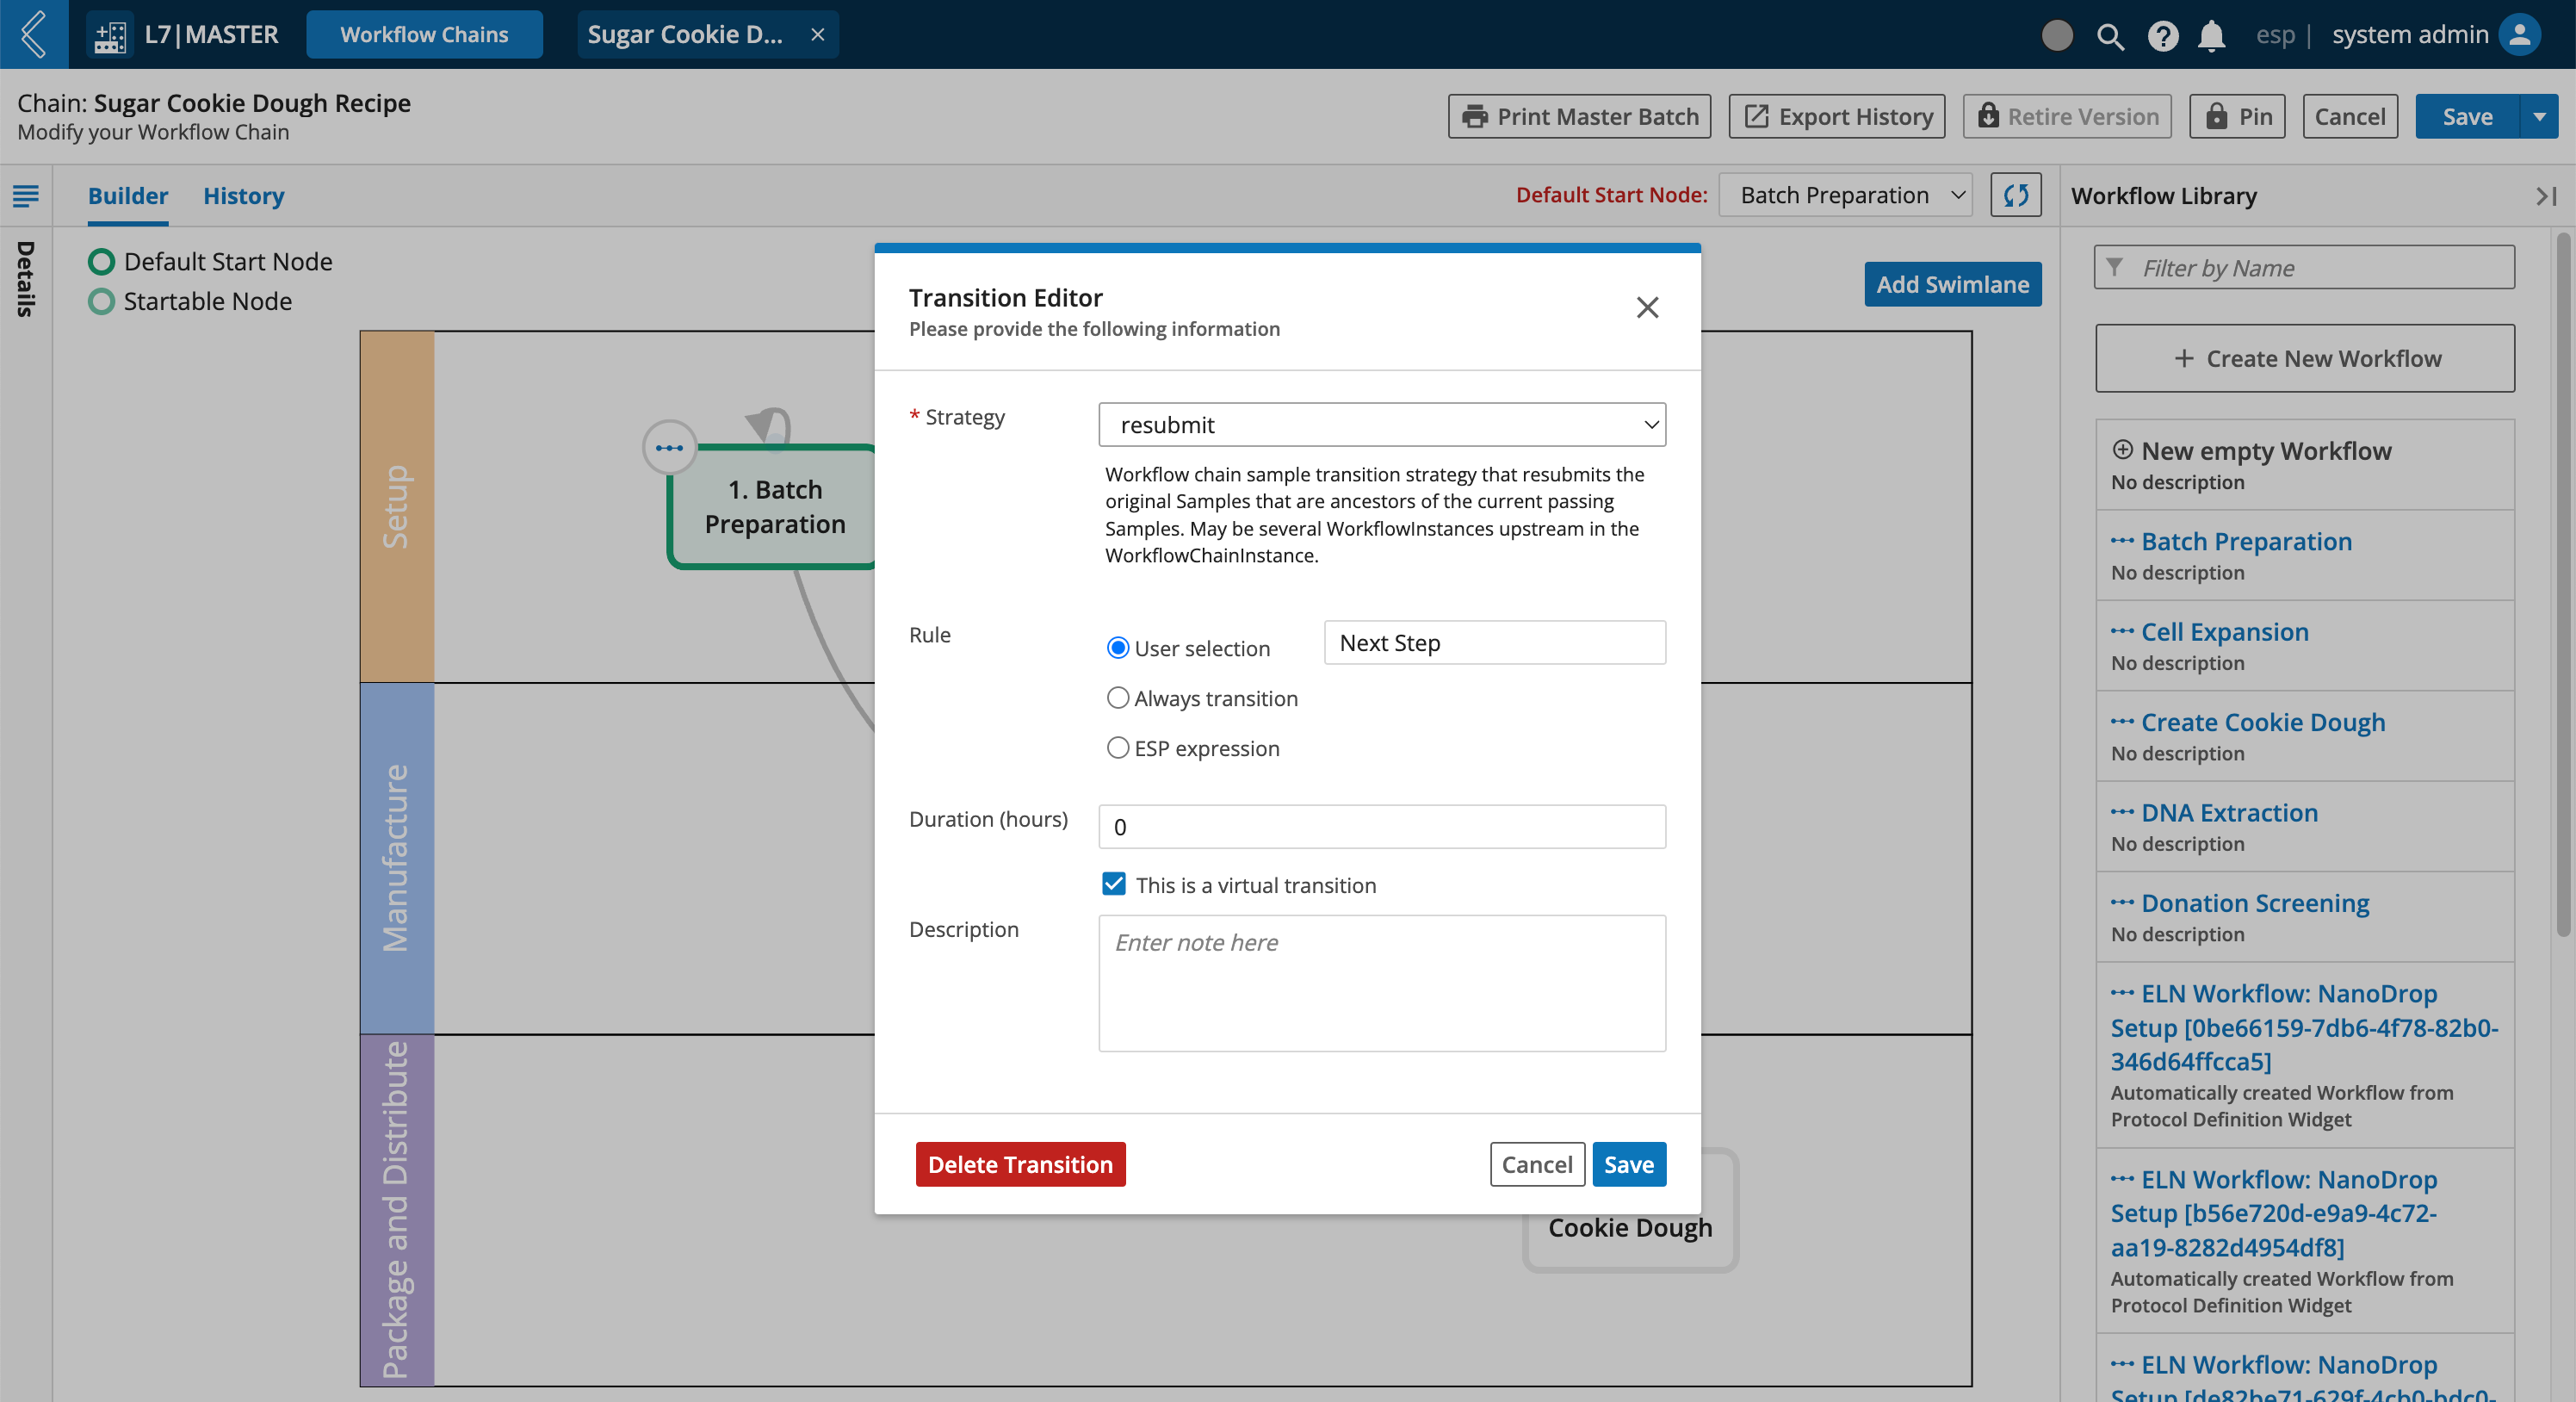
The Transition Editor has two key components: strategy and rule. Think of the strategy as the “who” and the rule as the “when” - which Entities will be transitioned and when will they be transitioned.
Transition Strategies
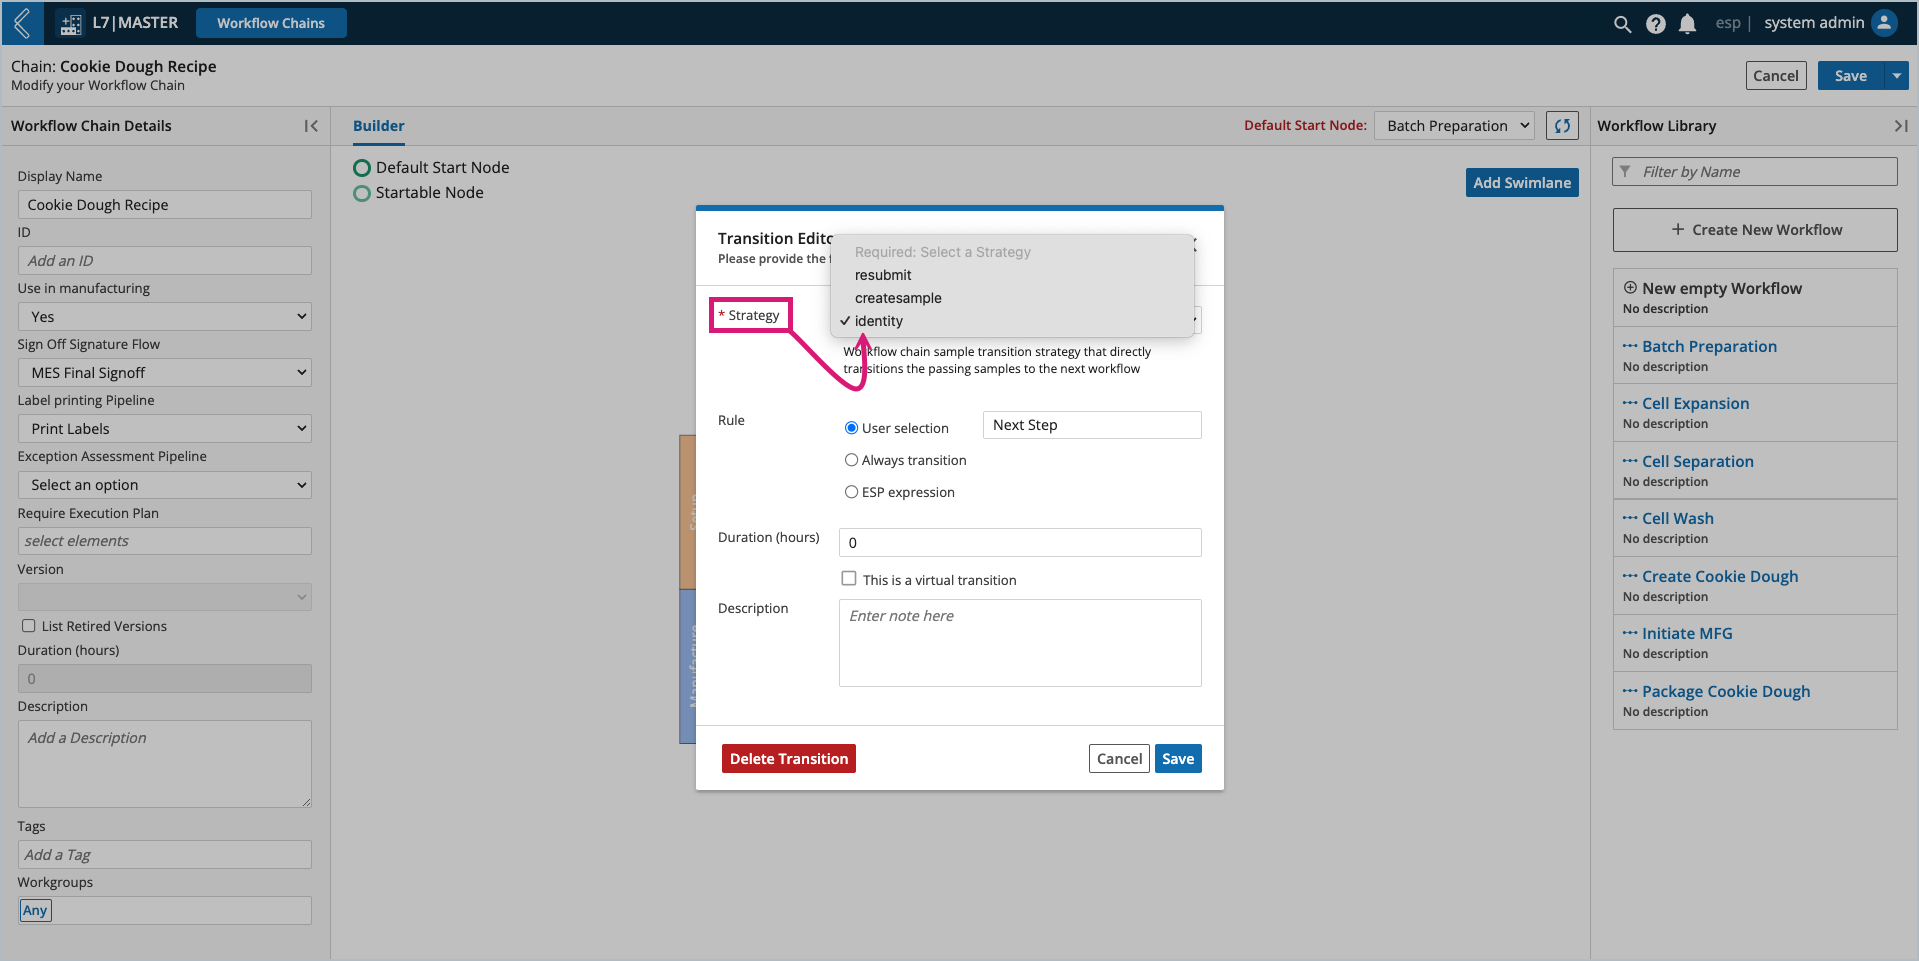
L7|ESP has three (3) out-of-box strategies,
Identity - transitions the Batch from one Workflow to the next. Most commonly used strategy in L7 MES processes.
Resubmit - transitions the Batch back to the start of the Workflow to repeat the Section
Createsample - creates Samples from the selected Sample Type as children of the final Sample Set in the upstream Workflow. Not supported in L7 MES because Items can only be created in Sample Protocols.
Transition Rules
The two (2) most common rules are:
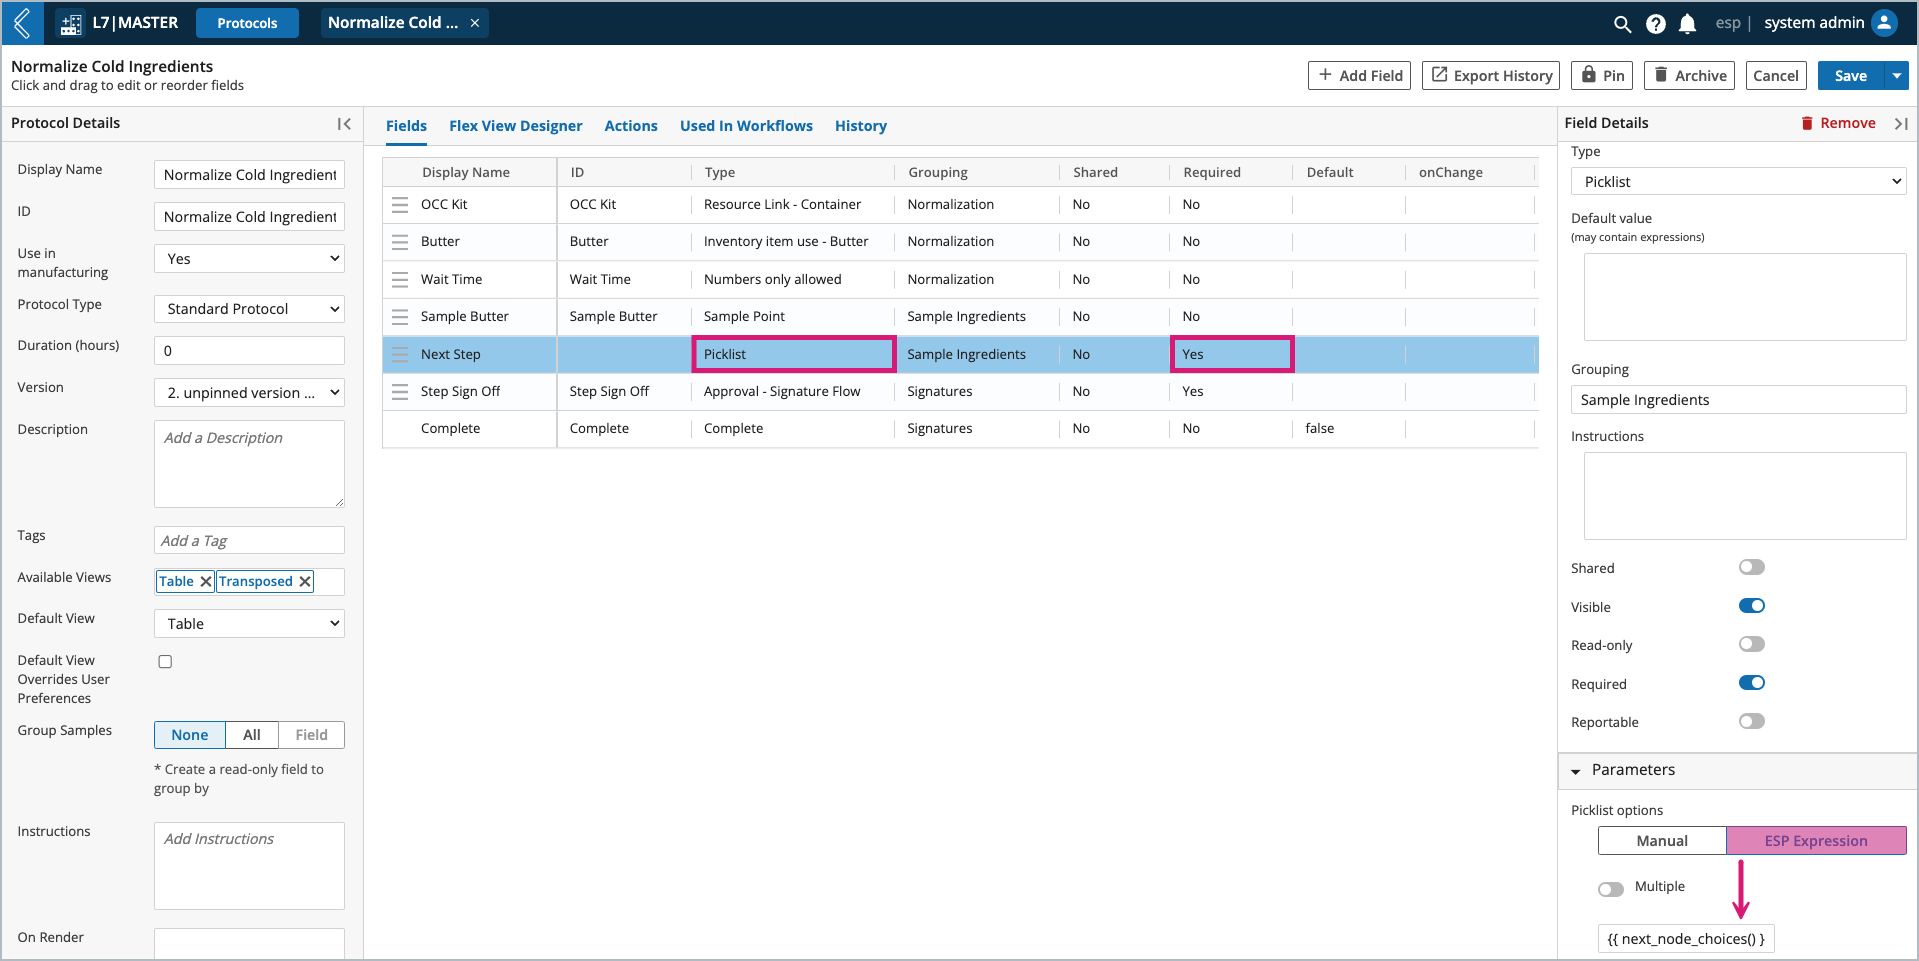
User selection – transitions the Batch to the Section(s) selected in the Next Step field. This rule supports the dynamic nature of branching Workflow Chains, and is the default rule assigned to all transitions.
The Next Step field can be renamed in the Transition Editor, and will be added at runtime to the last Protocol in the Workflow. If added at runtime, this field will always be the last field in the Workflow.
Alternatively, this field can be added to the corresponding Protocol to customize its details and position if:
The field needs to be required (this is best practice).
The field needs to be a single-select picklist.
Finished needs to be removed from the list of options (see the note below).
A default value needs to be assigned.
A Signature Flow auto-completes the Protocol.
Auto-completion requires the Signature Flow to be the last field in the Protocol.
Note
Next Step must be a picklist with options set by the L7|ESP Expression {{ next_node_choices() }}
To drop "finished" from the list of options: {{ next_node_choices(drop=None) }}
Always transition – transitions all Entities set by the strategy when the upstream Workflow is completed.
This rule can be made the default_wfc_transition in the esp Configuration.
default_wfc_transition:always_transition
Note
This rule will transition all Entities to each Workflow connected to the upstream Workflow in the Workflow Chain.
Custom rules can be configured in Python using the ESP expression option. Common examples include:
Evaluating an Entity value:
{{ entity_value('Field Name') == 'Value' }}
Evaluating a boolean (checkbox) value:
{{ str(cell('Field ID')).lower() == 'true' }}
Evaluating a picklist value:
{{ cell('Field ID', 'Protocol ID') == 'Value' }}
Evaluating more than one (1) picklist value:
{{ cell('Field ID', 'Protocol ID') in ['Value 1', 'Value 2'] }}
Virtual and Non-Virtual Transitions
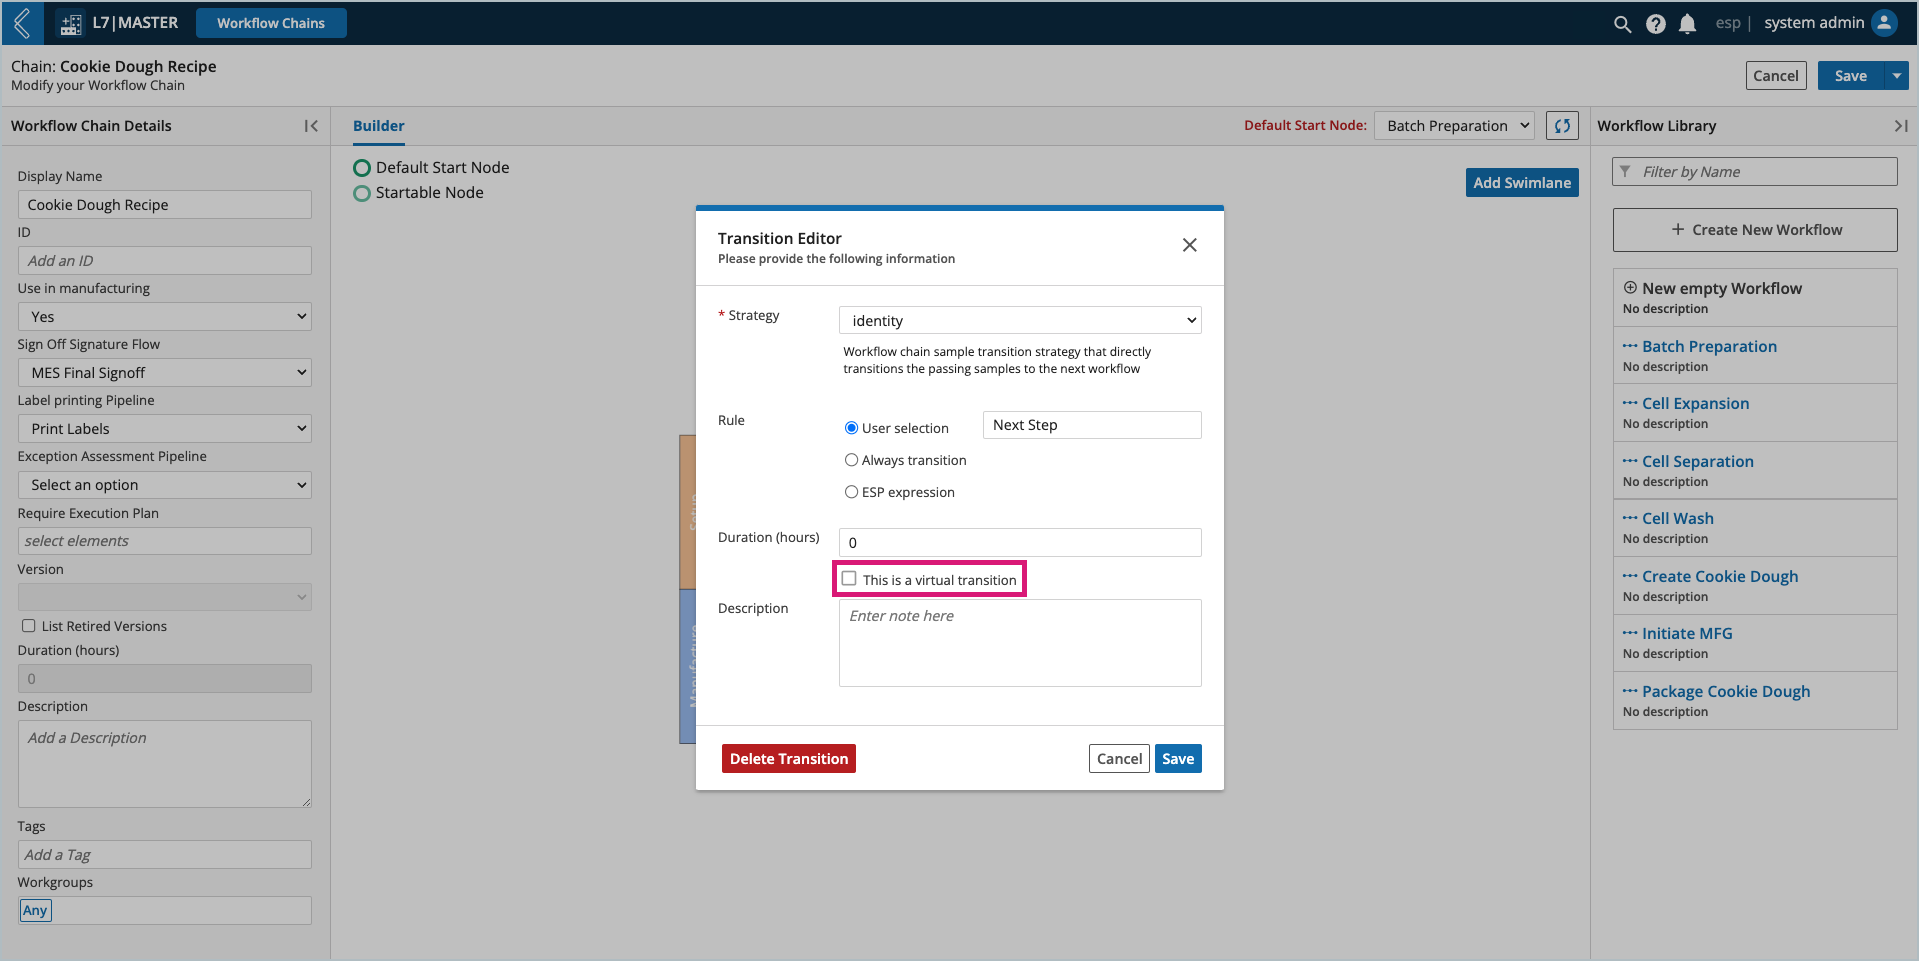
The “this is a virtual transition” checkbox converts the solid grey arrow to an orange dashed arrow. There is no functional difference between a virtual and non-virtual transition. Virtual transitions are typically seen as optional, whereas non-virtual transitions serve as the consistent path for Entities to take across the Workflow Chain.
Resubmit/Looping Processes
Workflow Chains are not confined to linear processes. Resubmits can be configured in the Transition Editor for repeatable Sections and cyclical parts of the Recipe. When a Section undergoes repeated execution in L7 MES, its numbering will be updated to append a letter to the Section number each time the node is executed (i.e., 1 → 2 → 2A → 2B → 3).
To configure resubmits or looping:
Add a transition (arrow) pointing back to a earlier node or the same node.
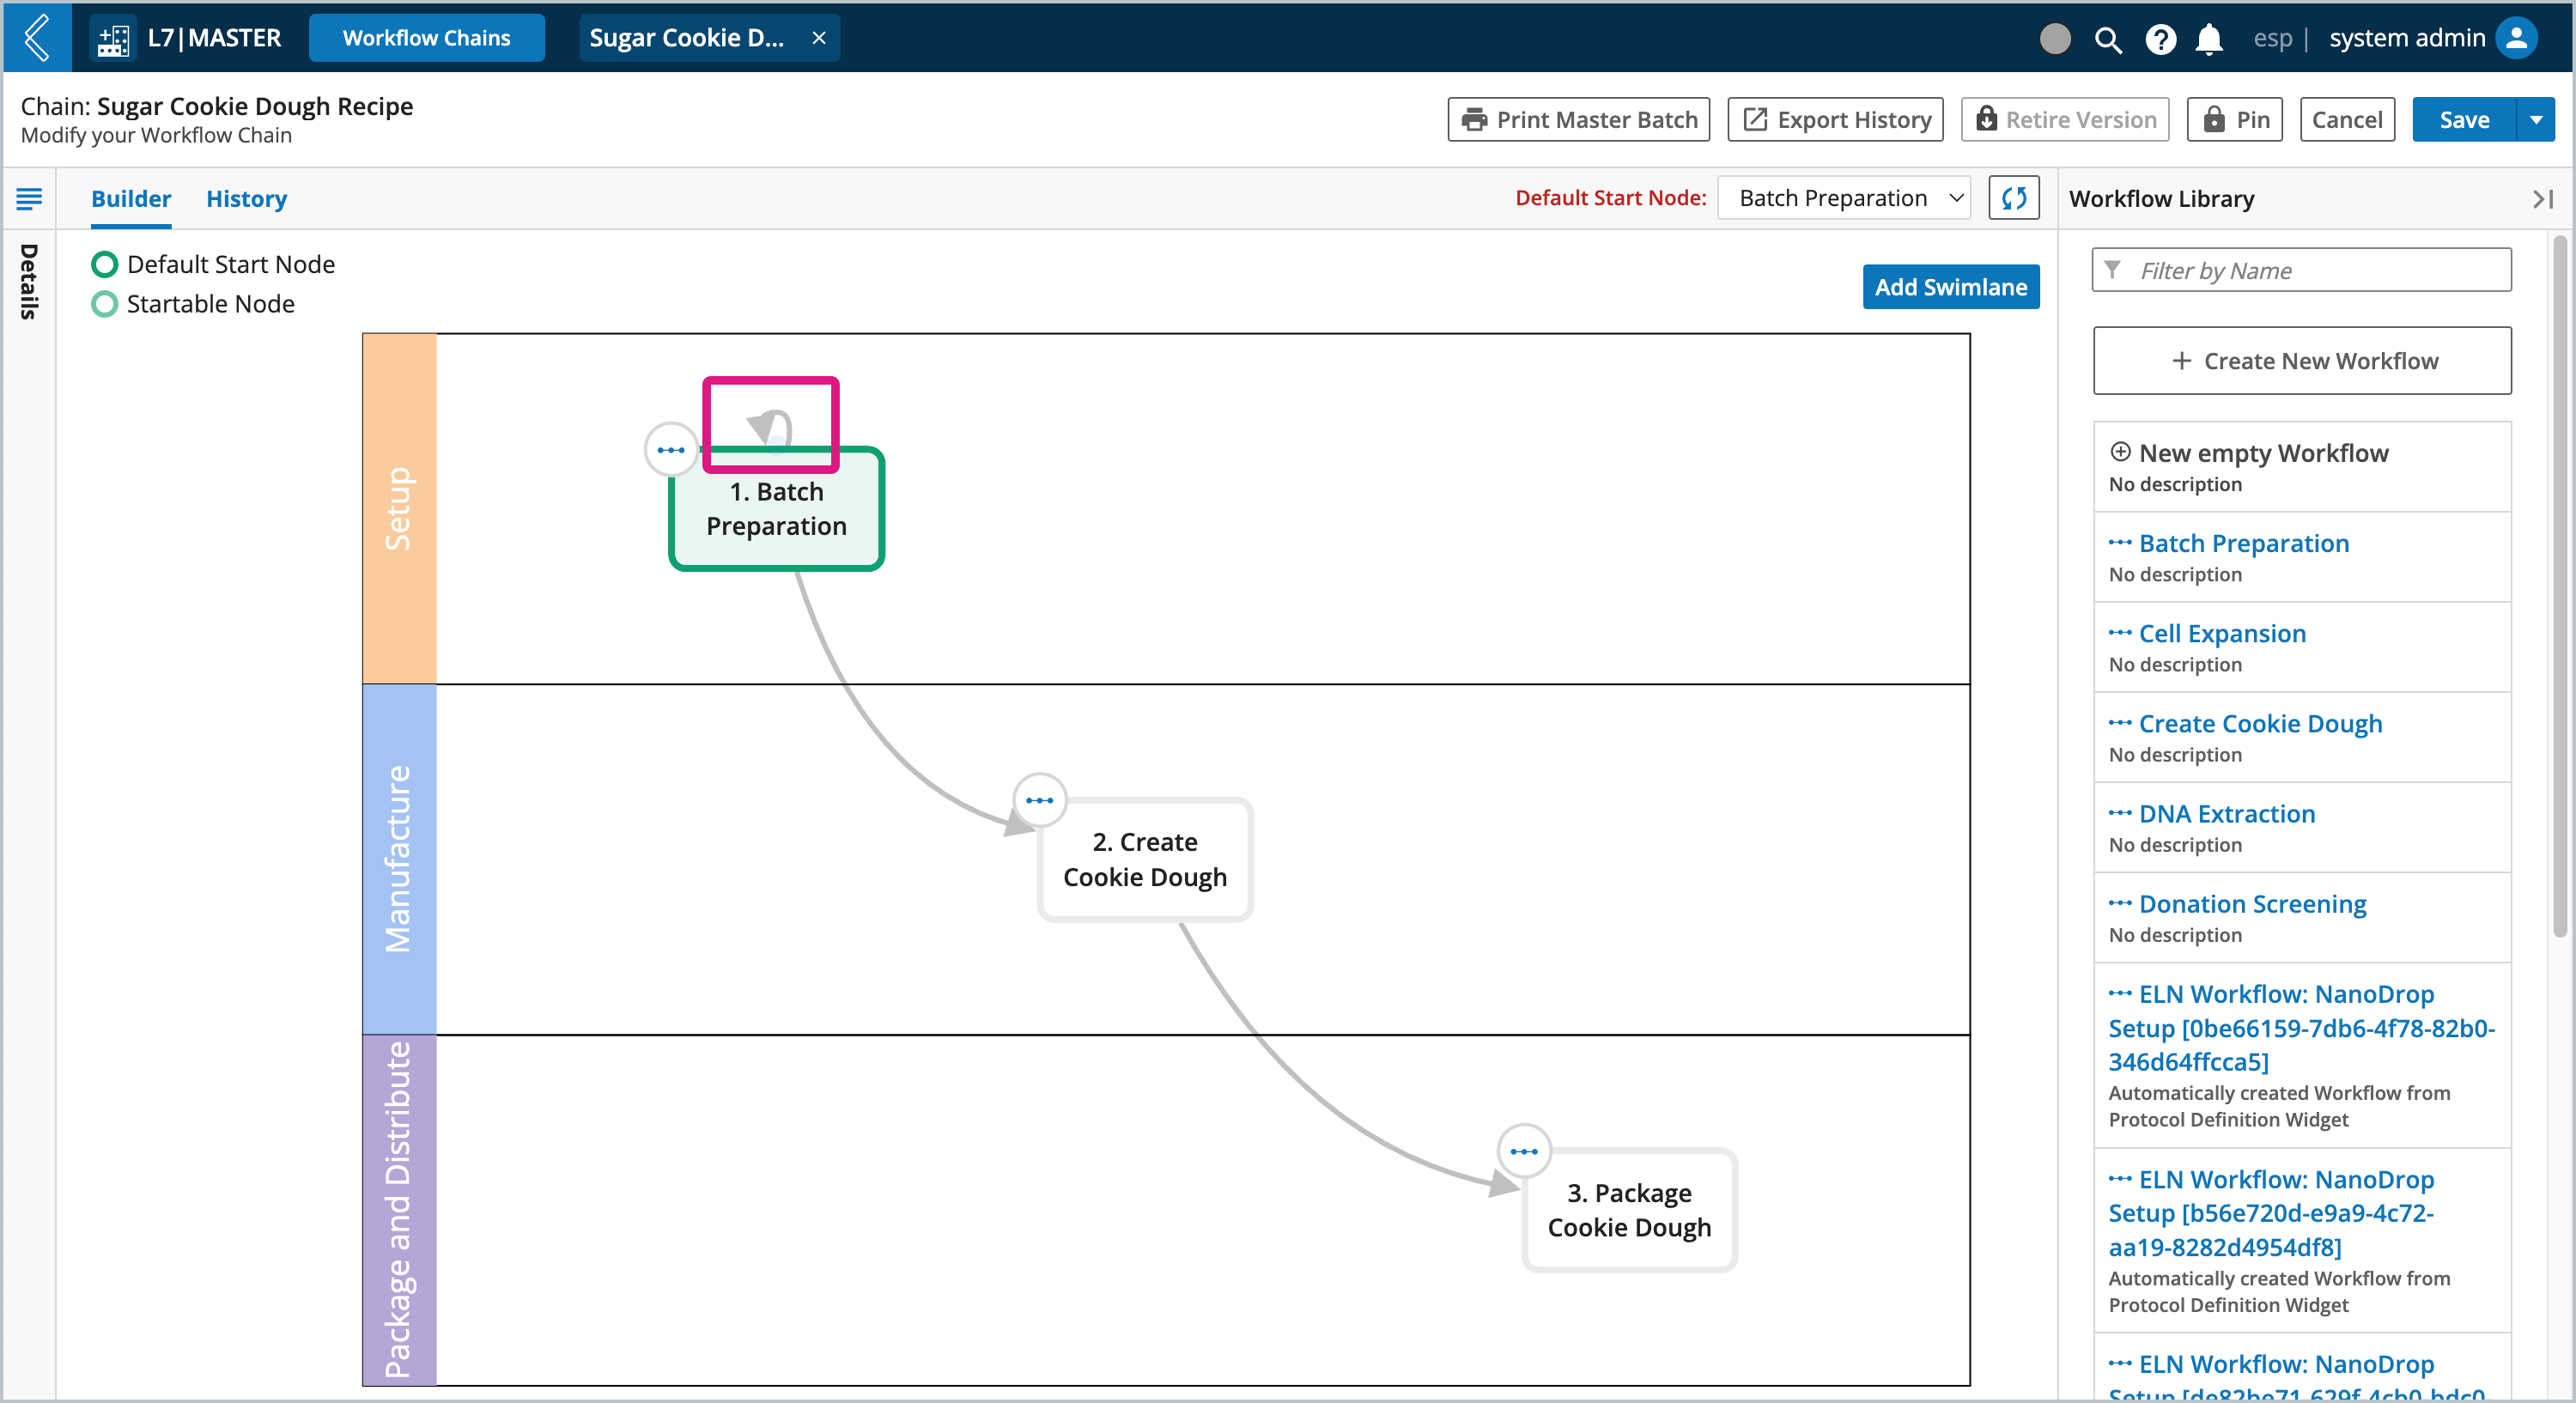
Select the transition to open the Transition Editor.
Set Strategy to resubmit.
Note
Resubmit strategy automatically applies the This is a virtual transition setting, but this setting is editable.
Set Rule to User selection.
Tip
Consider how you want to handle multiple routing strategies. For example, if a node supports resubmission and branching, can the Batch be sent to one (1) or more Sections. This will determine if the Next Step field is a single or multi-select picklist.
You may also consider using ESP expression instead of User selection, especially if the routing decision is dependent on a specific value recorded in the EBR and does not require input from the user.
Optionally enter a Duration (hours) to indicate how long it takes to perform the transition. This information is used in L7 Scheduling.
Select Save.
