Change Request - Process Models
As a group, read through the following Change Request and see how it translates to the requirements documented in your shared Google Sheet.
Important
Timing: You have 90 minutes to complete this stage of the project, after which we will debrief as a group.
Note
Build the Perform and Observe Signature Flow before using it in the Xuri Step. Signature Flow requirements are provided at the bottom of this page.
Recipe: CAR T Processing
Create a copy of the
CAR T ProcessingRecipeRename the Recipe
CAR T Processing and ExpansionAdd the
Cell ExpansionSection to the endPlace this Section in a new swim lane named
ExpansionThe Batch will transition to this Section when Cell Separation has been completed
Create a new
CAR TProduct in the MESProduct appMES Process:
CAR T Processing and ExpansionProduct Name:
CD22 CAR T
Section: Cell Expansion
Add instructions that link to vendor documentation for the CellBag and Cell Expansion System. The formatted Procedures are shown below:
CellBag Instructions - hyperlink to the file with the same name in the Data app
Video Demonstration - https://www.youtube.com/watch?v=39p6IDI39so&ab_channel=Cytiva
Tip
What HTML element will create the largest heading and a line break between hyperlinks?
Review our HTML guide here
Add a data link to pull the
Xuri Kitfrom the CAR T Batch EntityDo the same for the
Sepax KitandCliniMACS Kitin the Cell Wash and Cell Separation Sections
Tip
Commonly used Expressions for Workflow data links.
Expression
Description
{{ cell('Field ID', 'Protocol ID') }}Used to link a value from a field in an upstream Protocol.
{{ cell('Field ID', 'Protocol ID', generation=-1 }}Used to link a value from a field in an upstream Protocol, where the parent of the current Entity is the Entity in that upstream Protocol.
{{ tagged_value(['tag']) }}Used to link a value from a tagged field associated with an Entity or Protocol.
{{ entity_value('Field Name') }}Used to link a value from a field associated with the current Entity in the Protocol.
{{ entity_value('Field Name', generation=-1) }}Used to link a value from a field associated with the Parent of the current Entity in the Protocol.
Important
Testing: Create a new Batch Record in the MES app to test these changes with the CD22 CAR T Product
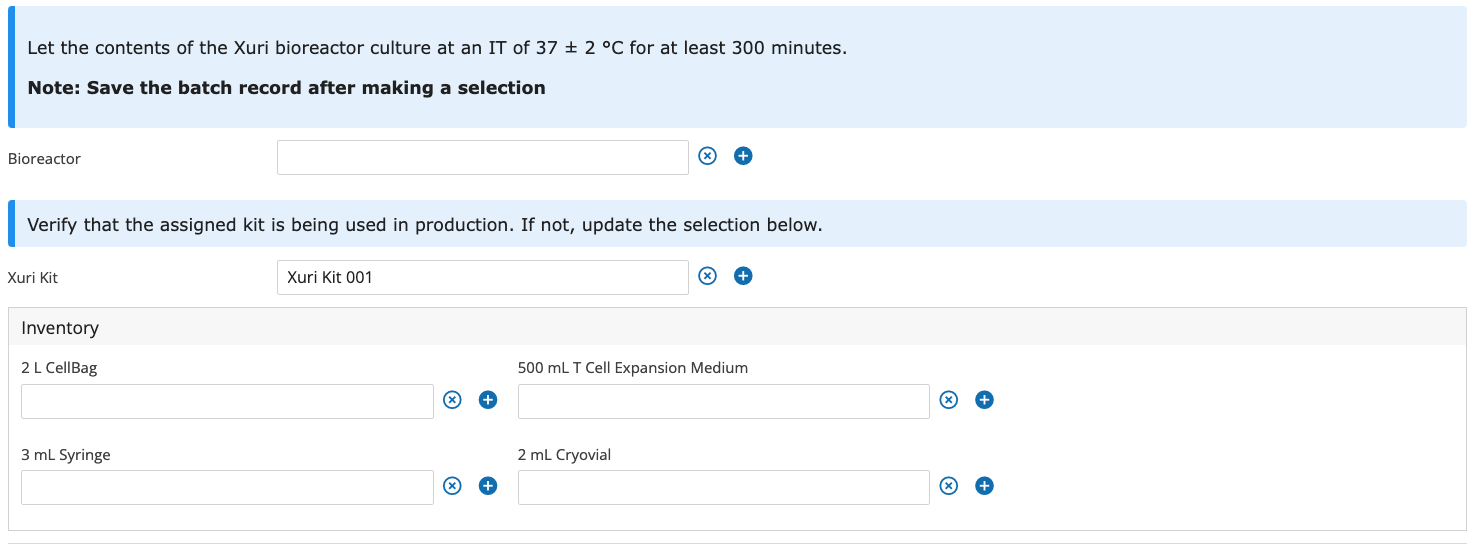
Step: Xuri
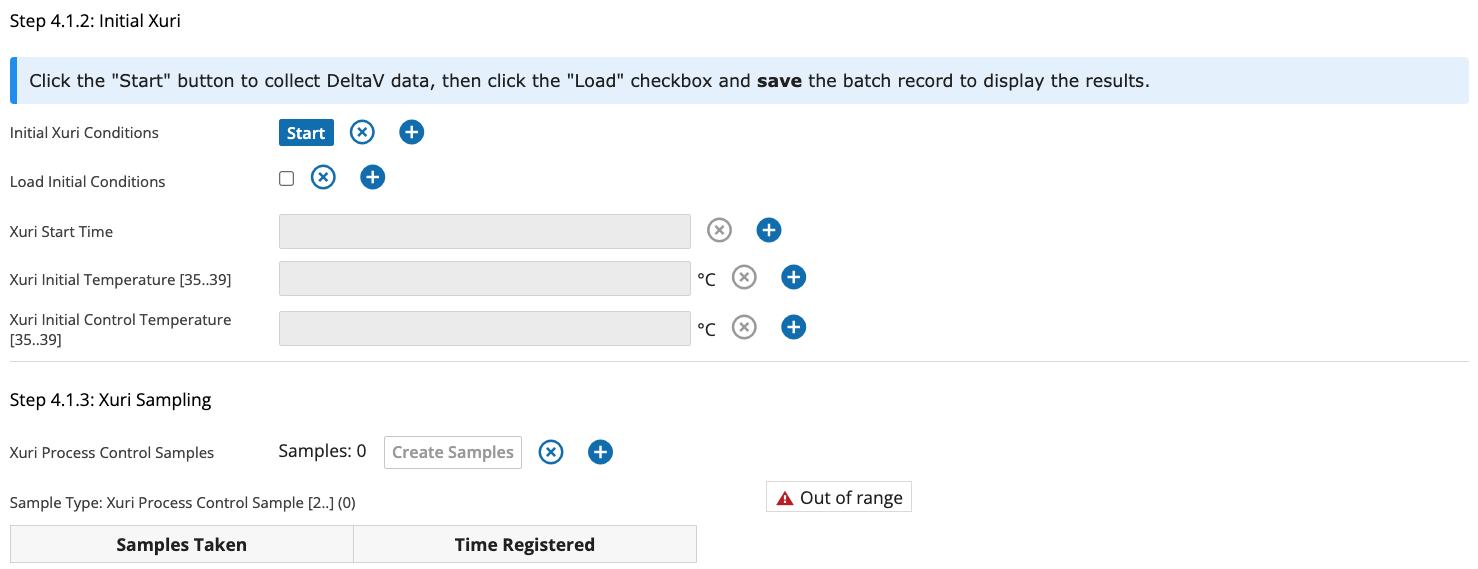
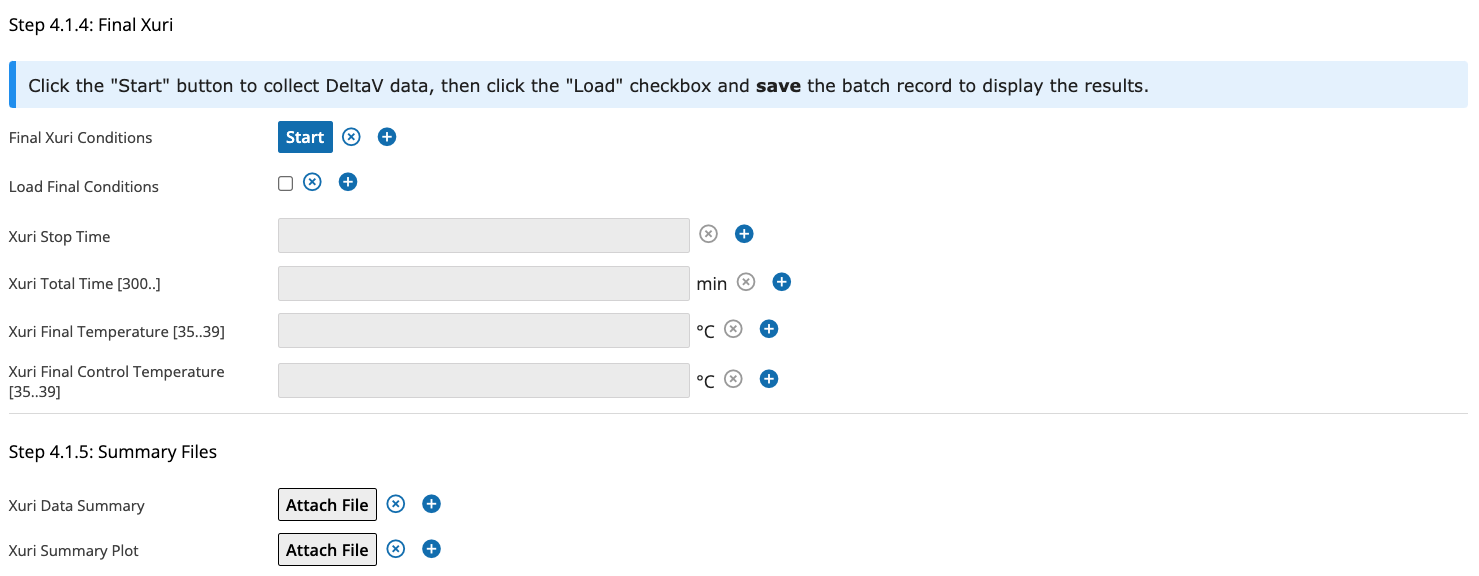
In the screenshots below, pay special attention to:
Sub-Steps and Sub-Step tables
Fields that are editable vs. read-only
Sample Types collected at Sample Points, and their min and/or max values
Min and/or max values for numeric fields and their Units of Measure
Restrict the
Xuri Kitfield to kits of this typeAdd two (2) fields for consumption of the following inventory items:
2 L CellBag
Position: immediately downstream of the
Xuri KitfieldName: 2 L CellBag
Sub-Step: Xuri Setup
Sub-Step table: Inventory
Valid Item Status:
Verified
500 mL T Cell Expansion Medium
Position: immediately downstream of the
2 L CellBagfieldName: 500 mL T Cell Expansion Medium
Sub-Step: Xuri Setup
Sub-Step table: Inventory
Valid Item Status:
Verified
Tip
When setting up Sub-Step tables and restricting Items to Kits, consider:
How do you add a field to a Sub-Step table using a Var Group?
What L7|ESP Expression will restrict Items to the Xuri Kit selected during Batch production?
Expression
Description
{{ [json_loads(entity_value('Field Name'))['uuid']] }}Used to reference a Batch Entity Type field.
{{ [json_loads(cell('Field ID', 'Protocol ID'))['uuid']] }}Used to reference a field in a Protocol by
ID{{ [json_loads(tagged_value(['tag']))['uuid']] }}Used to reference a field in a Protocol by
tag
Add a new Sub-Step named
Xuri Samplingwith the following Sample Point:Xuri Process Control Samples
Field position, name, and parameters can be taken from the screenshot below:

Add a numeric field named
Xuri Total Timeto theFinal XuriSub-StepThis field is a Critical Process Parameter (CPP)
Field position, unit of measure, and a min/max value can be taken from the screenshot below:

Create a new Signature Flow named Perform and Observe
Perform and Observe
Accept Reasons:
Performed byandObserved byReject Reasons:
ExceptionSignature 1
Signed by members of the
Manufacturing TechnicianRoleBlock progress until signed
Signature locks data
Signature 2
Signed by members of the
Manufacturing TechnicianRoleNominated by the previous signer
Note
The observer does not need to sign if the performer signs first. However, if the performer cannot sign in real-time, the observer must sign first and then nominate the performer.
How does the Signature Flow need to be configured to meet these requirements?
Add a new Sub-Step named
Signaturescontaining the Perform and Observe Signature Flow and Complete field
Important
Testing: Create a new Batch Record in the MES app to test these changes. Pin the CAR T Processing and Expansion Recipe once testing is complete.