Modeling Item Types and Vendors
Goals
Understand the relationship between Vendor, Item Type, and Item.
Understand design considerations and best practices for modeling Items.
Know how to create new Vendors and Item Types.
Key Terms
Term | Definition |
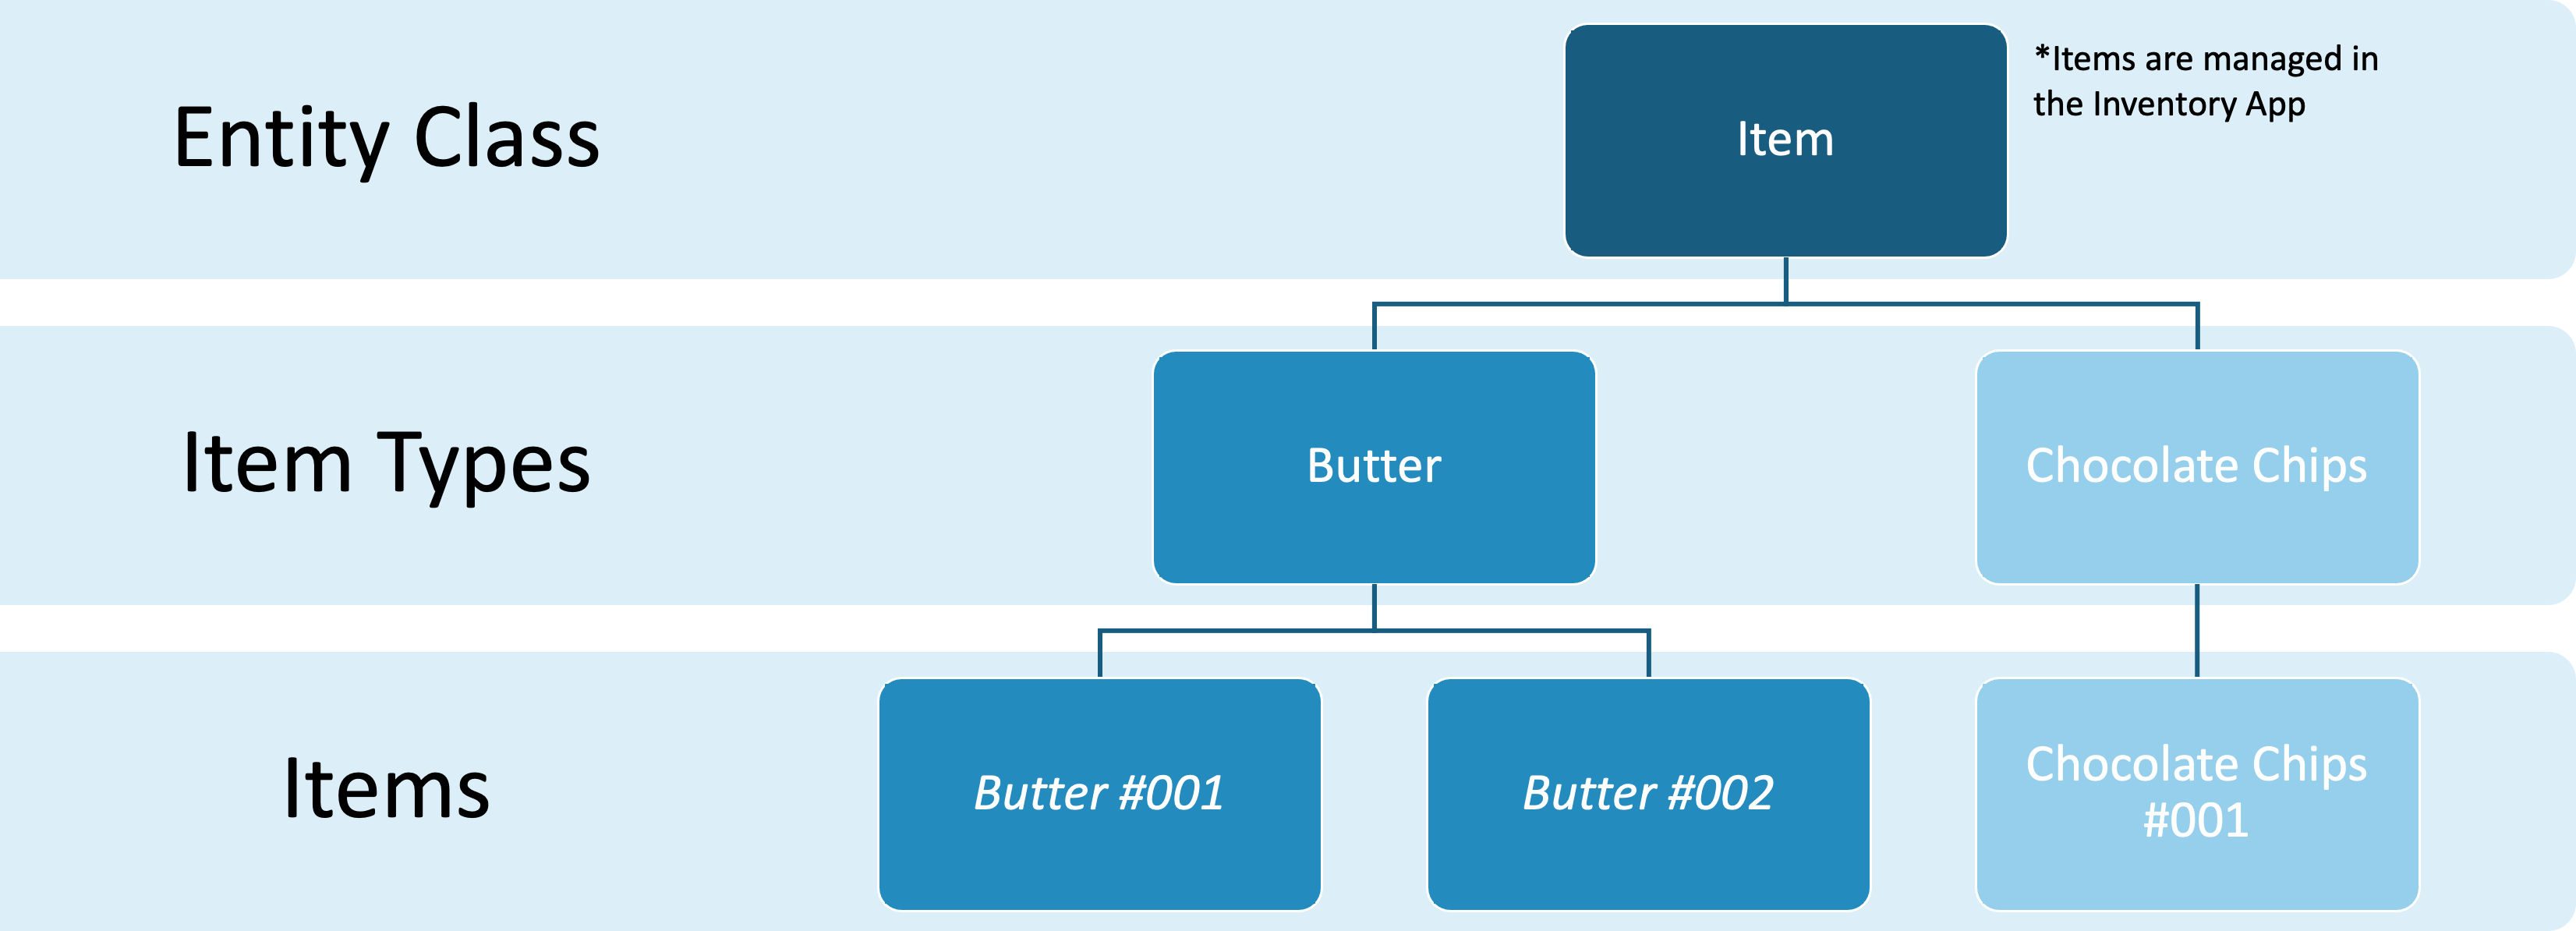
Item | A resource that is consumed as part of a business process. Items are instances, or occurrences, of Item Types. |
Item Type | Defines the attributes of an Item, including its type (consumable or reagent), units, custom fields, Vendors, and ID Sequences. |
Vendor | Person or place an Item is purchased. |
Terminology Relationship Diagram
What does an Item look like for an End User?
Items are created in L7 Inventory and grouped by Item Type.
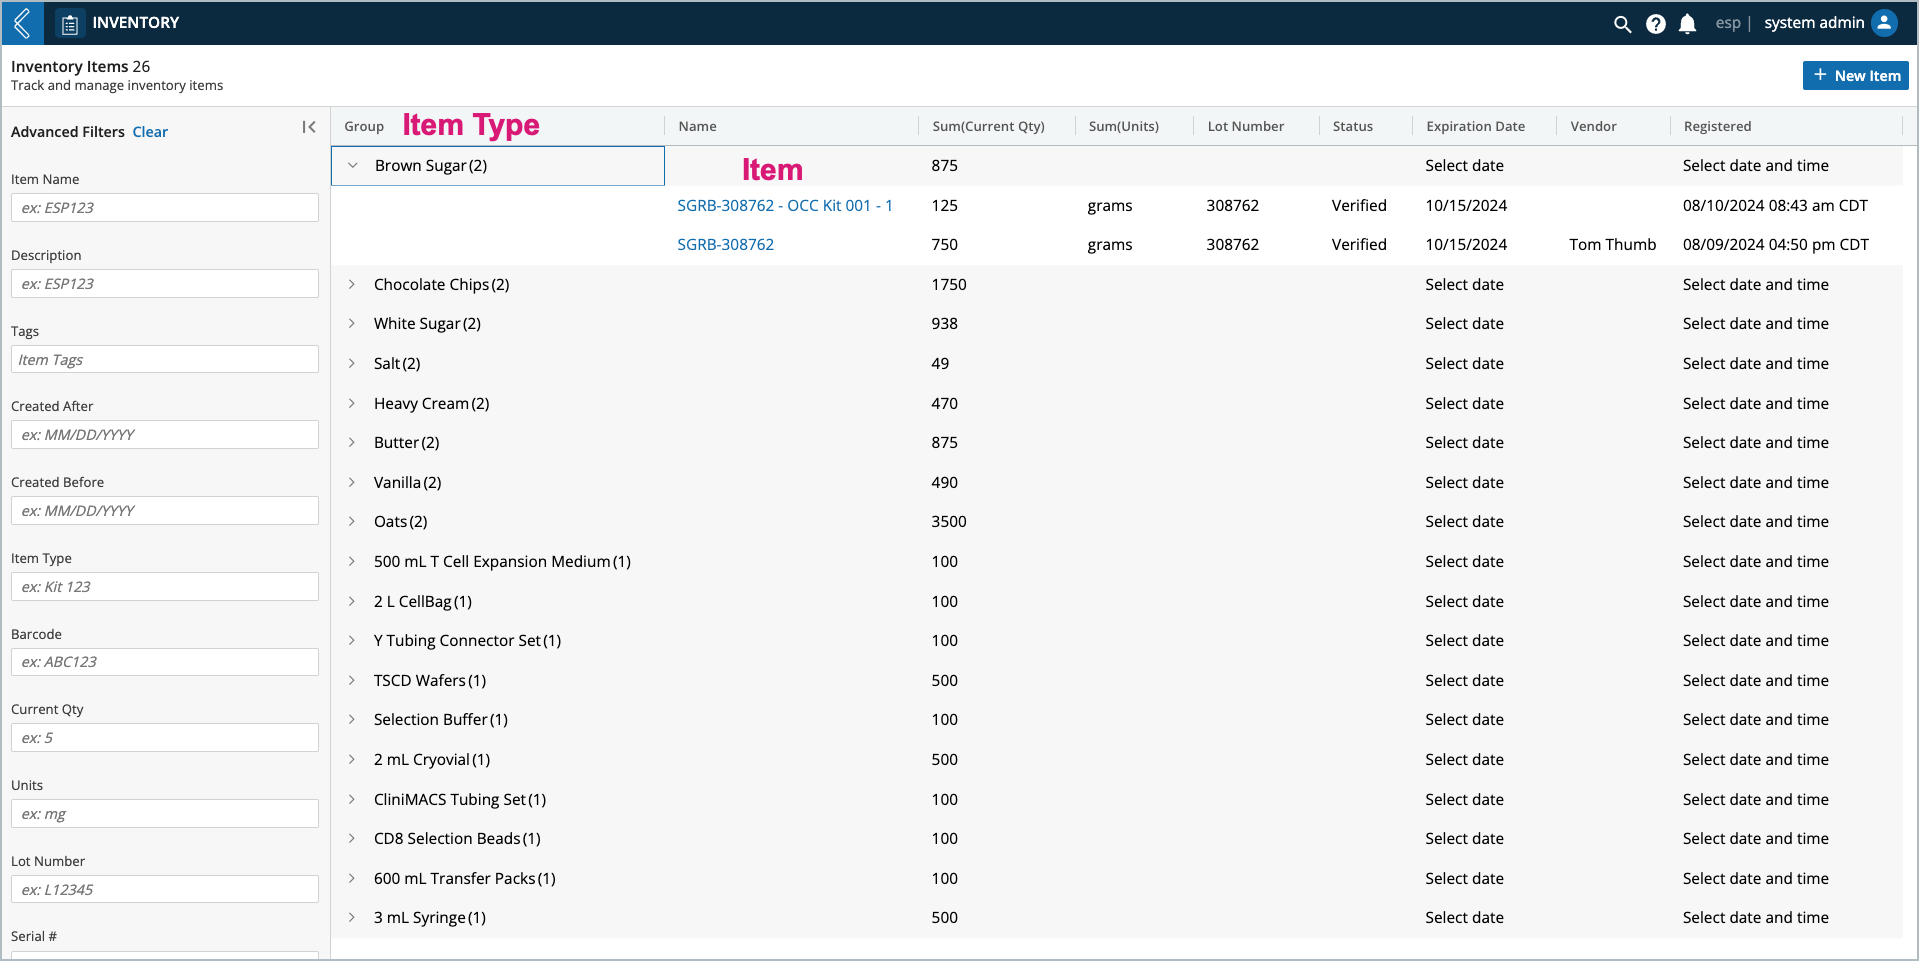
When an End User selects an Item, they see:
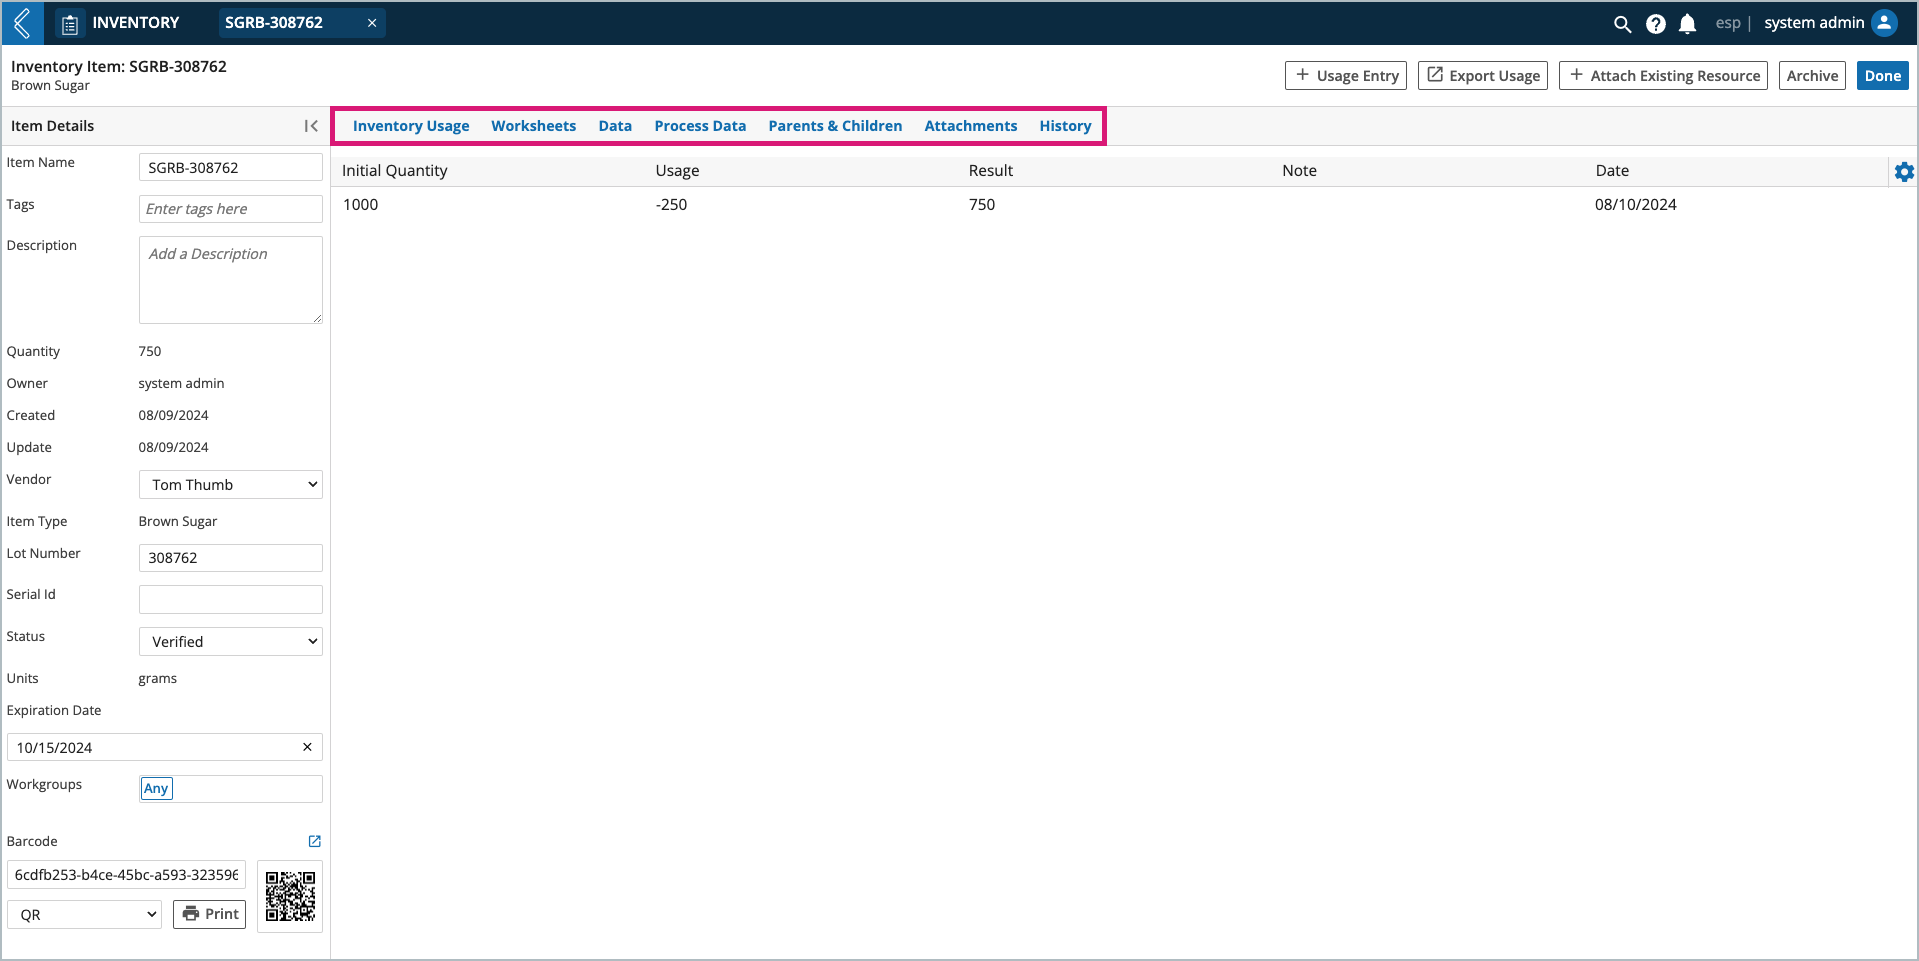
The Item’s usage history (Inventory Usage tab).
The Batches the Item is associated with (Worksheets tab).
The Item’s metadata (Data tab).
Production data associated with the Item (Process Data tab).
The Item’s relationship to other Entities (Parents & Children tab).
The files the Item is associated with (Attachments tab).
The Item’s history (History tab).
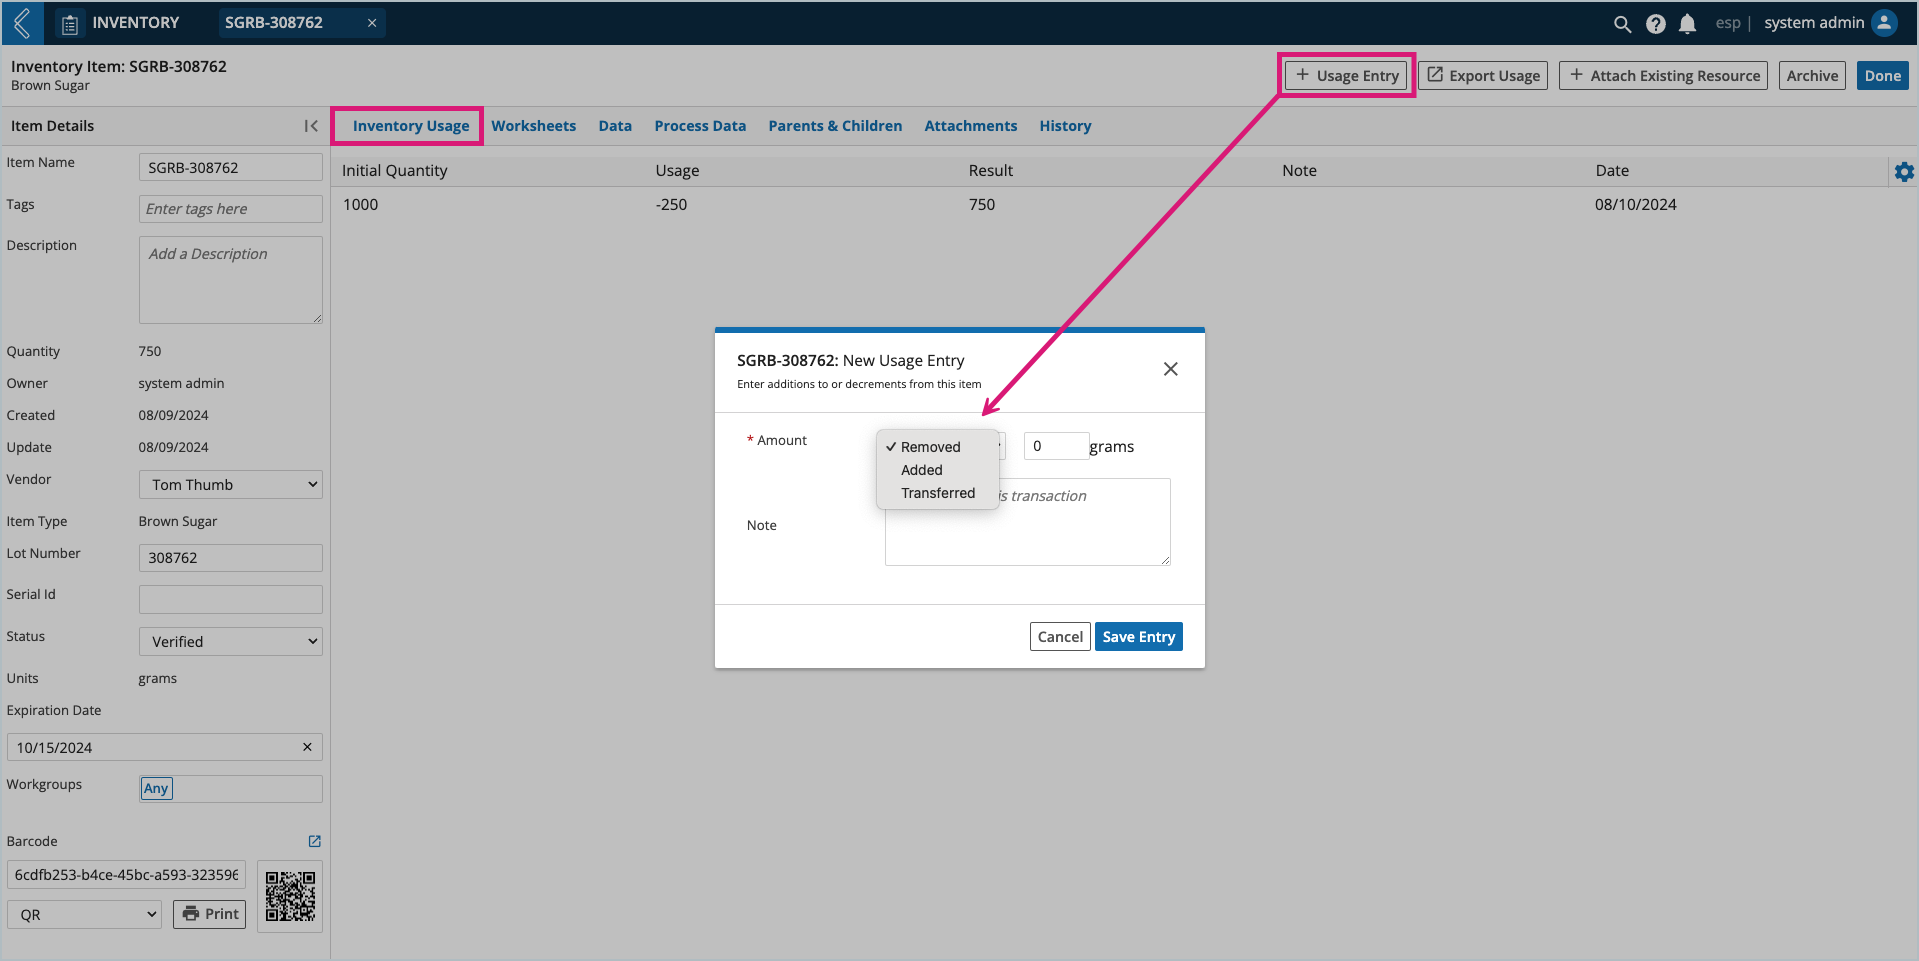
Quantity can be adjusted independent of a business process by adding a usage entry.
Note
L7|ESP will not warn the End User if the deduction results in a negative quantity.
Note
Protocols have a dedicated field for inventory item use.
This includes transferring some or all of an Item to or from another Item of the same type.
Transferring from another Item of the same type adds to the current Item’s quantity.
Transferring to another Item of the same type subtracts from the current Item’s quantity.
The corresponding addition/subtraction is also made to the other Item.
Tip
Transfers should be used to move Items from Kits back into available inventory.
L7|ESP will warn the End User if the transfer will result in a negative quantity.
How to Model Items
Items are created in L7 Inventory, then tracked and consumed in L7 MES. They can also be created at the end of a Batch when the Item is internally manufactured.
When to create a new Item Type:
If you have a consumable, reagent, or kit component that you wish to track and/or consume as part of a business process.
If two (2) Items have different units.
If two (2) Items have different custom fields.
Design Considerations:
How will this type of Item be consumed?
Consumables and kit components can only be consumed in whole number quantities.
In what units will this type of Item be consumed?
Is there any data that needs to be attributed to this type of Item?
How will this data be collected?
Where can this type of Item be purchased?
Will this Item be added to a Kit?
Do you want to add a "Catalog #" column to the Kit Summary report?
Do you want to replace the "Items" column with "Critical Reagents" and "Critical Supplies" groupings in the Kit Summary report?
Will this type of Item be created at the end of a Batch?
What sequence format should be used to name these Items?
Are there legacy Items that need to be migrated into L7|ESP?
How to create new Item Types
Go to: L7|Master → Item Types → + New Item Type
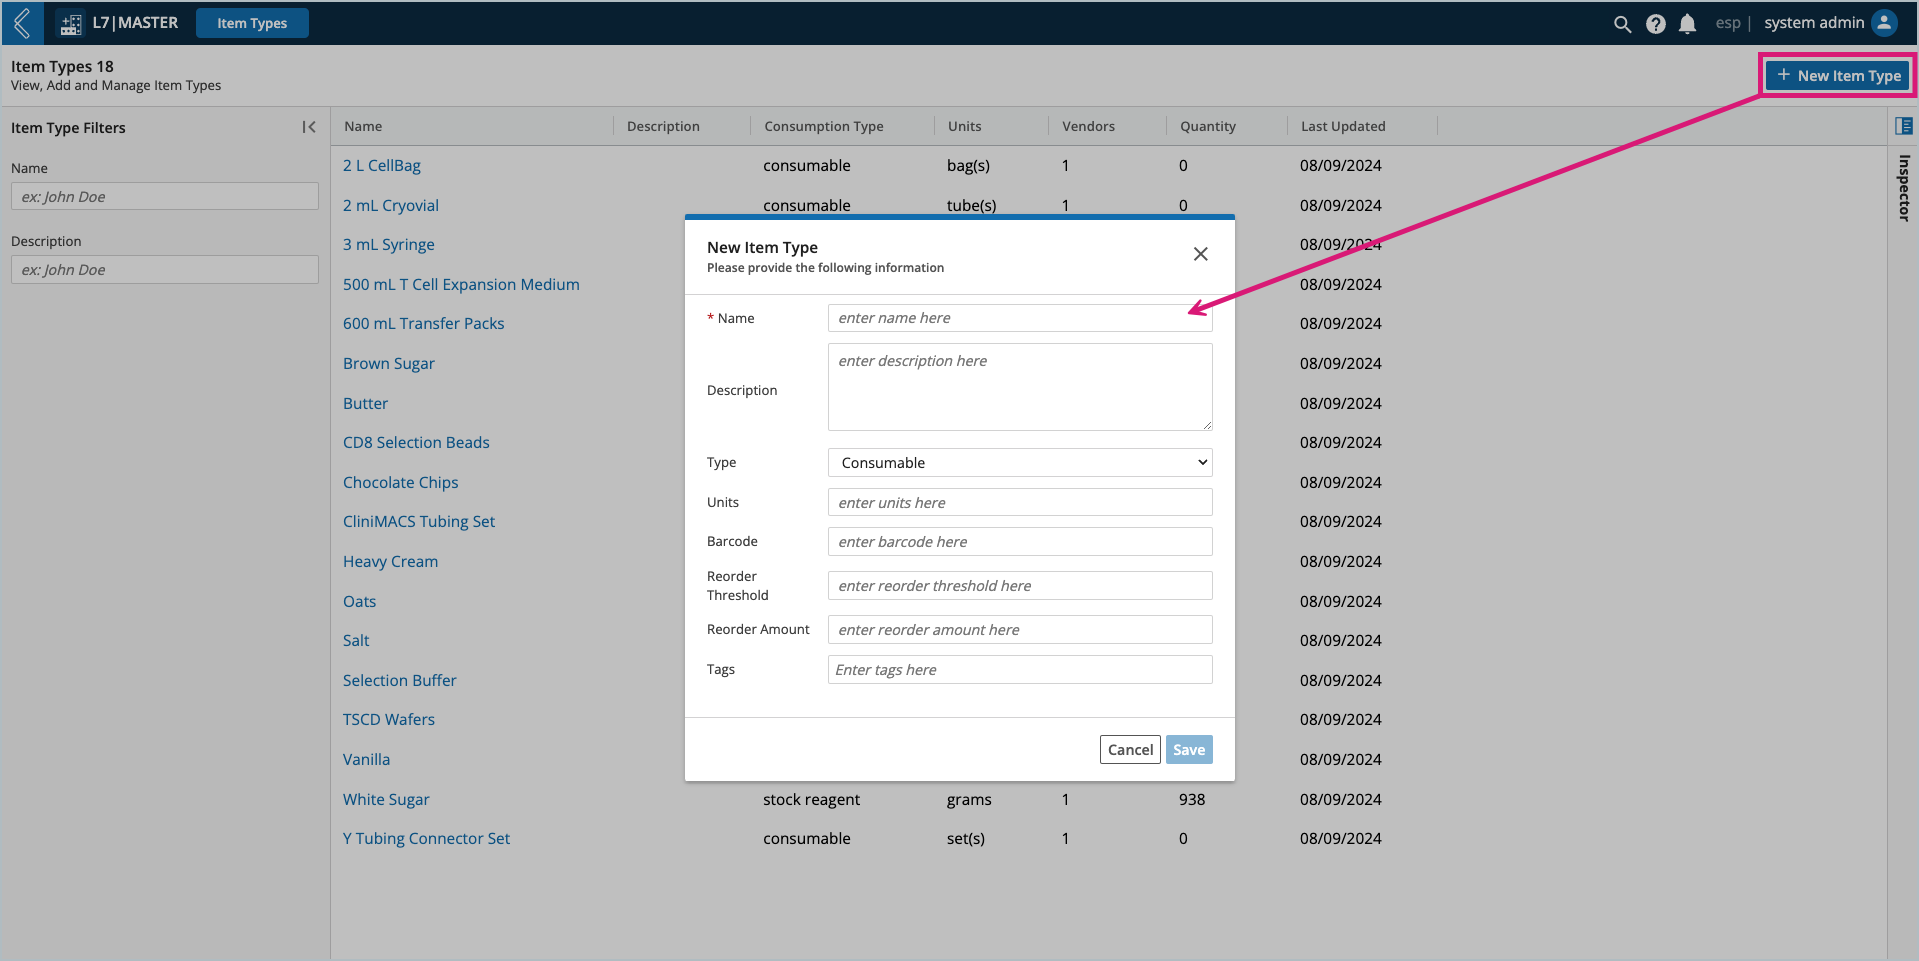
Type – options include:
Consumable – Items that are consumed in whole number quantities.
Stock reagent – Items that are consumed in decimal quantities.
Kit component – Precursor to formal Kit support; consumables and stock reagents can both be added to Kits.
Note
Type cannot be changed after the Item Type has been created. If a mistake is made, archive the Item Type and create a new one.
Units – quantity consumed (e.g., µL, mL, g).
Barcode – primarily used for Universal Product Codes.
Note
Each individual Item created in L7 Inventory will have its own unique barcode.
Reorder Threshold – when the sum of all Items in the group is less than or equal to this value, the Item Type and its current quantity will appear in the “Items Requiring Reorder” Dashboard widget.
Reorder Amount – the quantity that should be reordered once the Reorder Threshold is met.
Warning
Orders cannot be placed in L7 Inventory. L7|ESP does not manage financial transactions.
How to add Vendors to Item Types
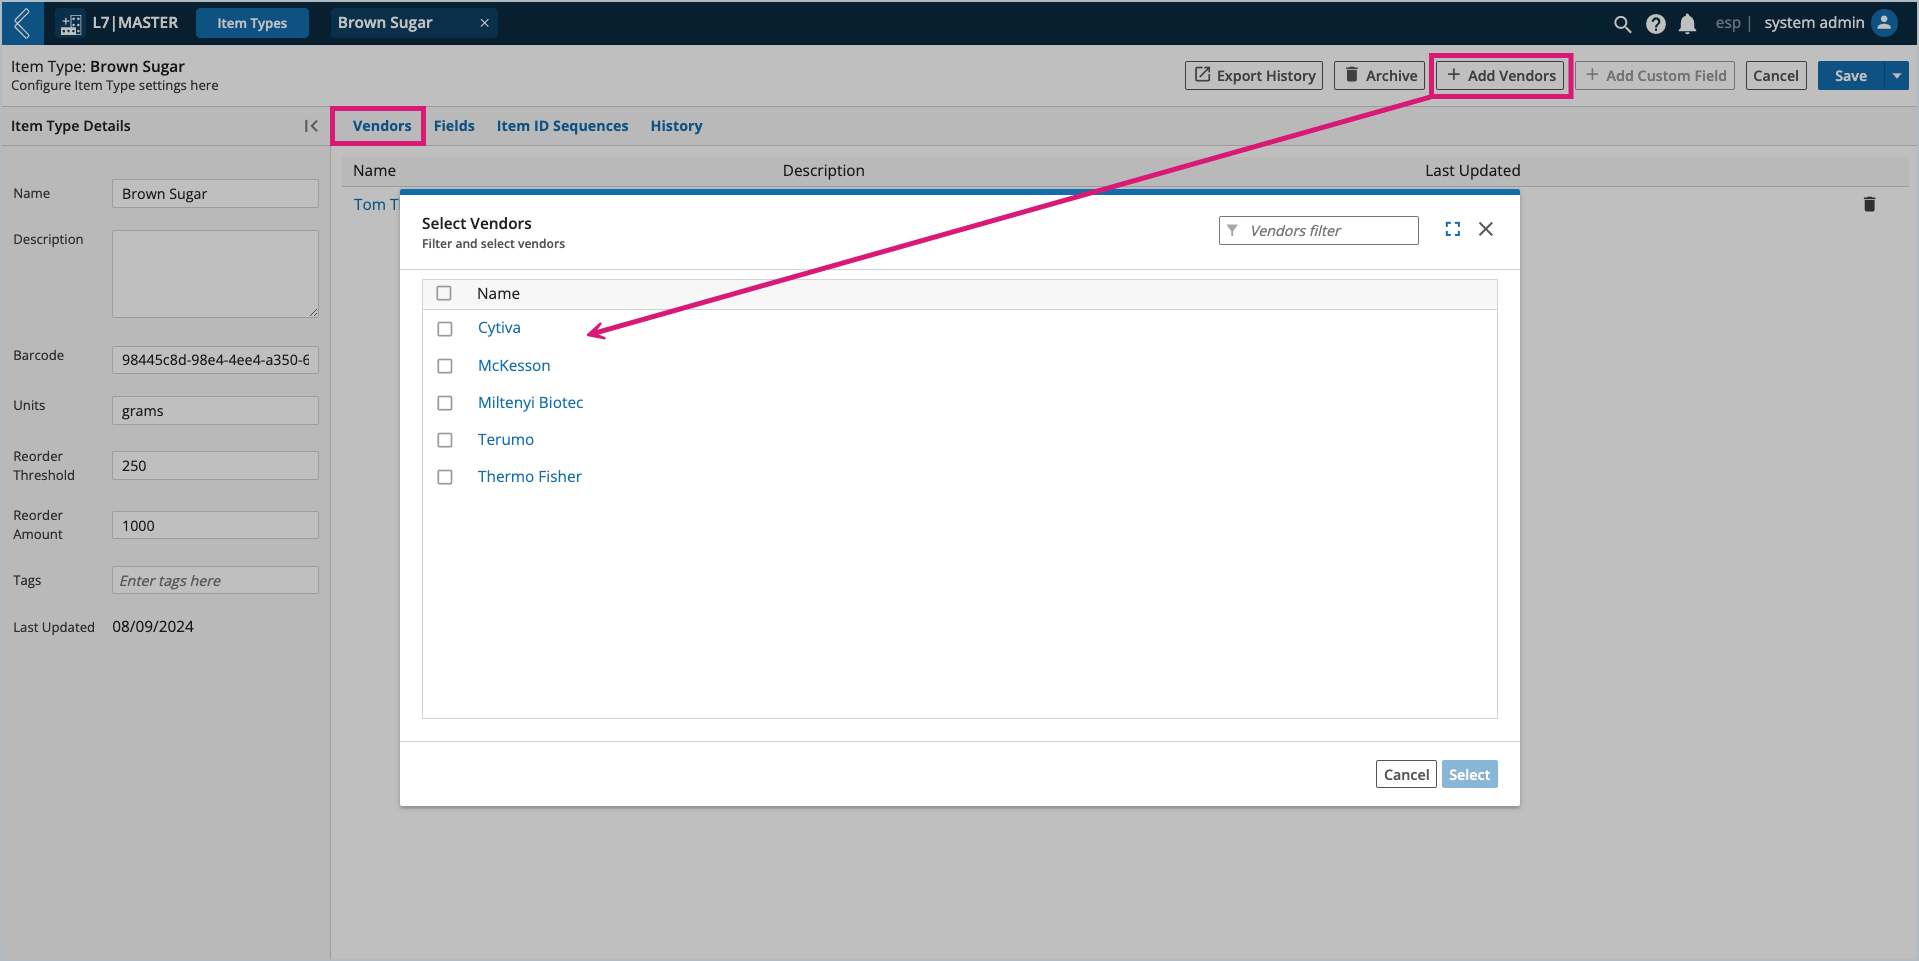
Go to: L7|Master → Item Types → select the Item Type → Vendors tab → + Add Vendors
Note
Vendors are a separate data model in L7|ESP, and must already exist before they can be added to an Item Type.
How to create new Vendors
Go to: L7|Master → Vendors → + New Vendor
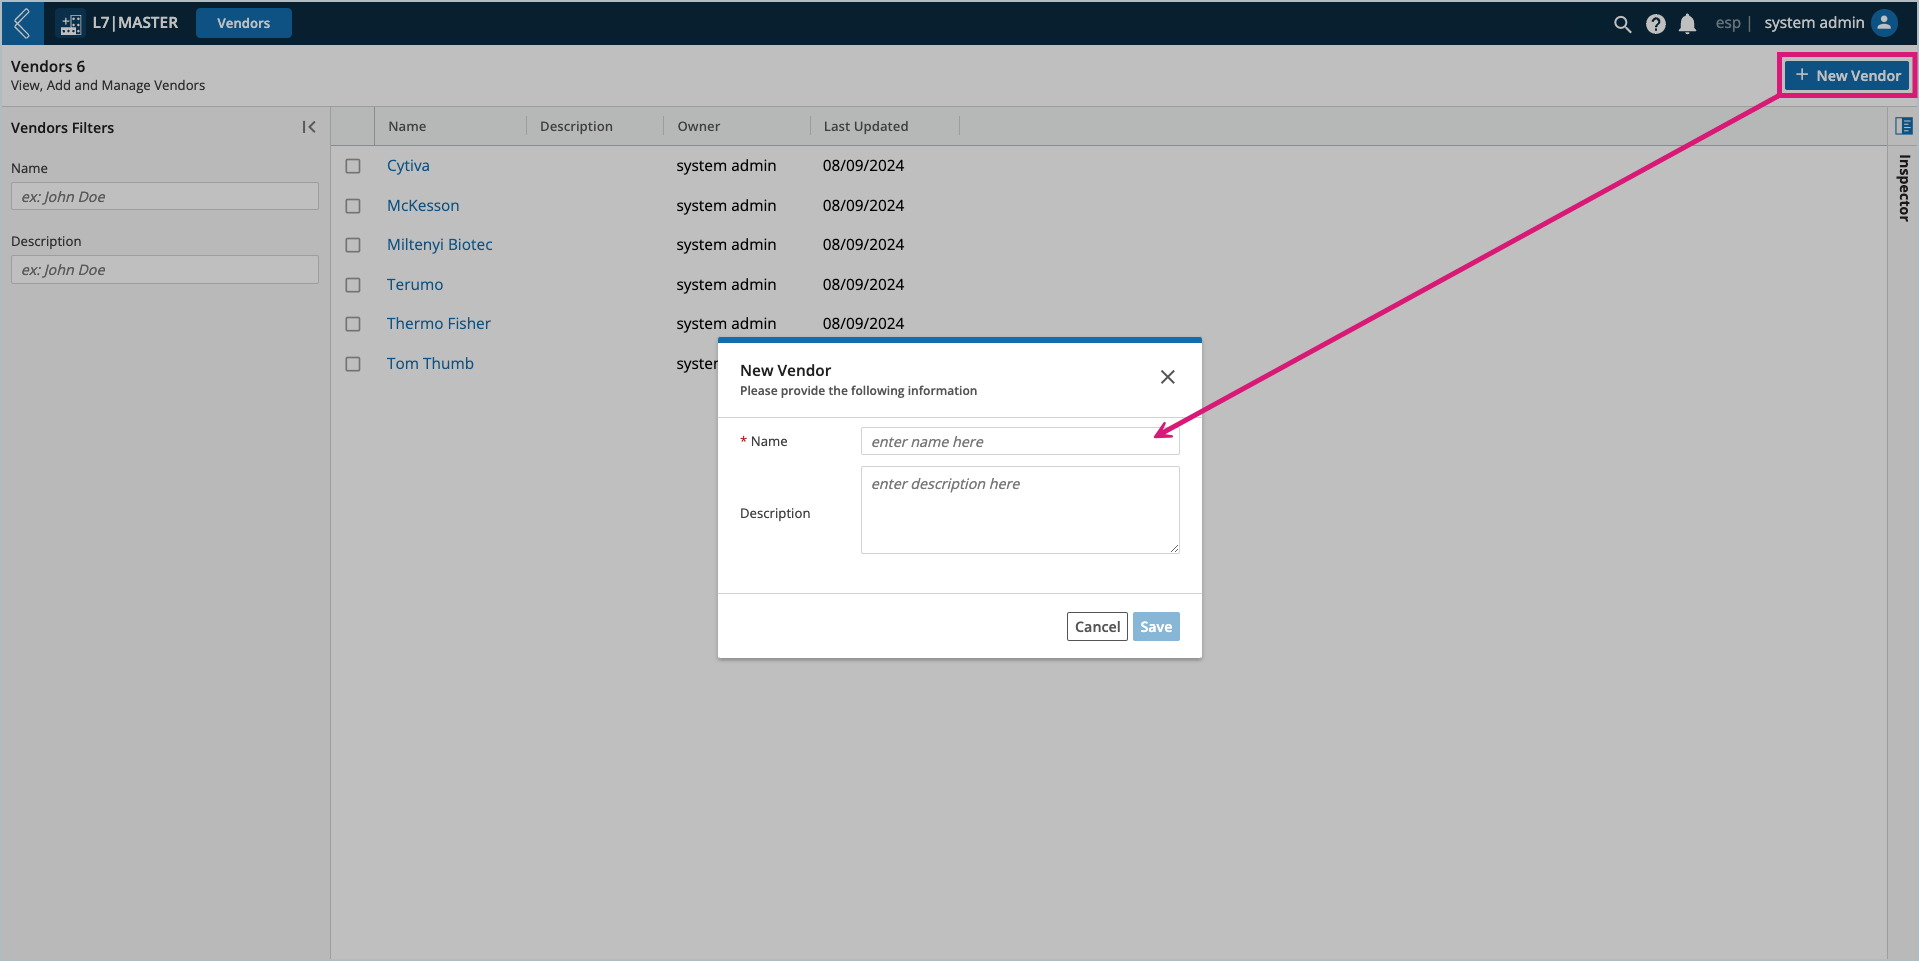
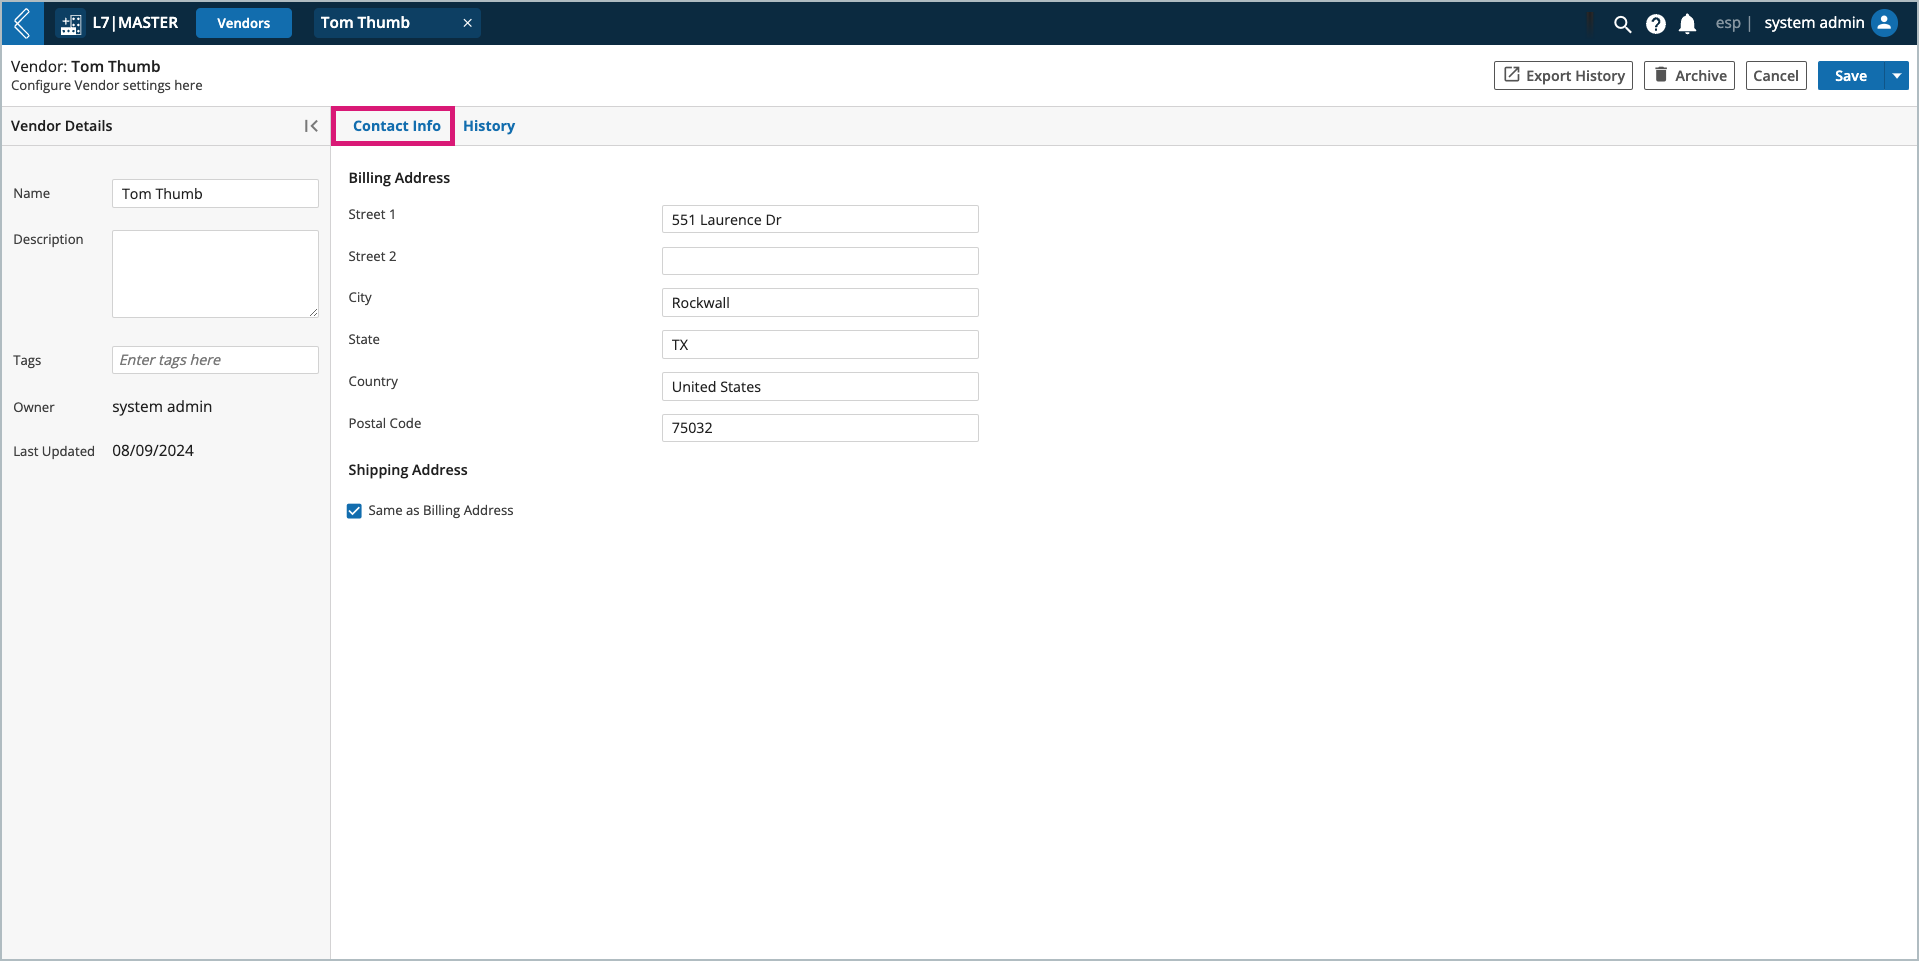
Once the Vendor has been created, select its Name to add an optional Billing and Shipping Address.
How to add custom fields to Item Types
Go to: L7|Master → Item Types → select the Item Type → Fields tab → + Add Custom Field
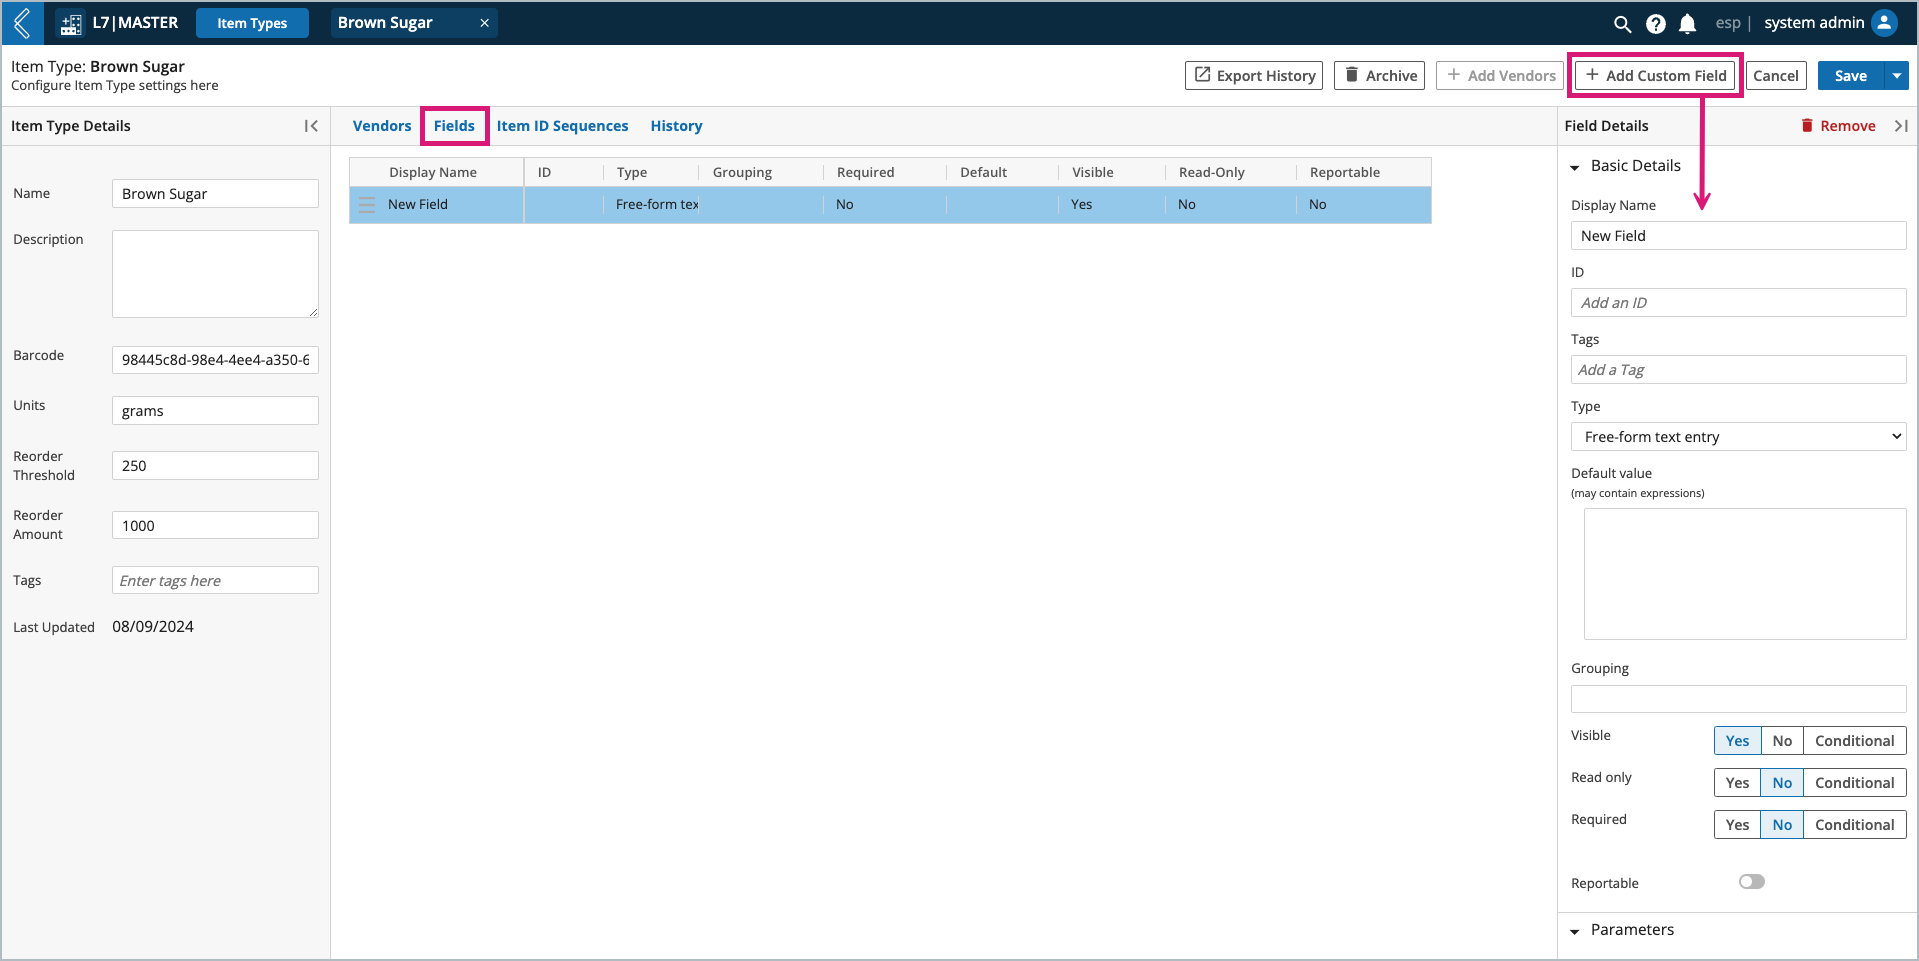
This process is the same as adding custom fields to Entity Types.
How to add Item ID Sequences
Item ID Sequences are created and managed in L7 Configuration, and only apply to Items created in a Sample Protocol.
Note
Item ID Sequences are added to id_sequences → item in the esp Configuration.
Refer to Configuring ID Sequences for more information.
How to modify a Kit Details summary report
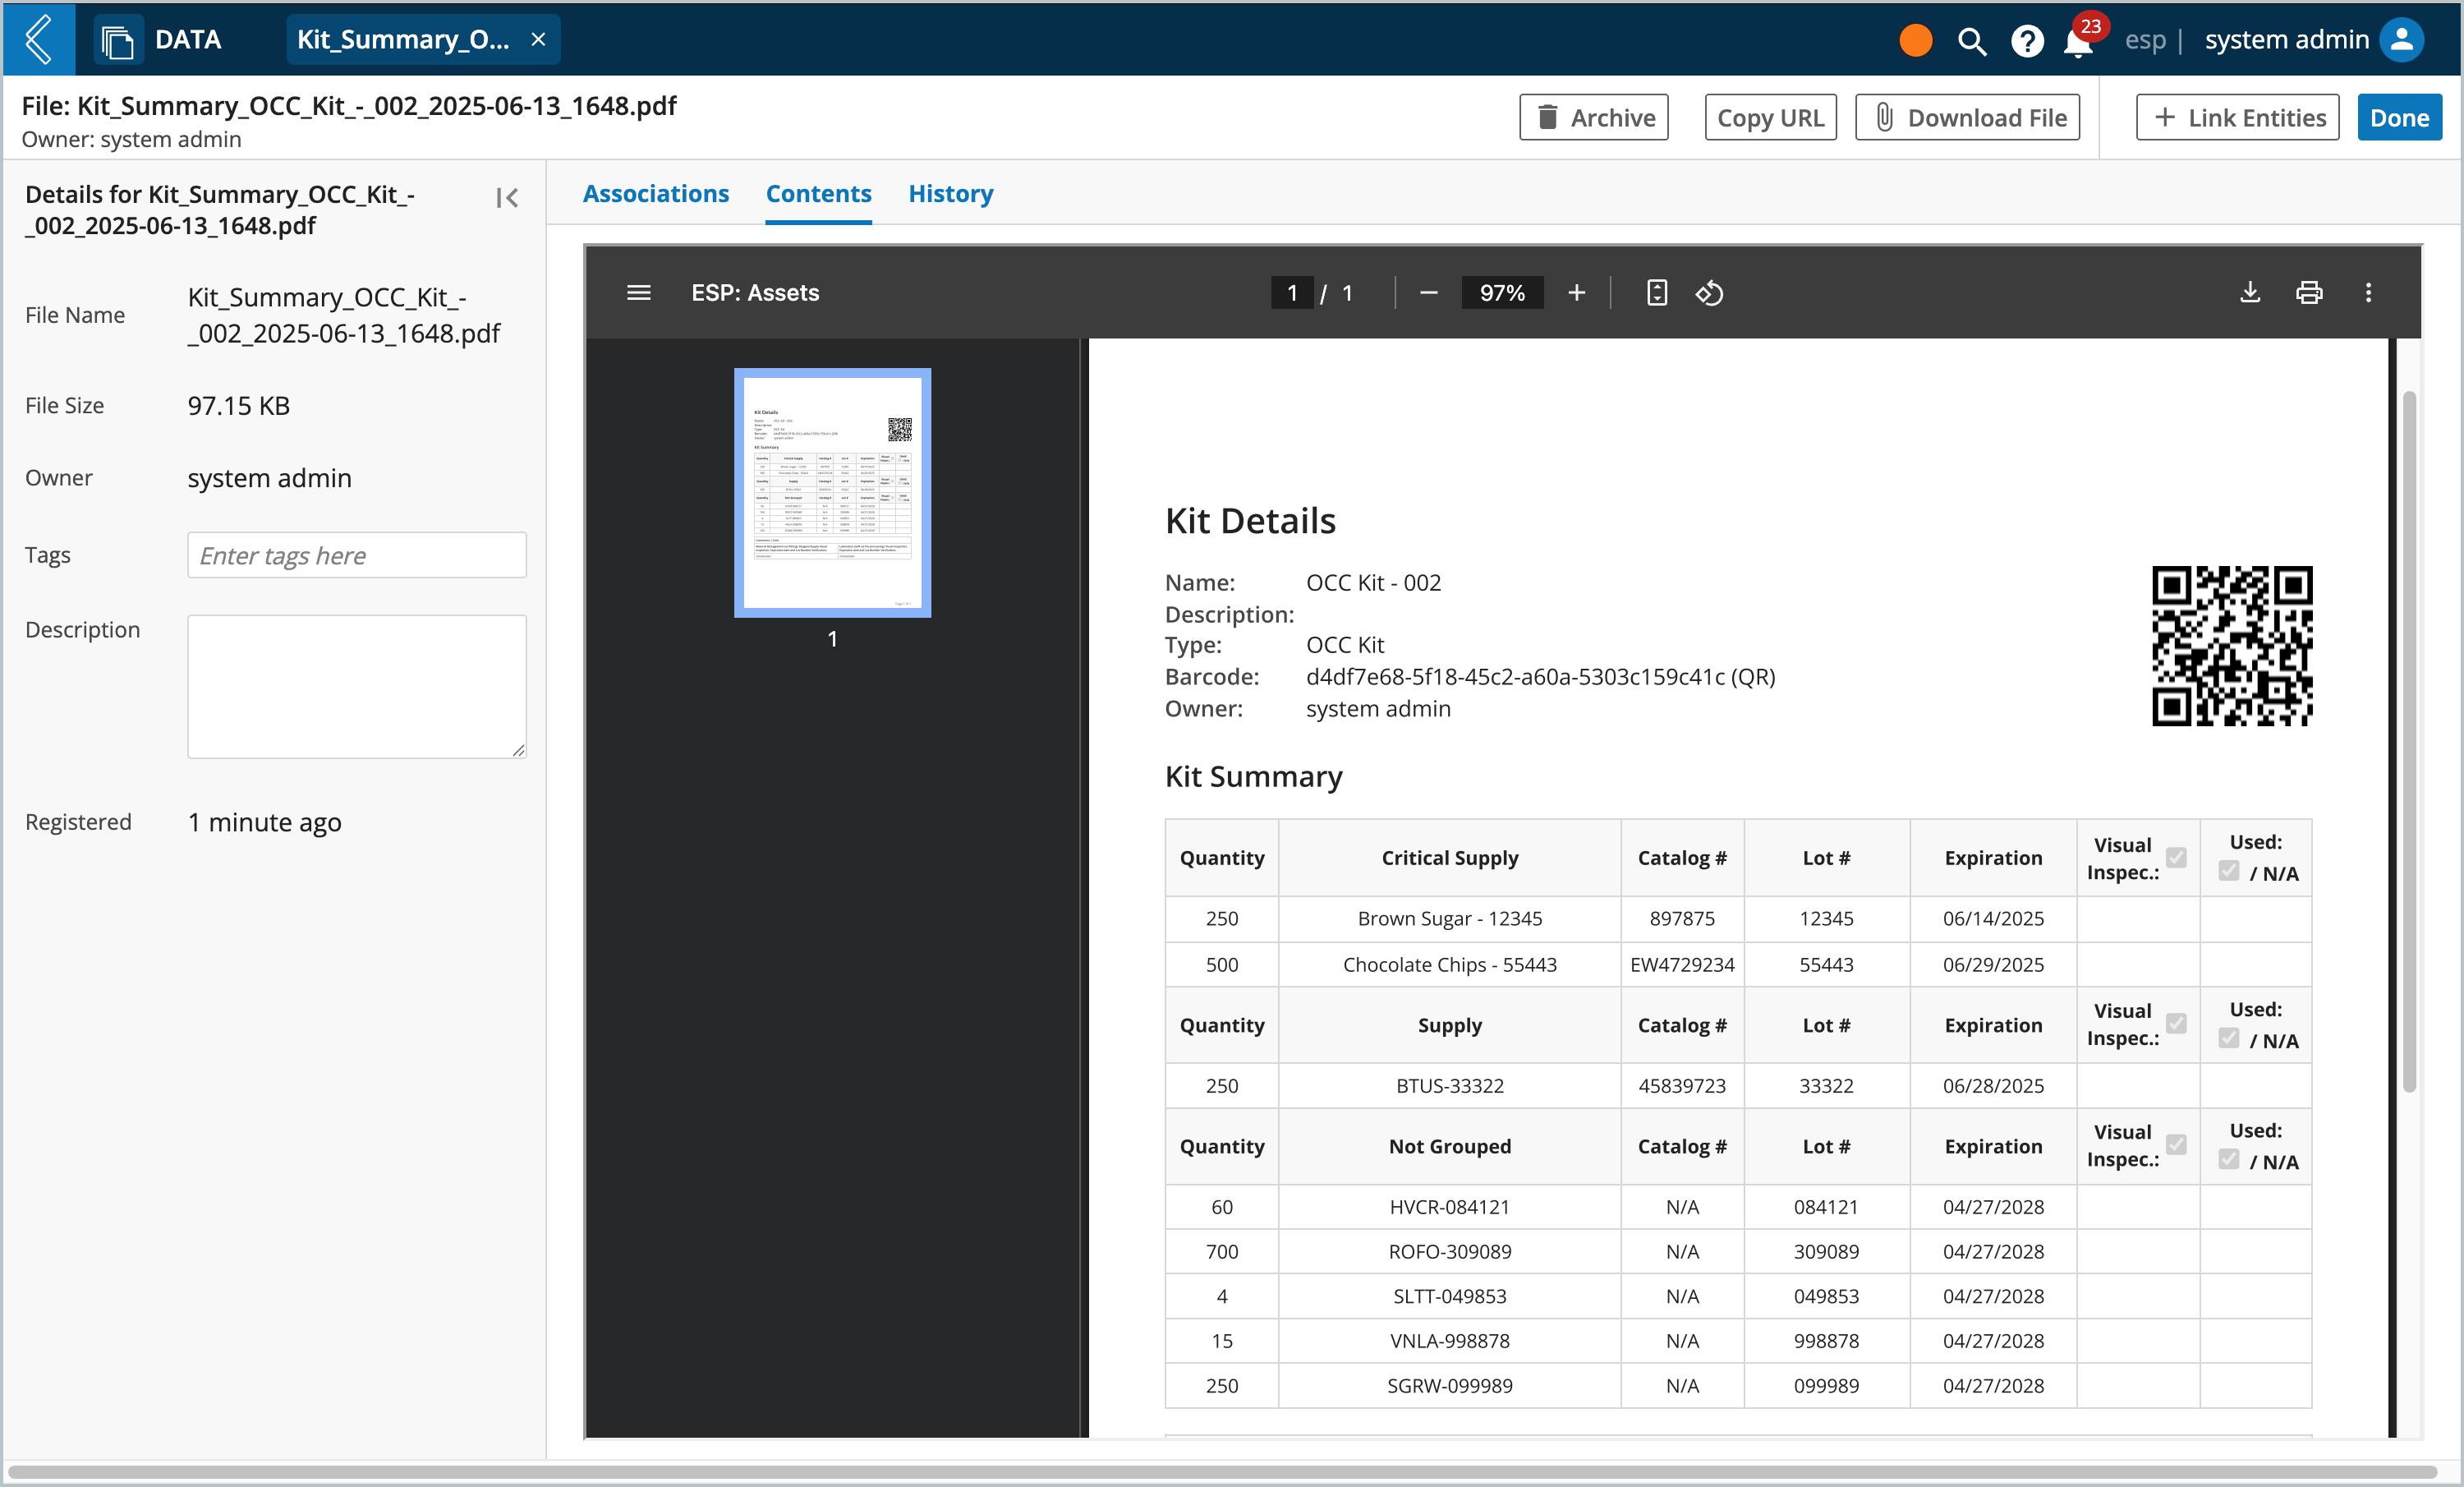
When Items are stored in Kits, you're able to print a summary report of the kit's contents. By default, all Items will be listed in a column named "Items". However, you can add a custom field to the Item Types named "Grouping" that will replace the "Item" column name with the respective options and a "Catalog #" column may be added to the report as well. These fields must also have the "reportable" toggle enabled.
Note
When Items have an assigned "Grouping", then they will be organized by their group on the report. If an Item does not have an assigned group, then they appear in the "Not Grouped" category.
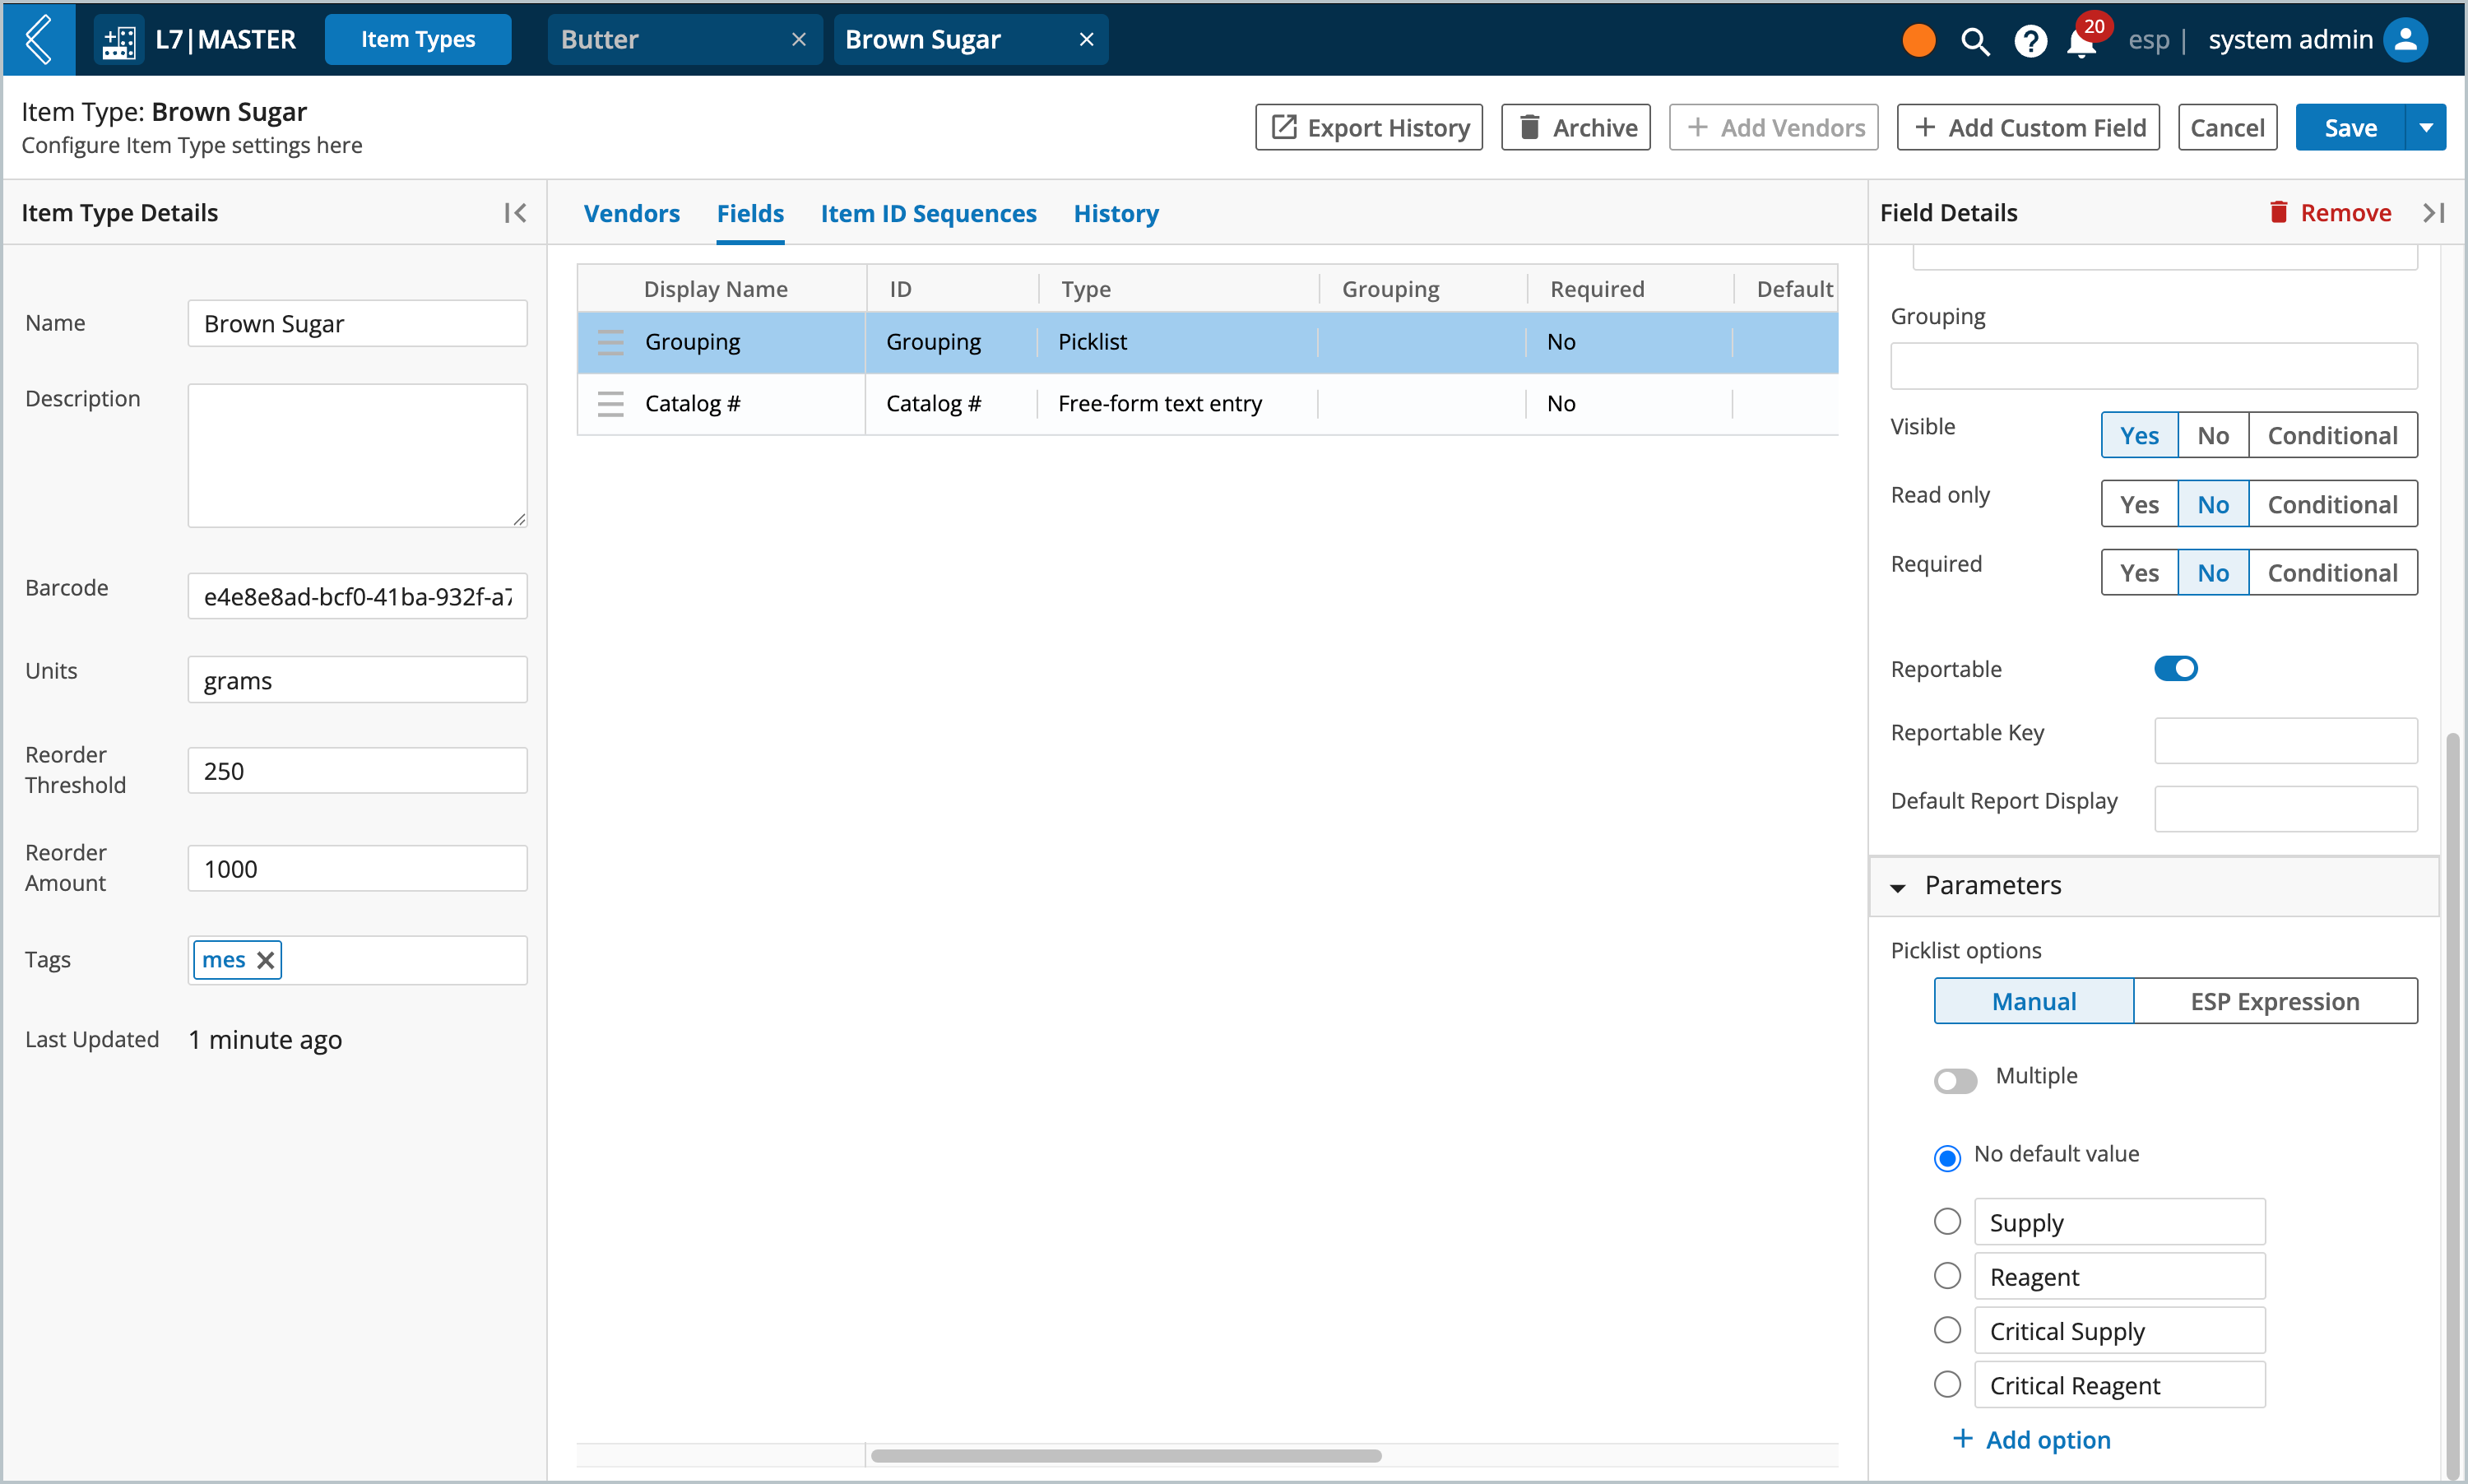
Adding a "Grouping" field will be replace the generic "Items" column with new headings that organize Items by their selected picklist options in the Kit Summary report.
Go to L7|MASTER's Item Type builder
Select an Item Type
Click the Fields tab
Click + Add Custom Field
Enter Grouping as the Display Name and ID name
Select picklist as the field Type
Enter the grouping options by (i.e., Critical Reagents and Critical Supplies)
Click Save
Tip
If a given Item Type will always have the same "Grouping" value, then apply a Default Value.
Free-form text entry fields are also allowed, but using a picklist and/or Default Value are best practice as it standardizes the format of data capture.
Adding a "Catalog #" field to the Item Type will add a "Catalog #" column to the Kit Summary report.
Go to L7|MASTER's Item Type builder
Select an Item Type
Click the Fields tab
Click + Add Custom Field
Enter Catalog # as the Display Name and ID name
Select Free-from text entry as the field Type
Click Save
To make sure your new fields are working properly, you will need to register new items, record their Grouping and Catalog #, add them to a kit, then generate the summary report.
Go L7 Inventory
Click + New Item
Register the new Item
Go to the Item's details page
Click the Data tab
Select a Grouping option
Enter a Catalog #
Click Done
Go to L7 Assets
Click the Kits tab
Click + Kits
Register the new kit
Click + Add to add the item to the kit and enter a quantity
Click Print Summary
Go to L7 Data app
Click the file name (it will start with "Kit_Summary_" followed by the kit name and the date created)
Click the Contents tab
Review the report
Naming considerations
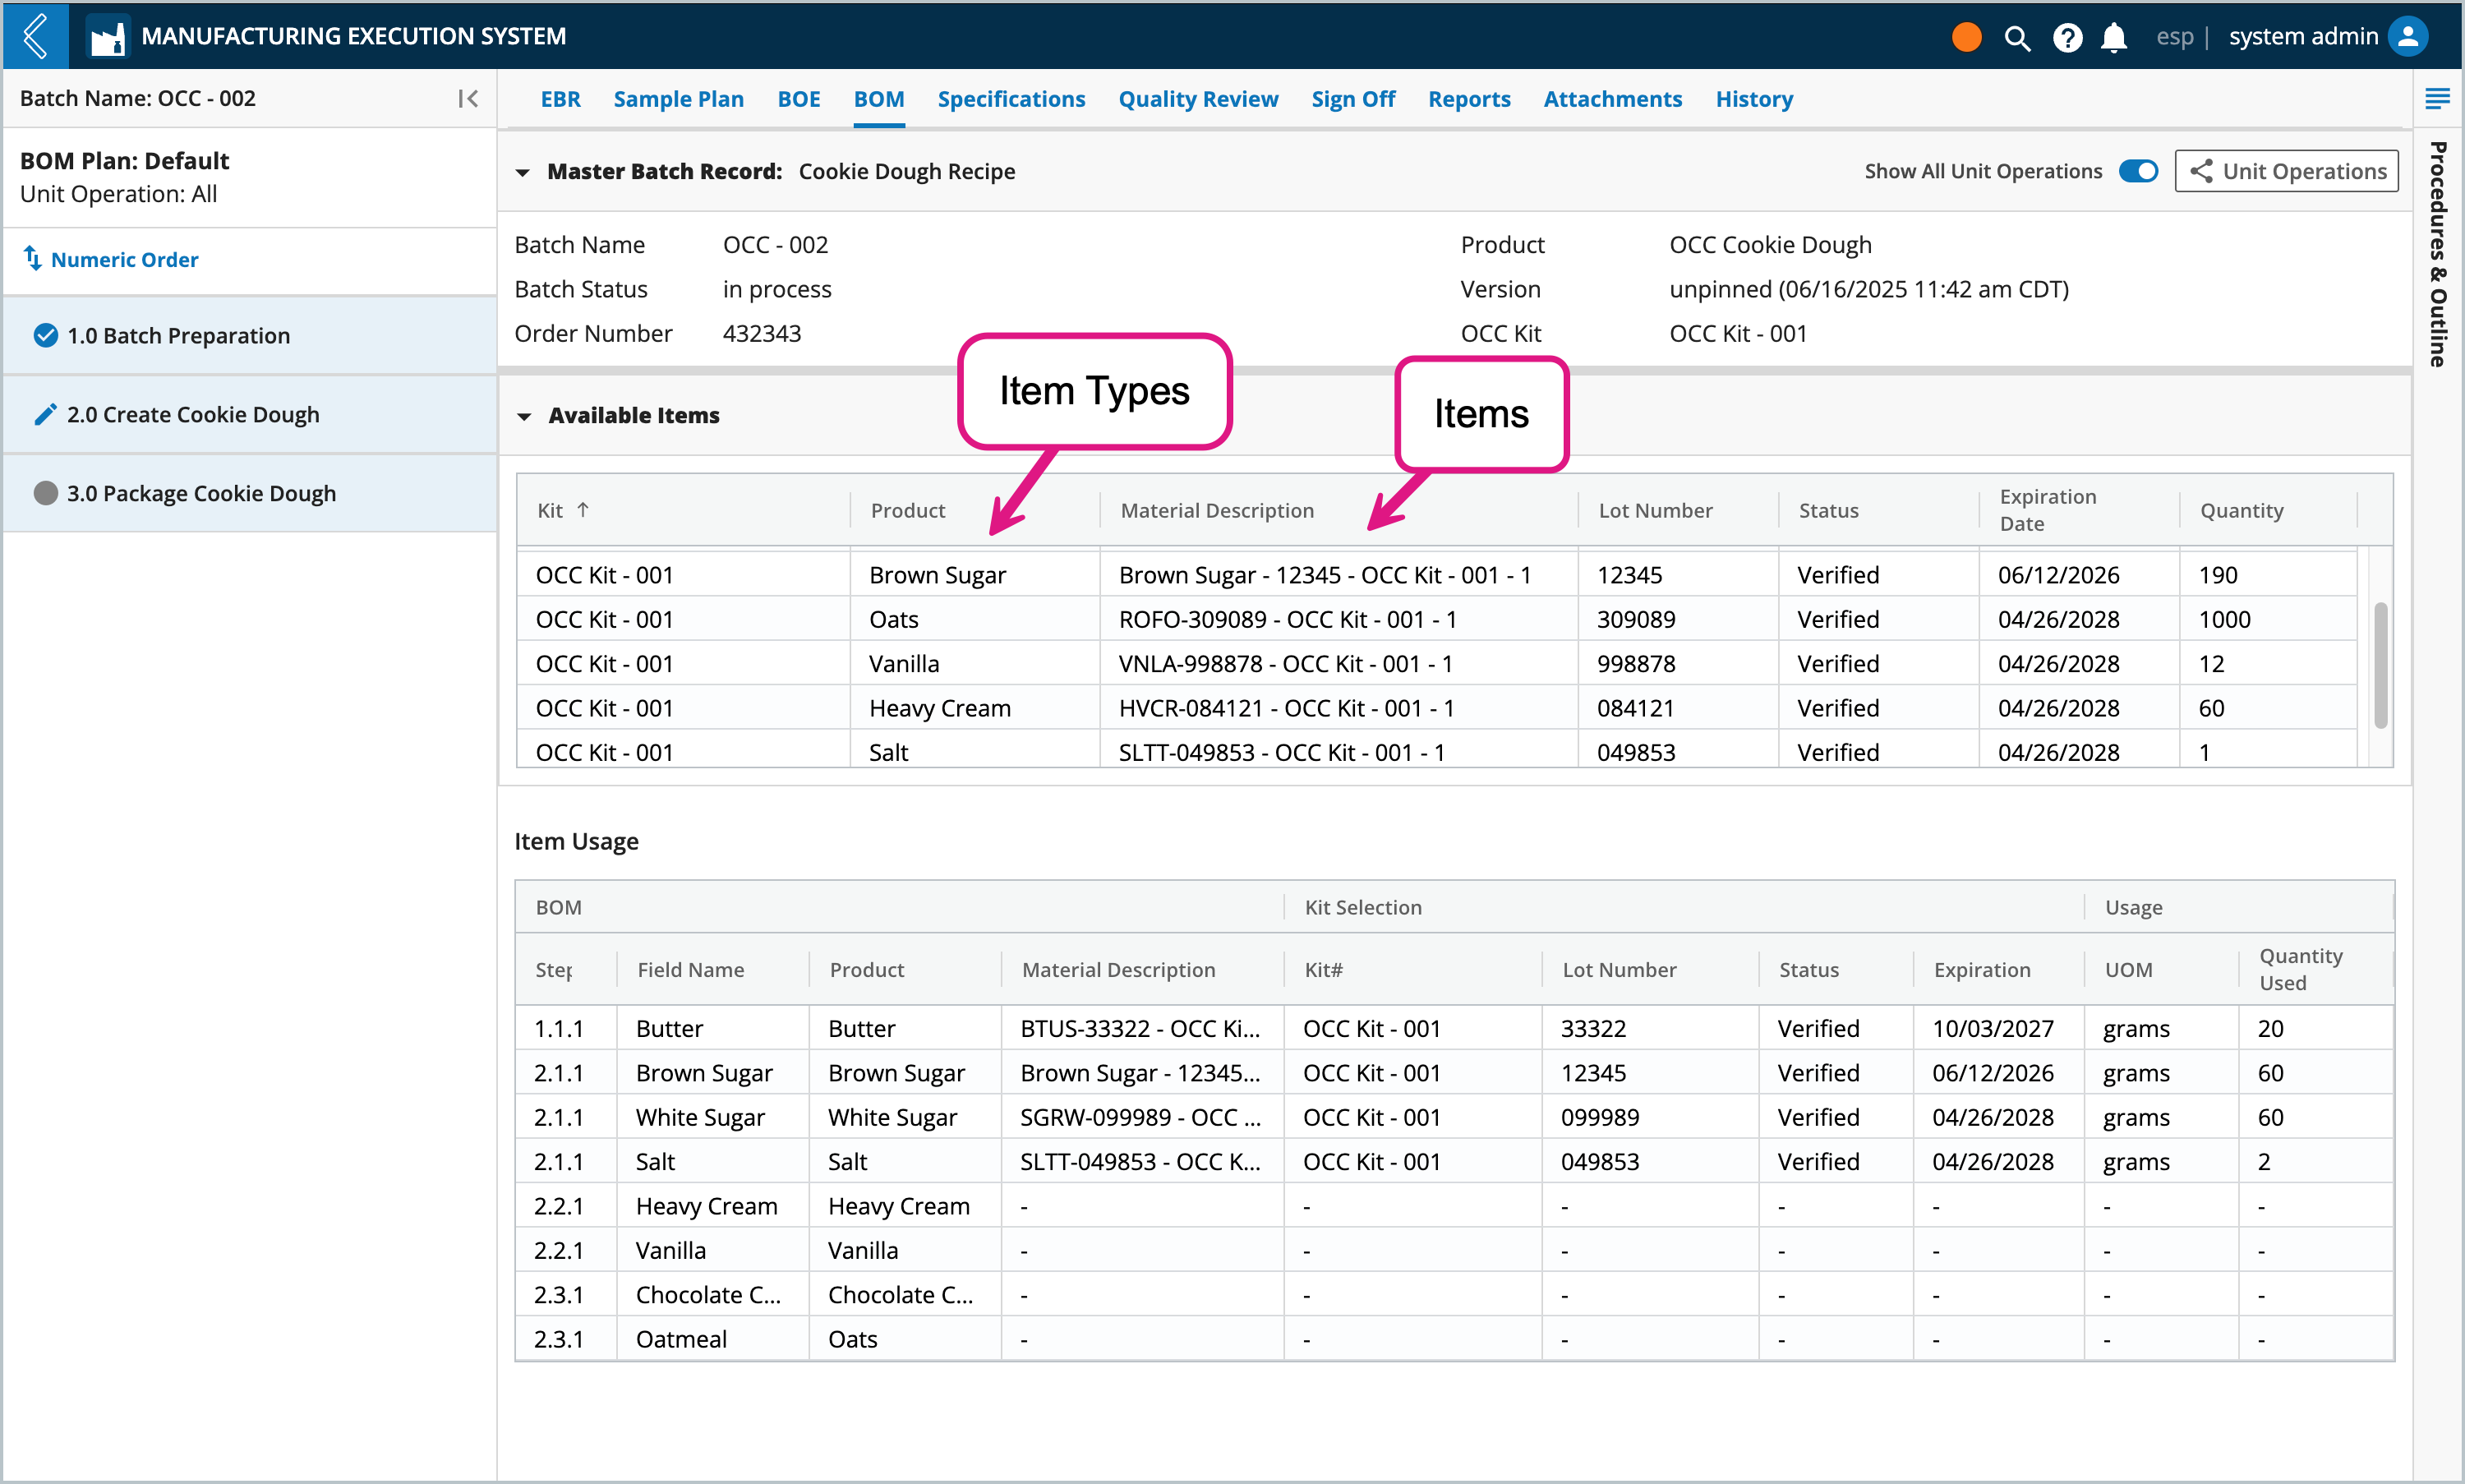
Take consideration when naming Item Types in L7|MASTER and Items in L7 Inventory, as these names will appear in the BOM tab and BOM report.
Transferring an Item to a Kit with a specified quantity creates a coalesced resource in L7 Inventory, which can then be tracked and consumed in L7 MES.
The name of this coalesced resource is a combination of the Item, Kit, and its position (dimension label) in the Container. It is referred to as the “Material Description” in the BOM tab and BOM report.
The “Product” is the Item Type in L7|MASTER the Item is derived from.
Managing Item status options
By default, Items can have a status of verified, expired, missing, recalled, quarantined, and pending verification. You can customize status options in the statuses configuration file in L7 Configuration, see Configuring Resource Statuses to learn more.