Modeling Unit Operations as Procedures
Key Terms
Term | Definition |
|---|---|
Procedure (Unit Operation) | An ordered chain of Workflows comprised of single-Protocols, sometimes referred to as a Protocol Chain. |
Workflow Chain (Recipe) | Ordered collection of nodes (Workflows and/or Procedures), representing an end-to-end business process. |
Node Library | When creating a Procedure, the Node Library displays a list of all Workflows containing a single-Protocol registered in the system. |
Node | When creating a Procedure, a node is the visual representation of a Workflow containing a single-Protocol |
Transition Strategy | Determines which Entities will transition to the next Workflow in the Procedure |
Transition Rule | Determines when Entities will transition to the next Workflow in the Procedure |
What are Procedures?
Procedures are an ordered collection of Workflows that each only contain a single Protocol. Procedures are used to represent Unit of Operations that require the ability to loop and branch at the Protocol level, rather than being confined to the Workflow level.
After creating a Procedure, you can add it to your Workflow Chain recipe(s). Once added to an L7 MES Workflow Chain and instantiated in L7 MES as a batch record, the name of the Procedure (the node's Display Name) will appear as a Unit of Operation, and each Protocol's Display Name will appear as the Step's name.
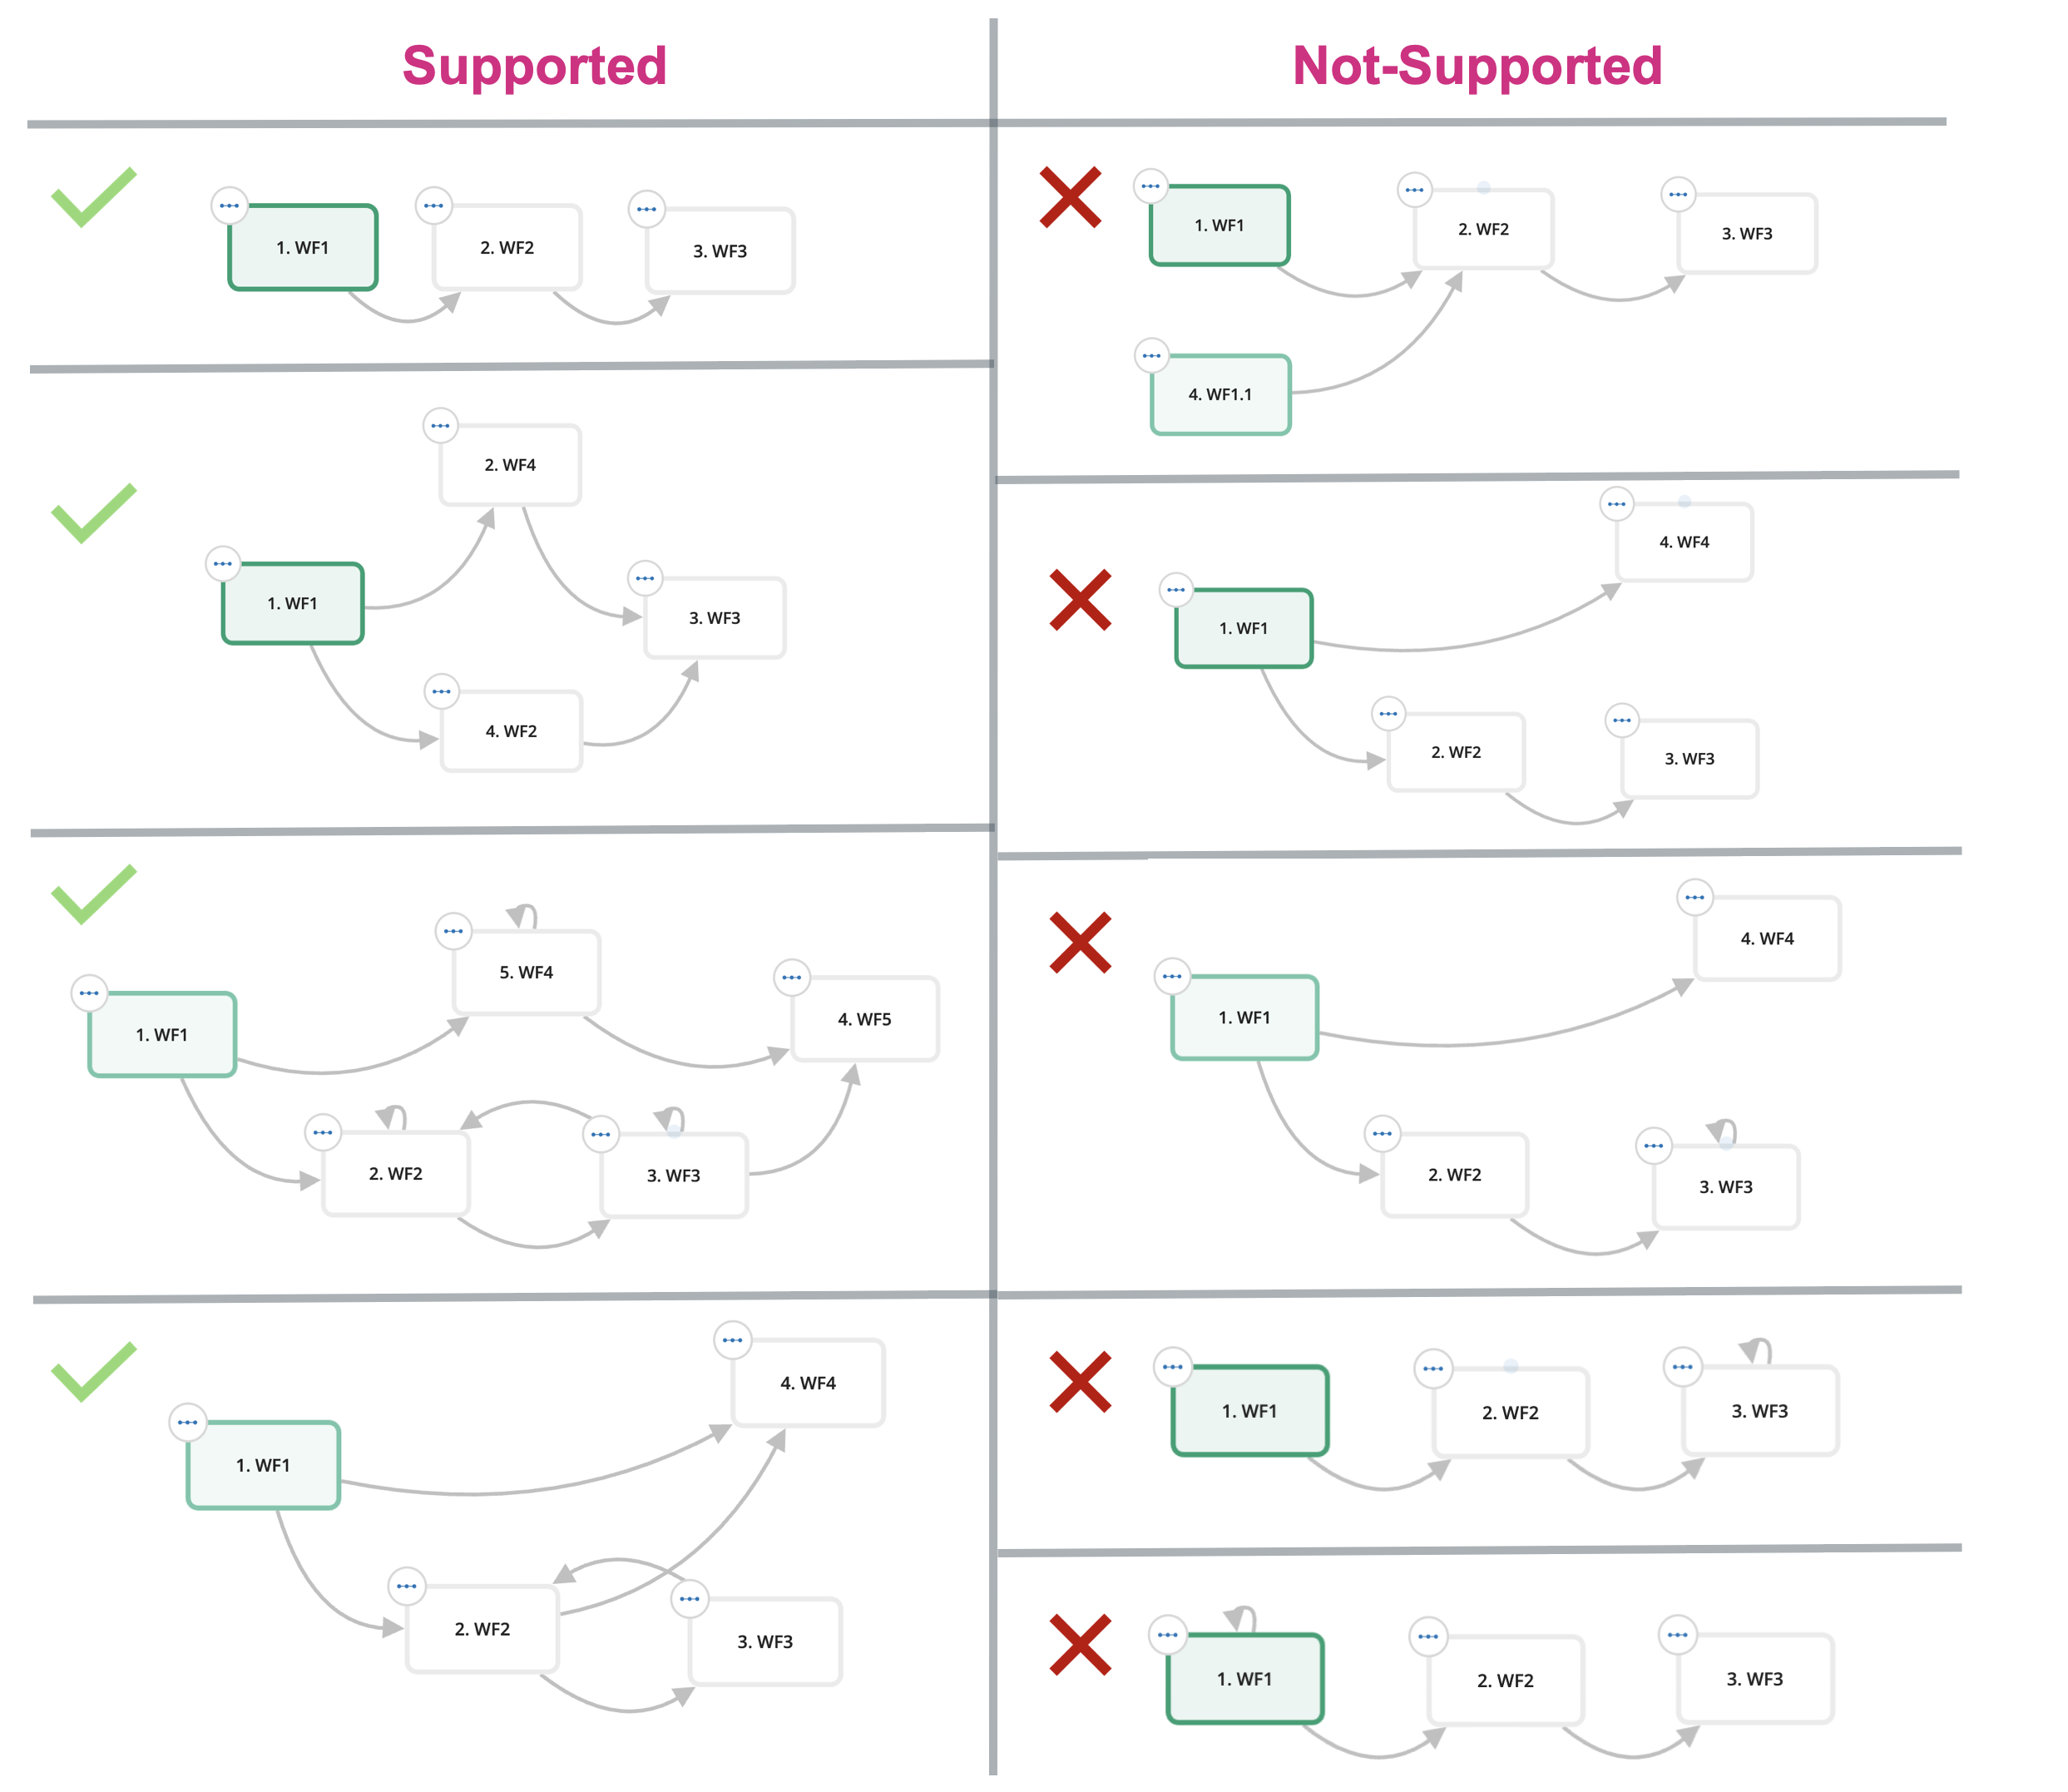
The system will enforce the following rules and will prevent you from saving if a rule is violated:
Can only have a single start node
Can only have a single end node
Start and end nodes cannot use resubmit transition strategies
Can only contain single-Protocol Workflows
Note
Procedures are only supported in L7 MES and require the Protocols, Workflows and Procedures to have Use in manufacturing setting set to yes.
Below are some examples of Procedures that follow and violate the rules of creating Procedures.
Procedure Display Names should reflect the Unit Operation name
Workflow Display Names should match the name of the Protocol they contain. Why? Since Procedure Workflows can only contain a single Protocol, naming them the same avoids confusion of which Workflow to use.
Node Display Names should match their Protocol Display Name. Why? If your Procedure allows the user to manually select where to transition the batch to next, then that picklist will display the node names, NOT the Protocol names.
Node Library overview
The Node Library displays all Workflows registered in the system that contain a single Protocol. Once a node is moved onto the canvas it can be connected to other node to form a Procedure.
Using the Node Library, you can:
Create new Workflows (+ Create New Workflow)
Placeholders can be added to the Procedure using “New Empty Workflow”. When ready, you can edit this node to build its Protocol.
Construct the Procedure by selecting a node from the Library, then drag and drop it onto the canvas. As additional nodes are added, you can rearrange their position.
Drag and drop nodes back into the Library to remove them from the Workflow Chain.
How to create new Procedures
Go to: L7|Master → Workflow Chains
Click + New Workflow Chain
Enter a Display Name (this name should reflect the name of the Unit Operation)
Select Yes to Use in Manufacturing
Select Procedure in Workflow Chain or Procedure
Construct the Procedure using the Node Library
Apply transition strategies and rules
Constructing a Procedure
Drag and drop a node from the Node Library to the canvas
Note
By default, the first node added to the canvas will automatically be marked as startable, as indicated by its the green coloration. The startable setting is used to define where in the recipe the manufacturing process begins.
Procedures can have more than one (1) startable node.
To edit whether a node is startable or not, right-click the node and select "Edit node properties", then select/deselect the "Startable" checkbox.
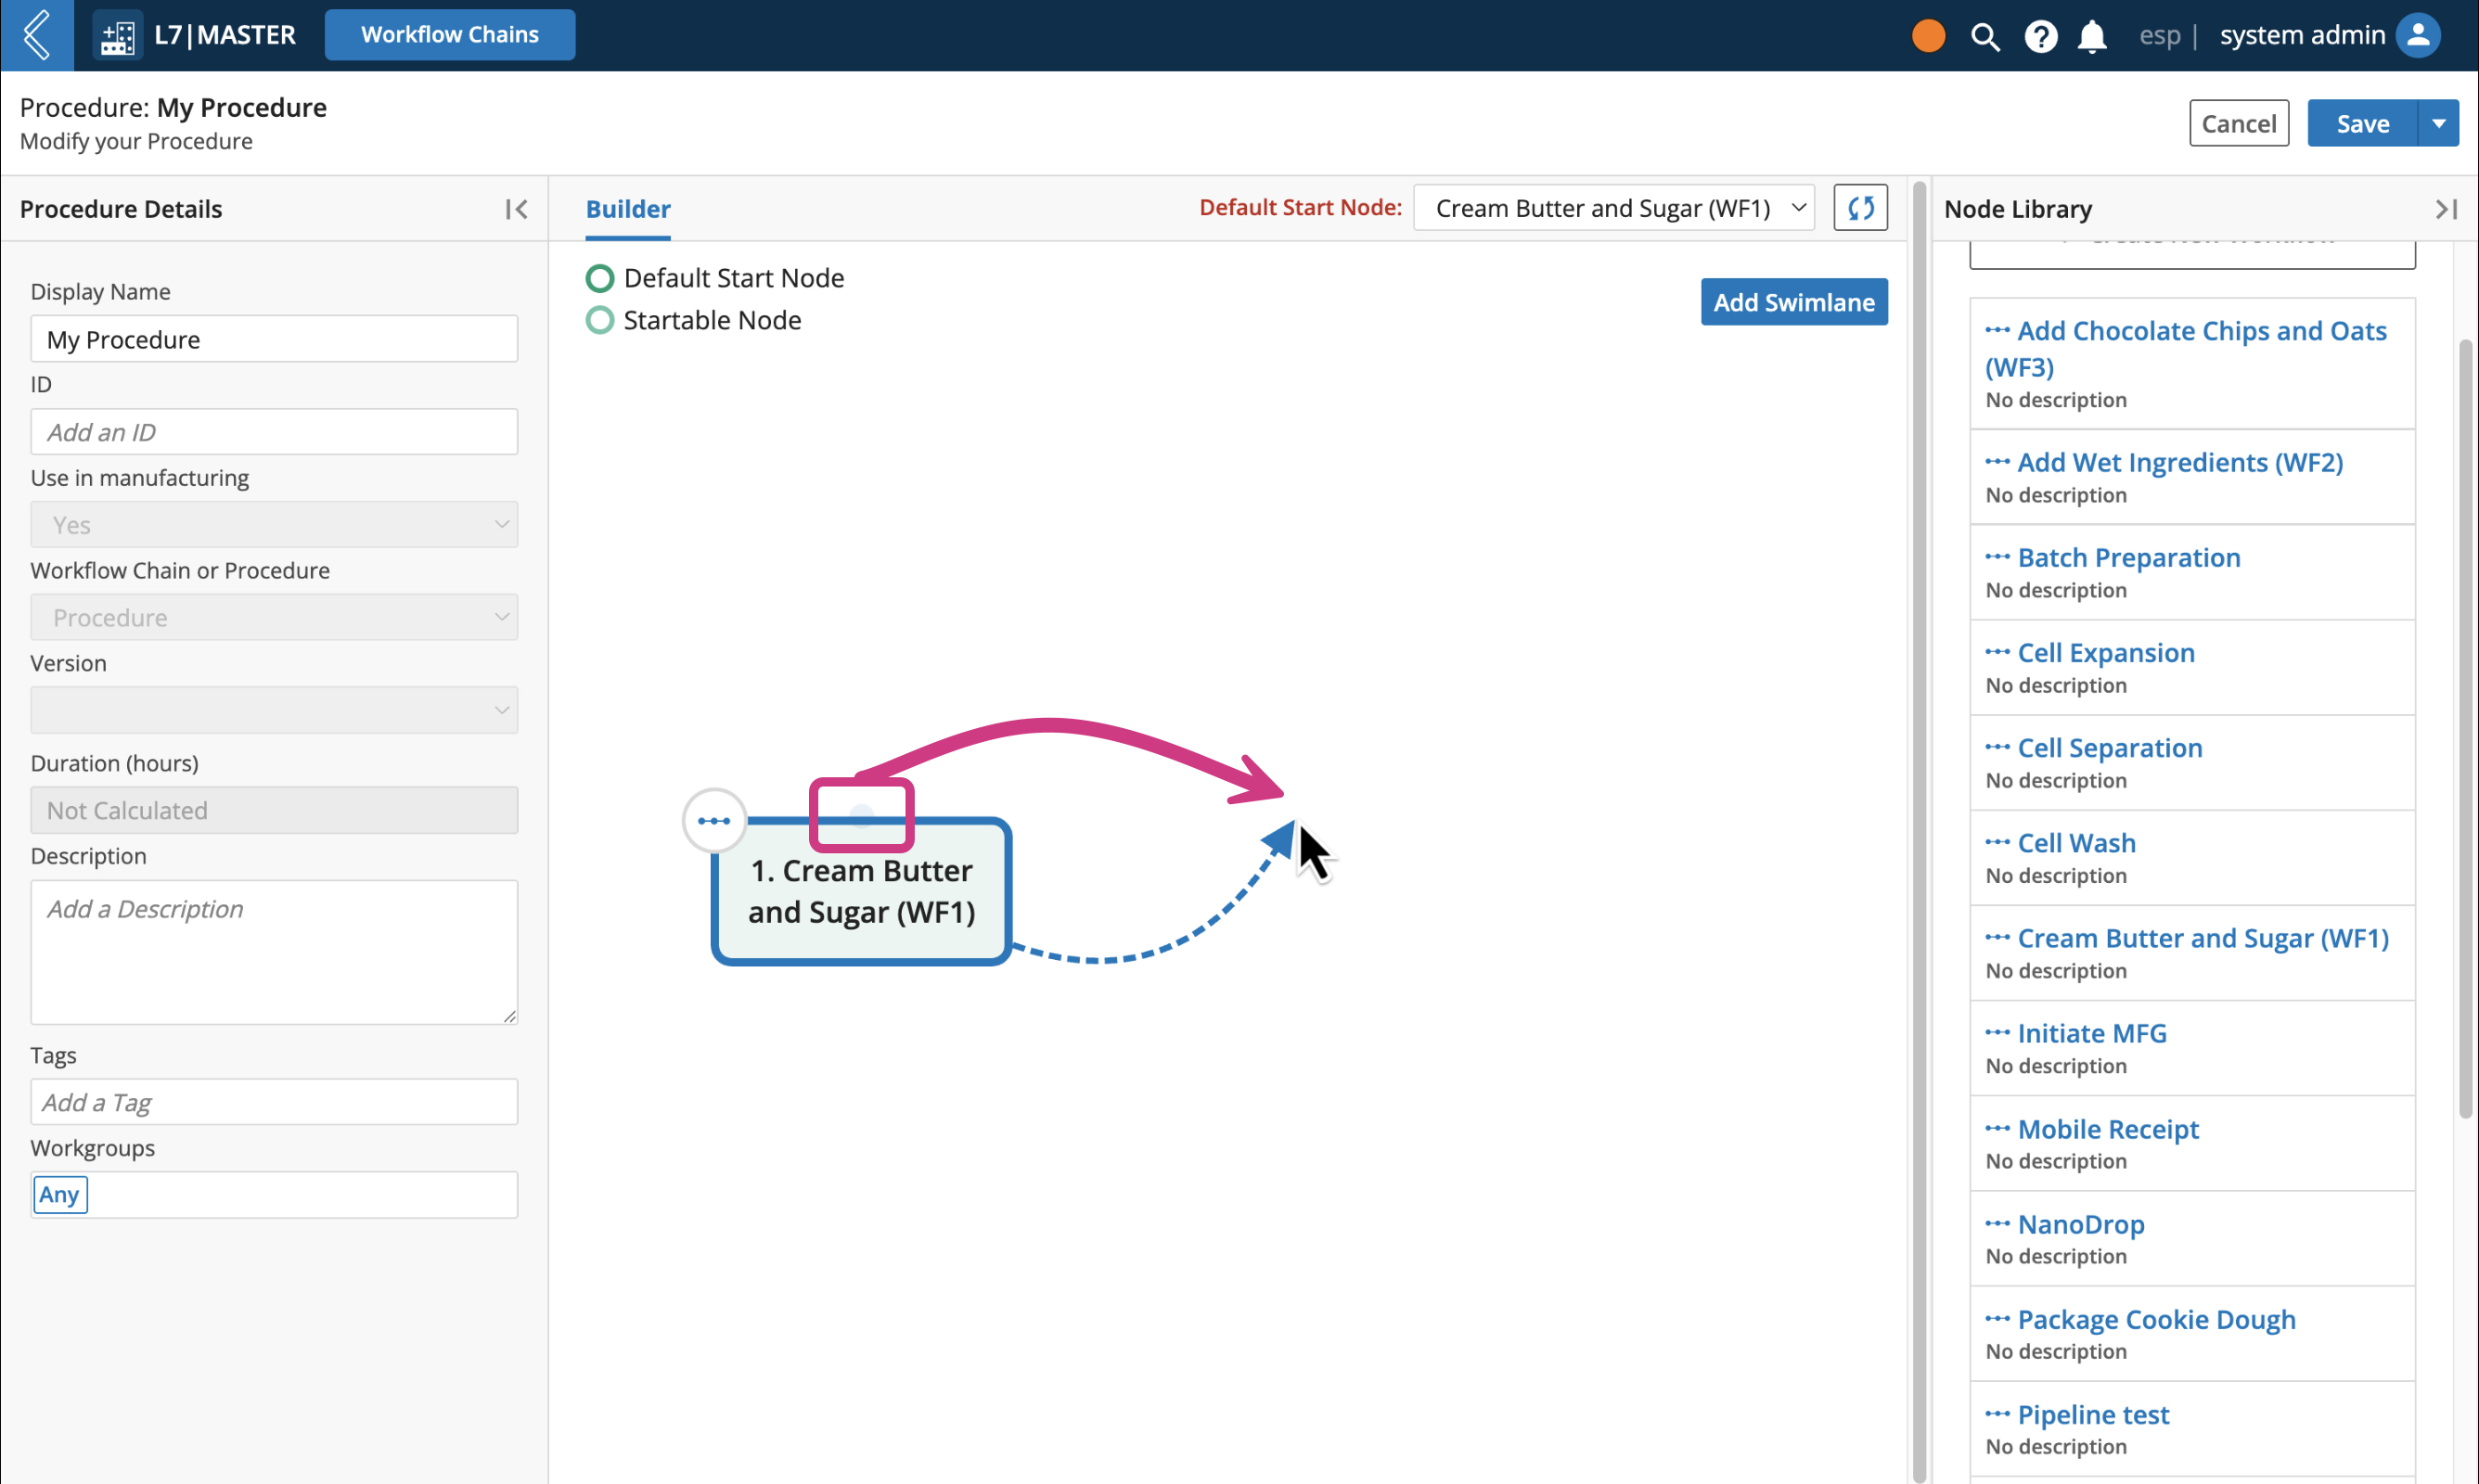
Continue building the Procedure by hovering over the first node to activate the light blue dot at the top of the node.
Select the light blue dot at the top of the node and drag the arrow to an empty space in the canvas.
Select the next node from the dropdown menu in the Rapid add node editor.
Repeat until finished
Note
An alternative approach to using the rapid add node editor, is to drag the next node onto the canvas and connect it to the first by selecting the blue dot at the top of the first node and connecting the arrow to the second node.
Manually connecting nodes already present on the canvas will open the Transition Editor.
Tip
Changing a node Display Name, ID, and version
You can manage the node's Display Name, ID, and version by right-clicking the node, then select "Edit node properties".
Why change a Display Name? When using a User Selection transition rule, the user in L7 MES will see the display name of the node appear in the picklist when they select where to transition the batch to next. Also, by changing the Display Name, the same node can be used more than once in the same Workflow Chain, or a generic node can be given a process-specific name.
If a node is used more than once in the same Workflow Chain, the same version of that node must always be used. By default, the latest version will be used, but all pinned versions will also be available.
Procedure transitions
What is the Transition Editor?
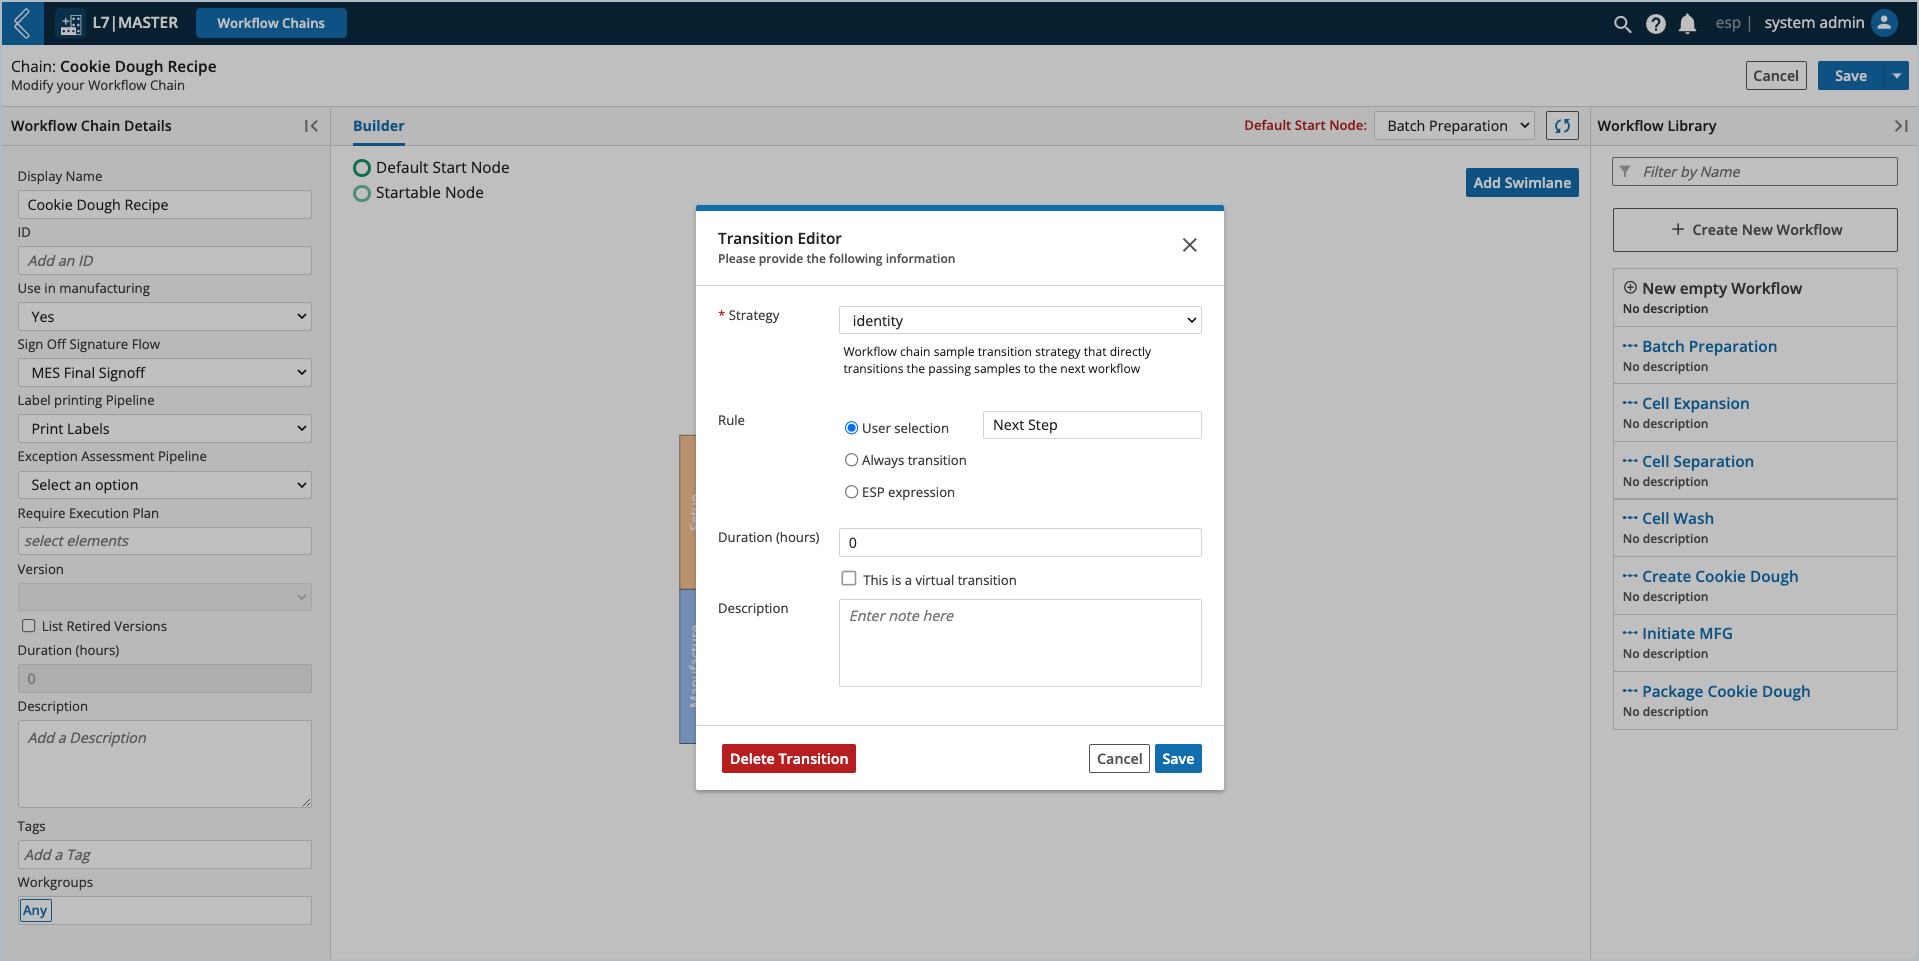
The Transition Editor is the modal used to define how Entities move through a Procedure. To access the Transition Editor, select a transition (arrow) in the Procedure.
The Transition Editor has two key components: strategy and rule. Think of the strategy as the “who” and the rule as the “when” - which Entities will be transitioned and when will they be transitioned.
Transition Strategies
L7|ESP has three (3) out-of-box strategies,
Identity - transitions the Batch from one node to the next. Most commonly used strategy in L7 MES processes.
Resubmit - transitions the Batch back to the start of the Protocol to repeat the Step
Createsample - creates Samples from the selected Sample Type as children of the final Sample Set in the upstream node. Not supported in L7 MES because Items can only be created in Sample Protocols.
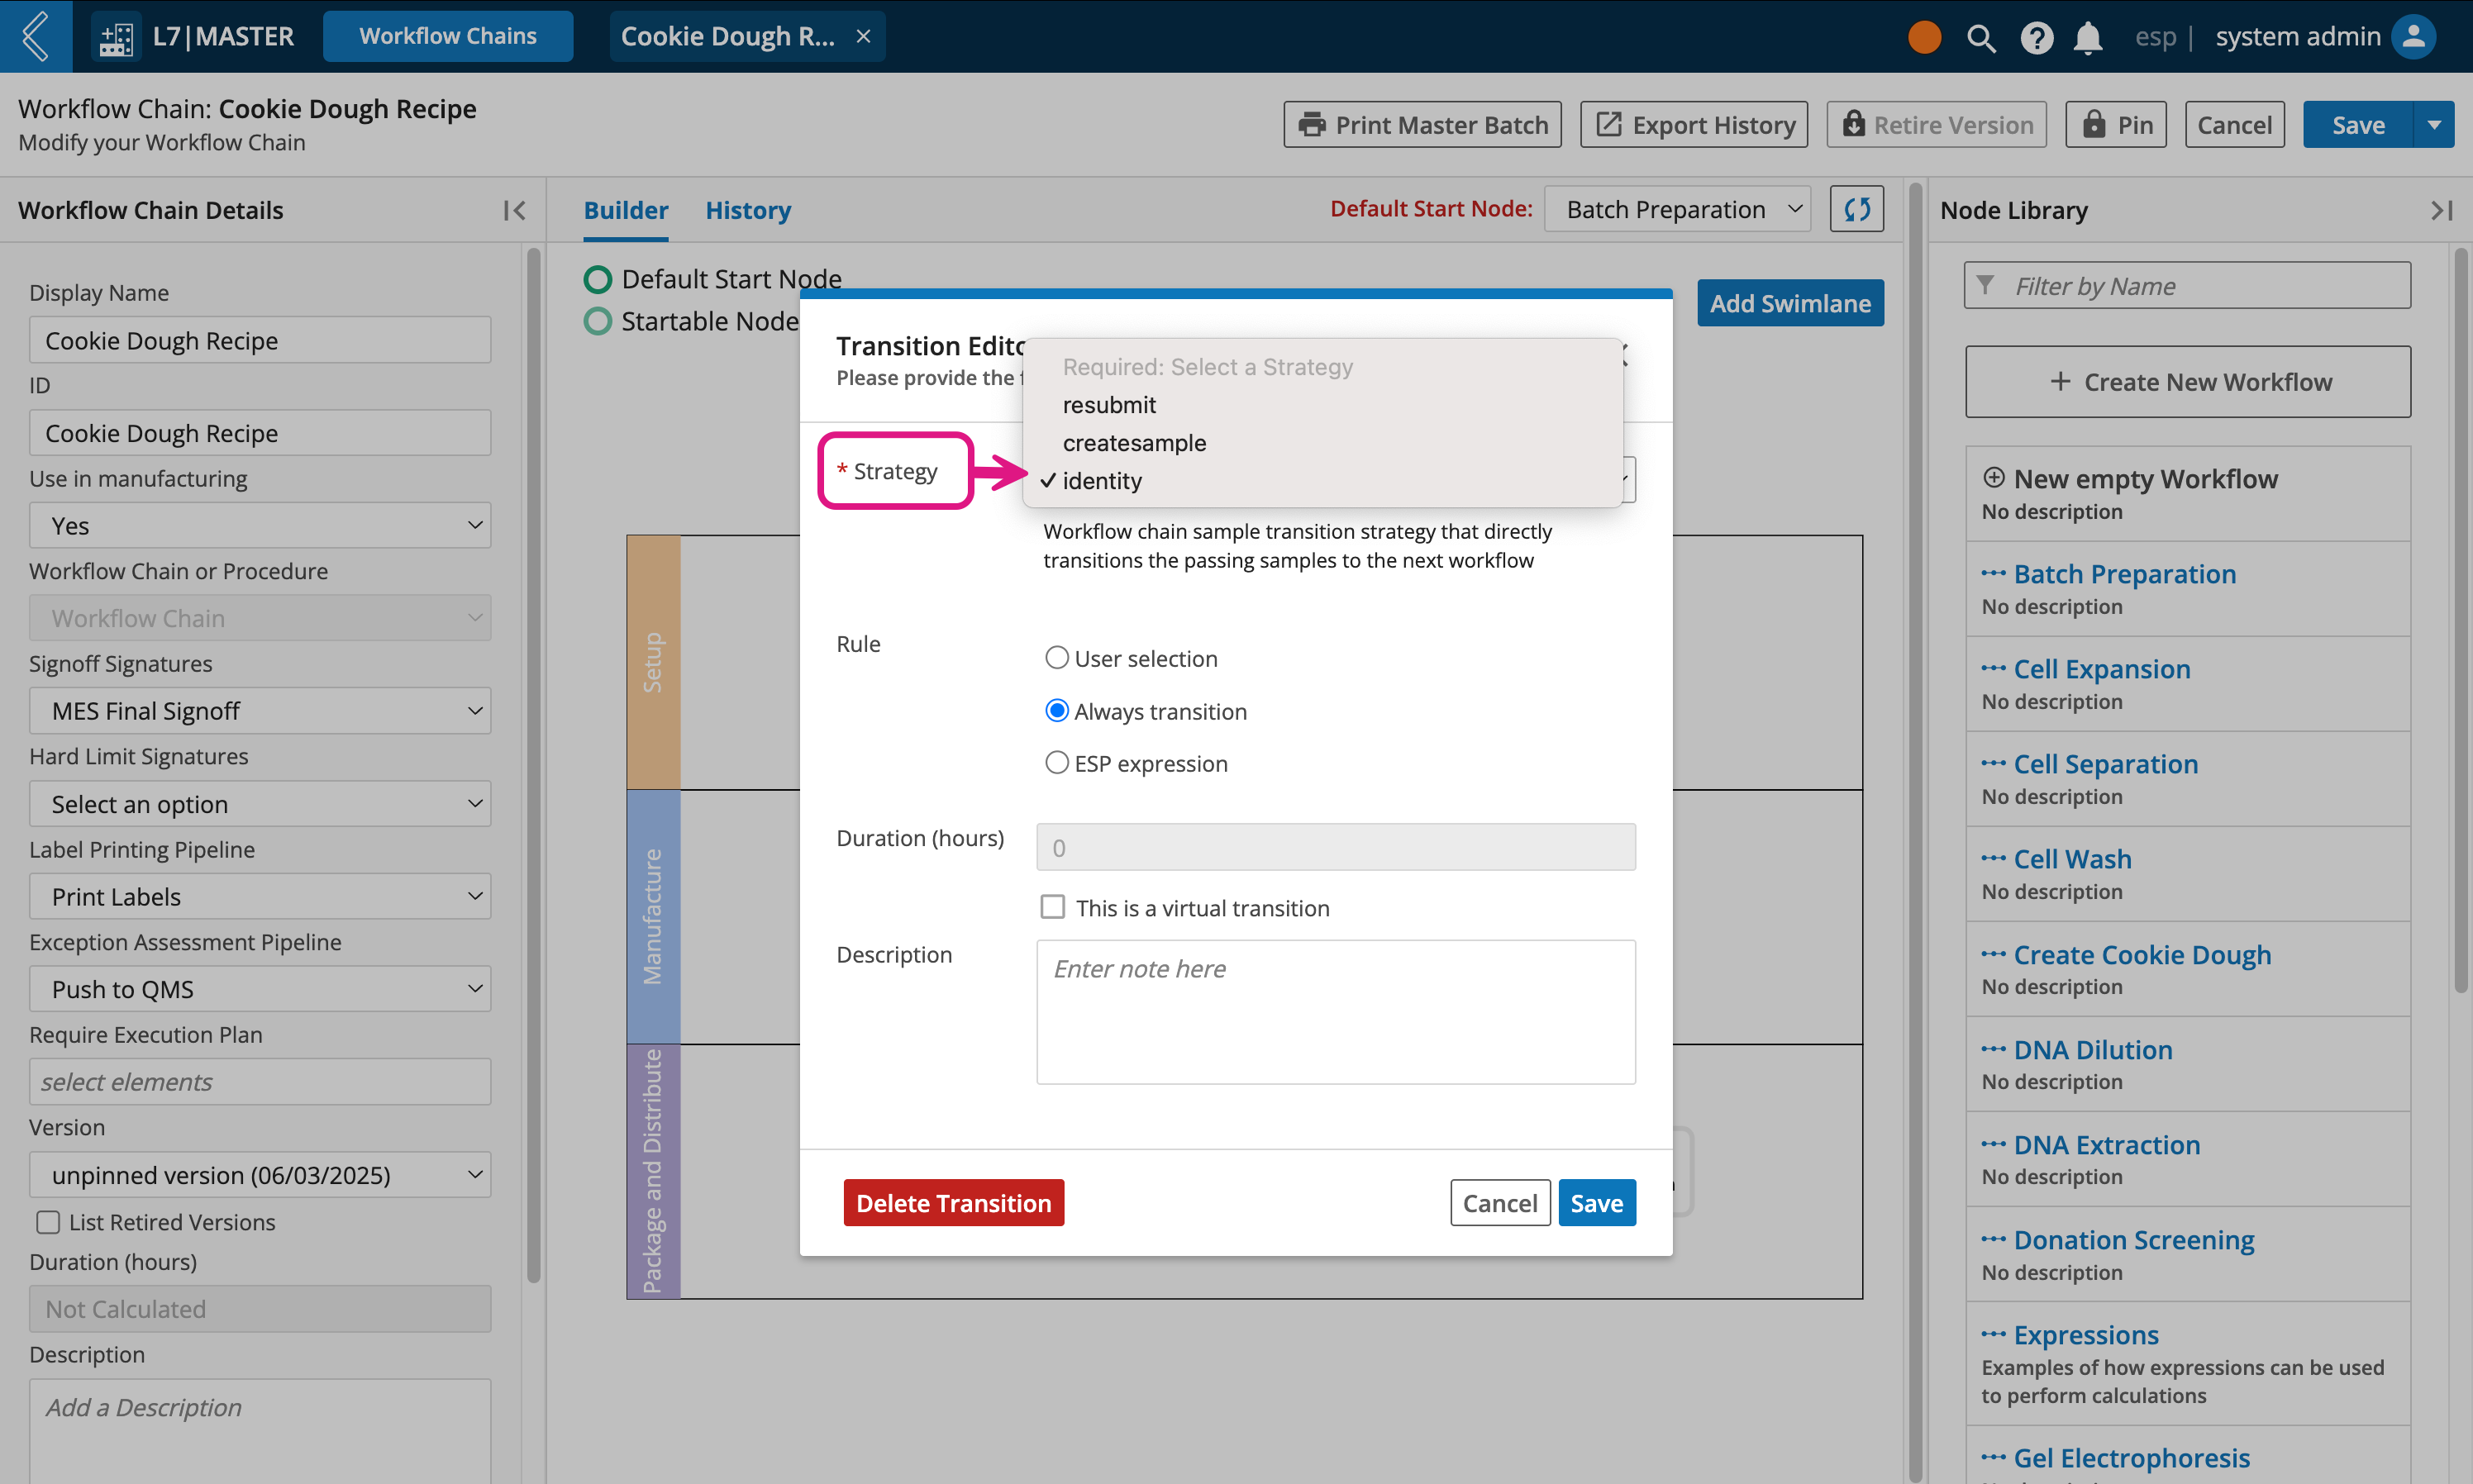
Transition Rules
The two (2) most common rules are:
User selection – transitions the Batch to the Step(s) selected in the Next Step field. This rule supports the dynamic nature of branching Procedures, and is the default rule assigned to all transitions.
The Next Step field can be renamed in the Transition Editor, and will be added at runtime to the last Protocol in the node. If added at runtime, this field will always be the last field in the node.
Alternatively, this field can be added to the corresponding Protocol to customize its details and position if:
The field needs to be required (this is best practice).
The field needs to be a single-select picklist.
Finished needs to be removed from the list of options (see the note below).
A default value needs to be assigned.
A Signature Flow auto-completes the Protocol.
Auto-completion requires the Signature Flow to be the last field in the Protocol.
Note
Next Step must be a picklist with options set by the L7|ESP Expression {{ next_node_choices() }}
To drop "finished" from the list of options: {{ next_node_choices(drop=None) }}
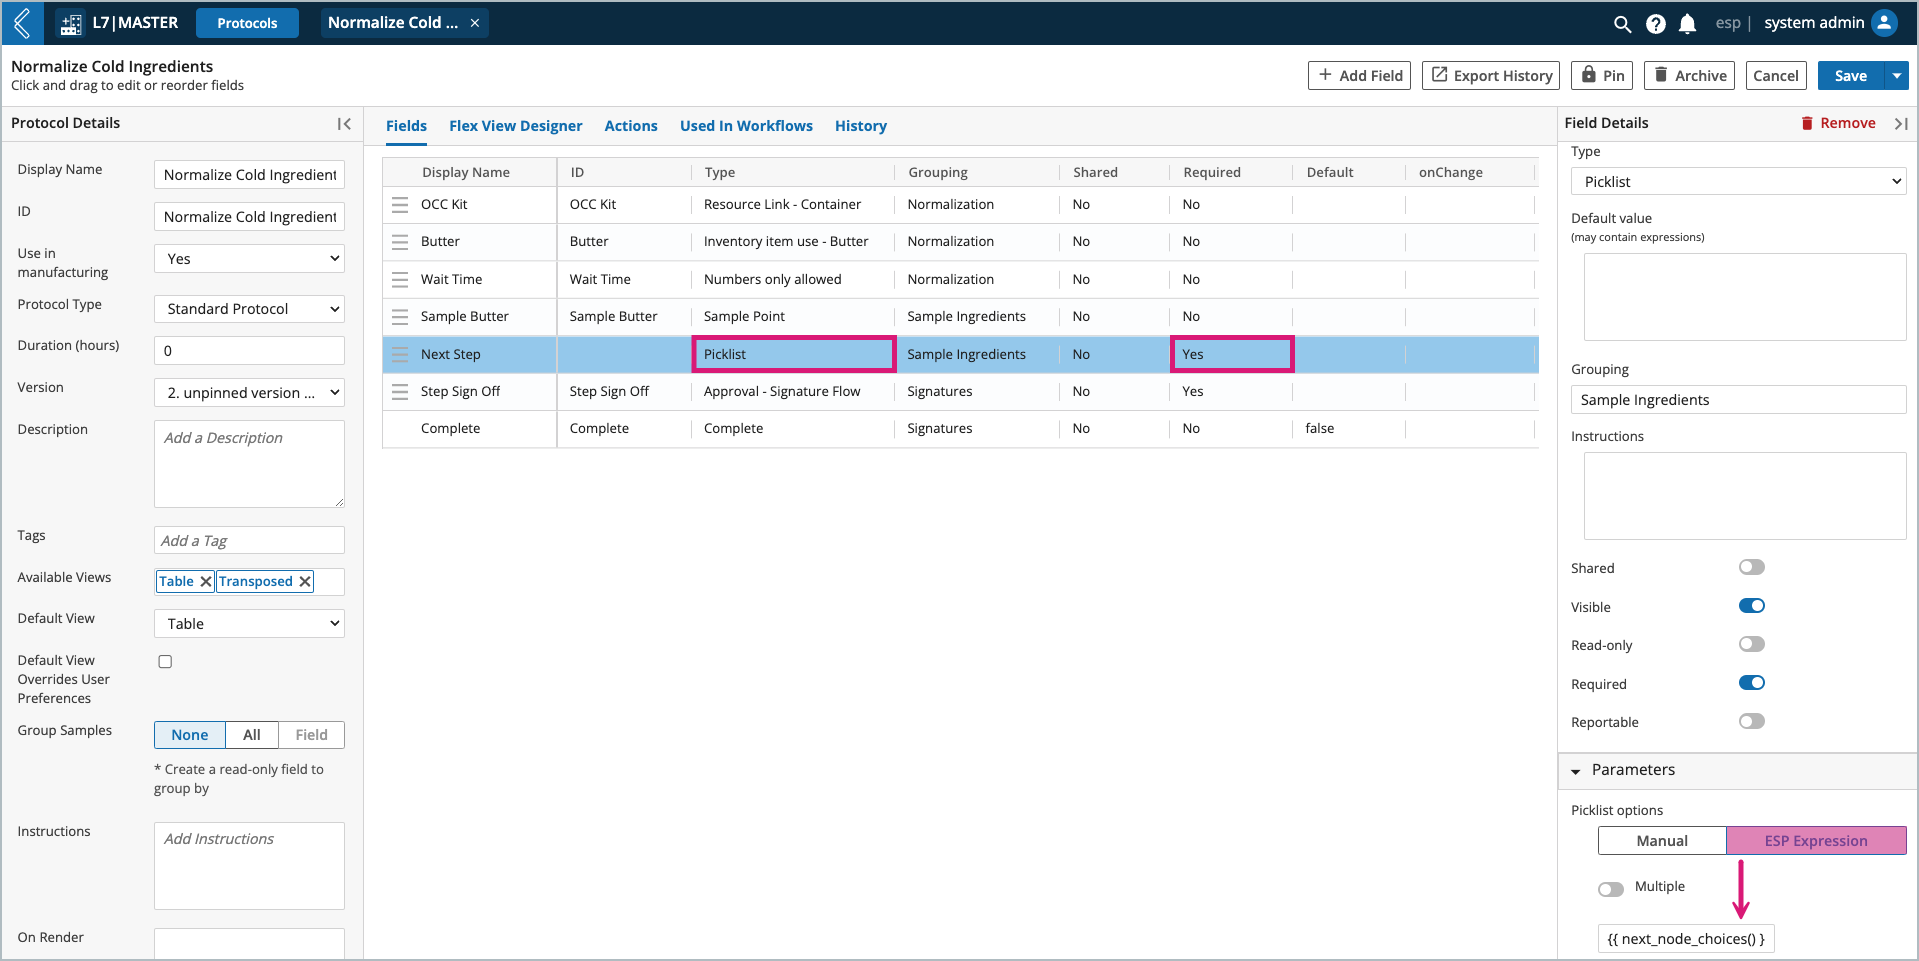
Always transition – transitions all Entities set by the strategy when the upstream node is completed.
This rule can be made the default_wfc_transition in the esp Configuration.
default_wfc_transition:always_transition
Note
This rule will transition all Entities to each node connected to the upstream node in the Procedure.
Custom rules can be configured in Python using the ESP expression option. Common examples include:
Evaluating an Entity value:
{{ entity_value('Field Name') == 'Value' }}
Evaluating a boolean (checkbox) value:
{{ str(cell('Field ID')).lower() == 'true' }}
Evaluating a picklist value:
{{ cell('Field ID', 'Protocol ID') == 'Value' }}
Evaluating more than one (1) picklist value:
{{ cell('Field ID', 'Protocol ID') in ['Value 1', 'Value 2'] }}
Resubmit/Looping Processes
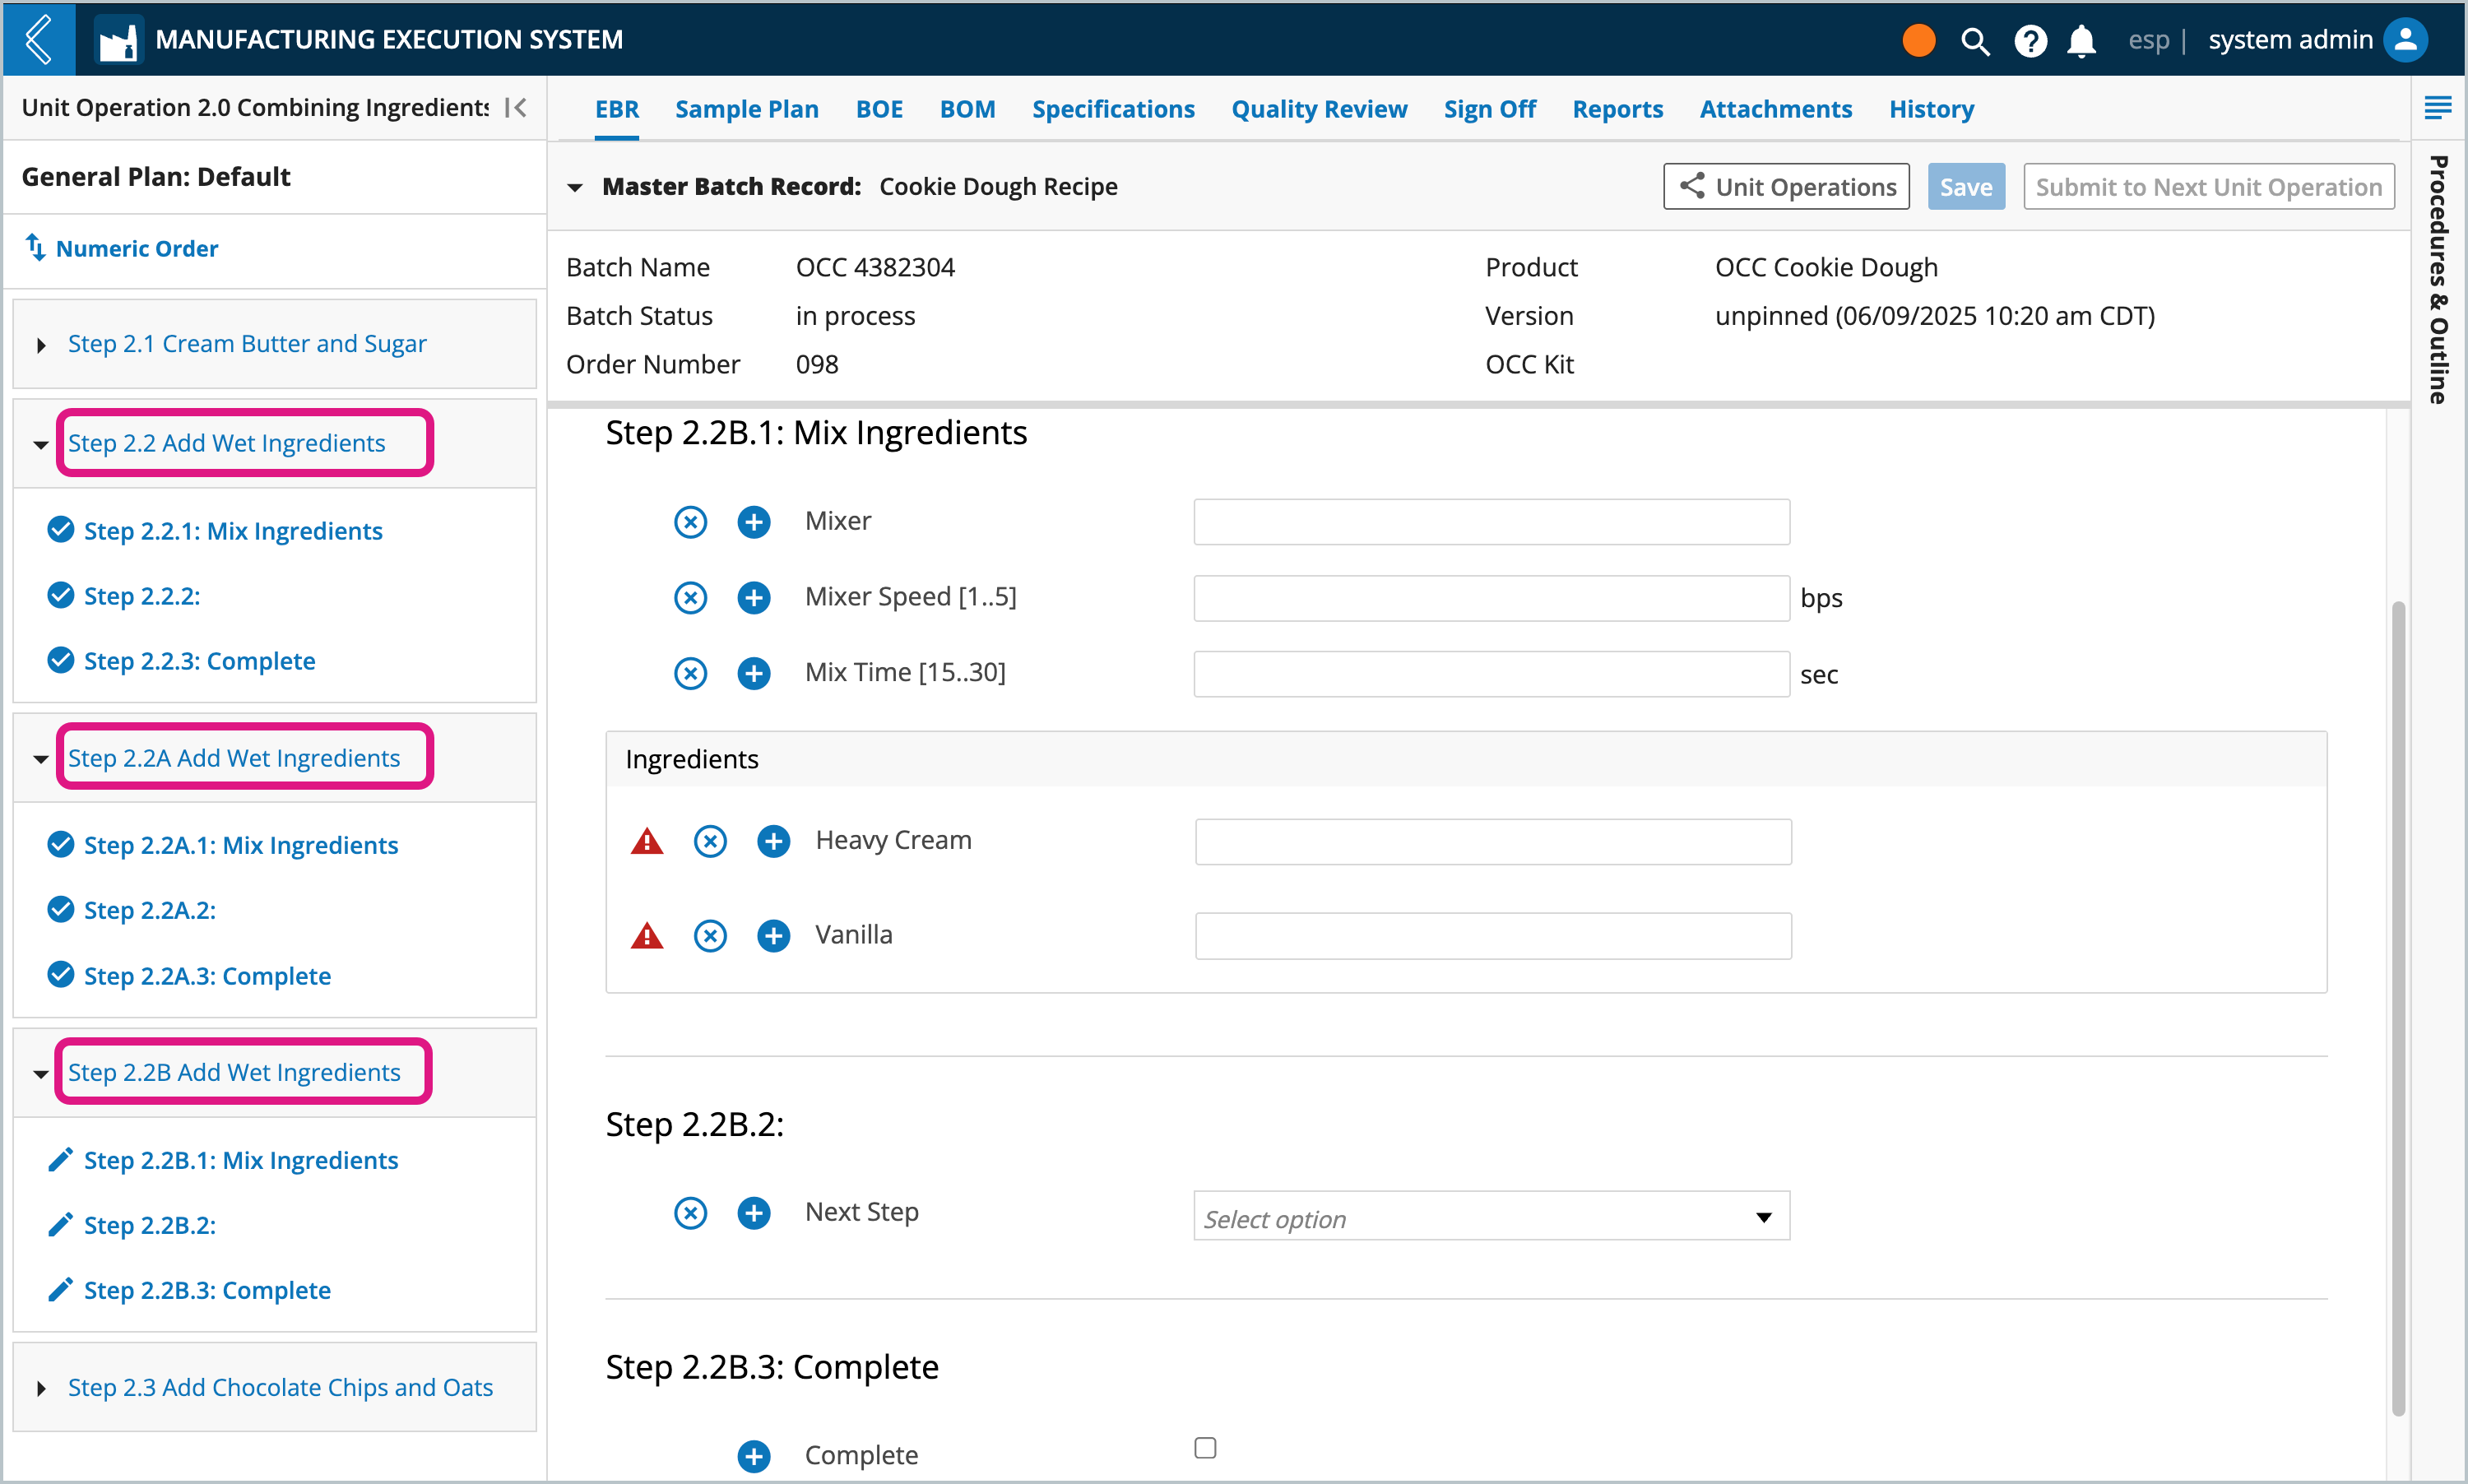
Procedures are not confined to linear processes. Resubmits can be configured in the Transition Editor for repeatable Steps and cyclical parts of the Recipe. When a Step undergoes repeated execution in L7 MES, its numbering will be updated to append a letter to the Step number each time the node is executed (i.e., 1 → 2 → 2A → 2B → 3).
To configure resubmits or looping:
Add a transition (arrow) pointing back to a earlier node or the same node.
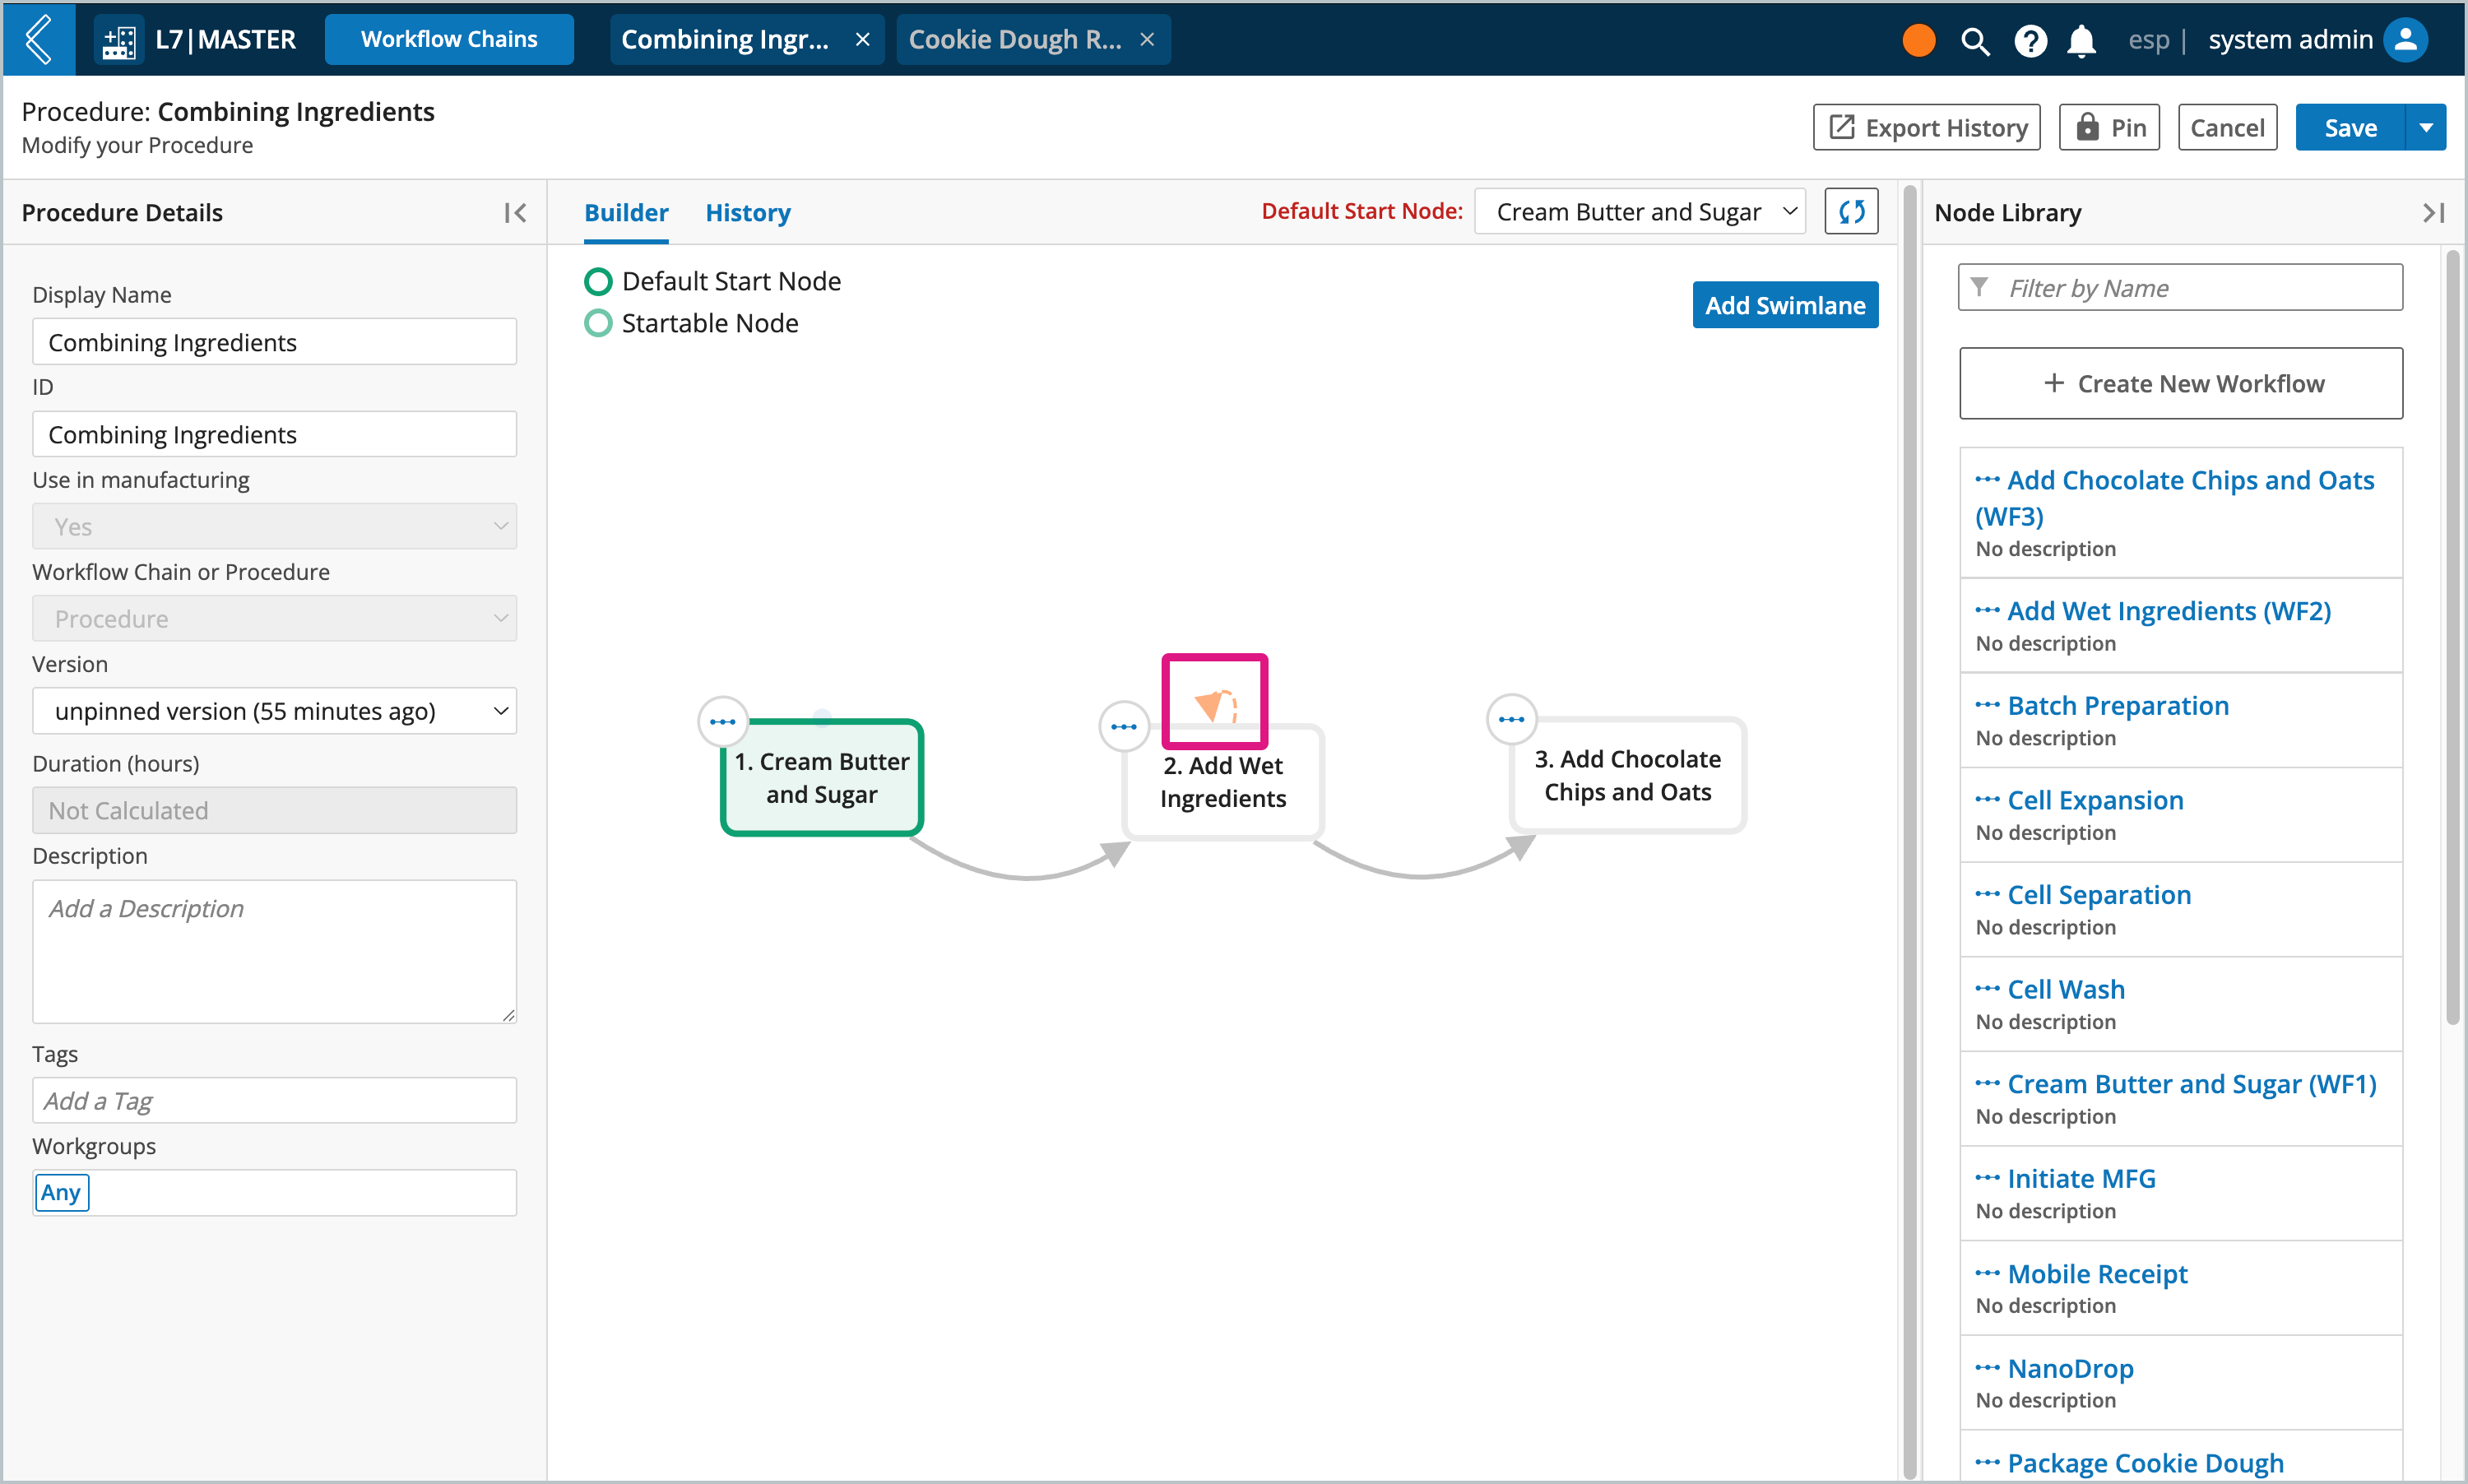
Select the transition to open the Transition Editor.
Set Strategy to resubmit.
Note
Resubmit strategy automatically applies the This is a virtual transition setting, but this setting is editable.
Set Rule to User selection.
Tip
Consider how you want to handle multiple routing strategies. For example, if a node supports resubmission and branching, can the Batch be sent to one (1) or more Steps. This will determine if the Next Step field is a single or multi-select picklist.
You may also consider using ESP expression instead of User selection, especially if the routing decision is dependent on a specific value recorded in the EBR and does not require input from the user.
Optionally enter a Duration (hours) to indicate how long it takes to perform the transition. This information is used in L7 Scheduling.
Select Save.
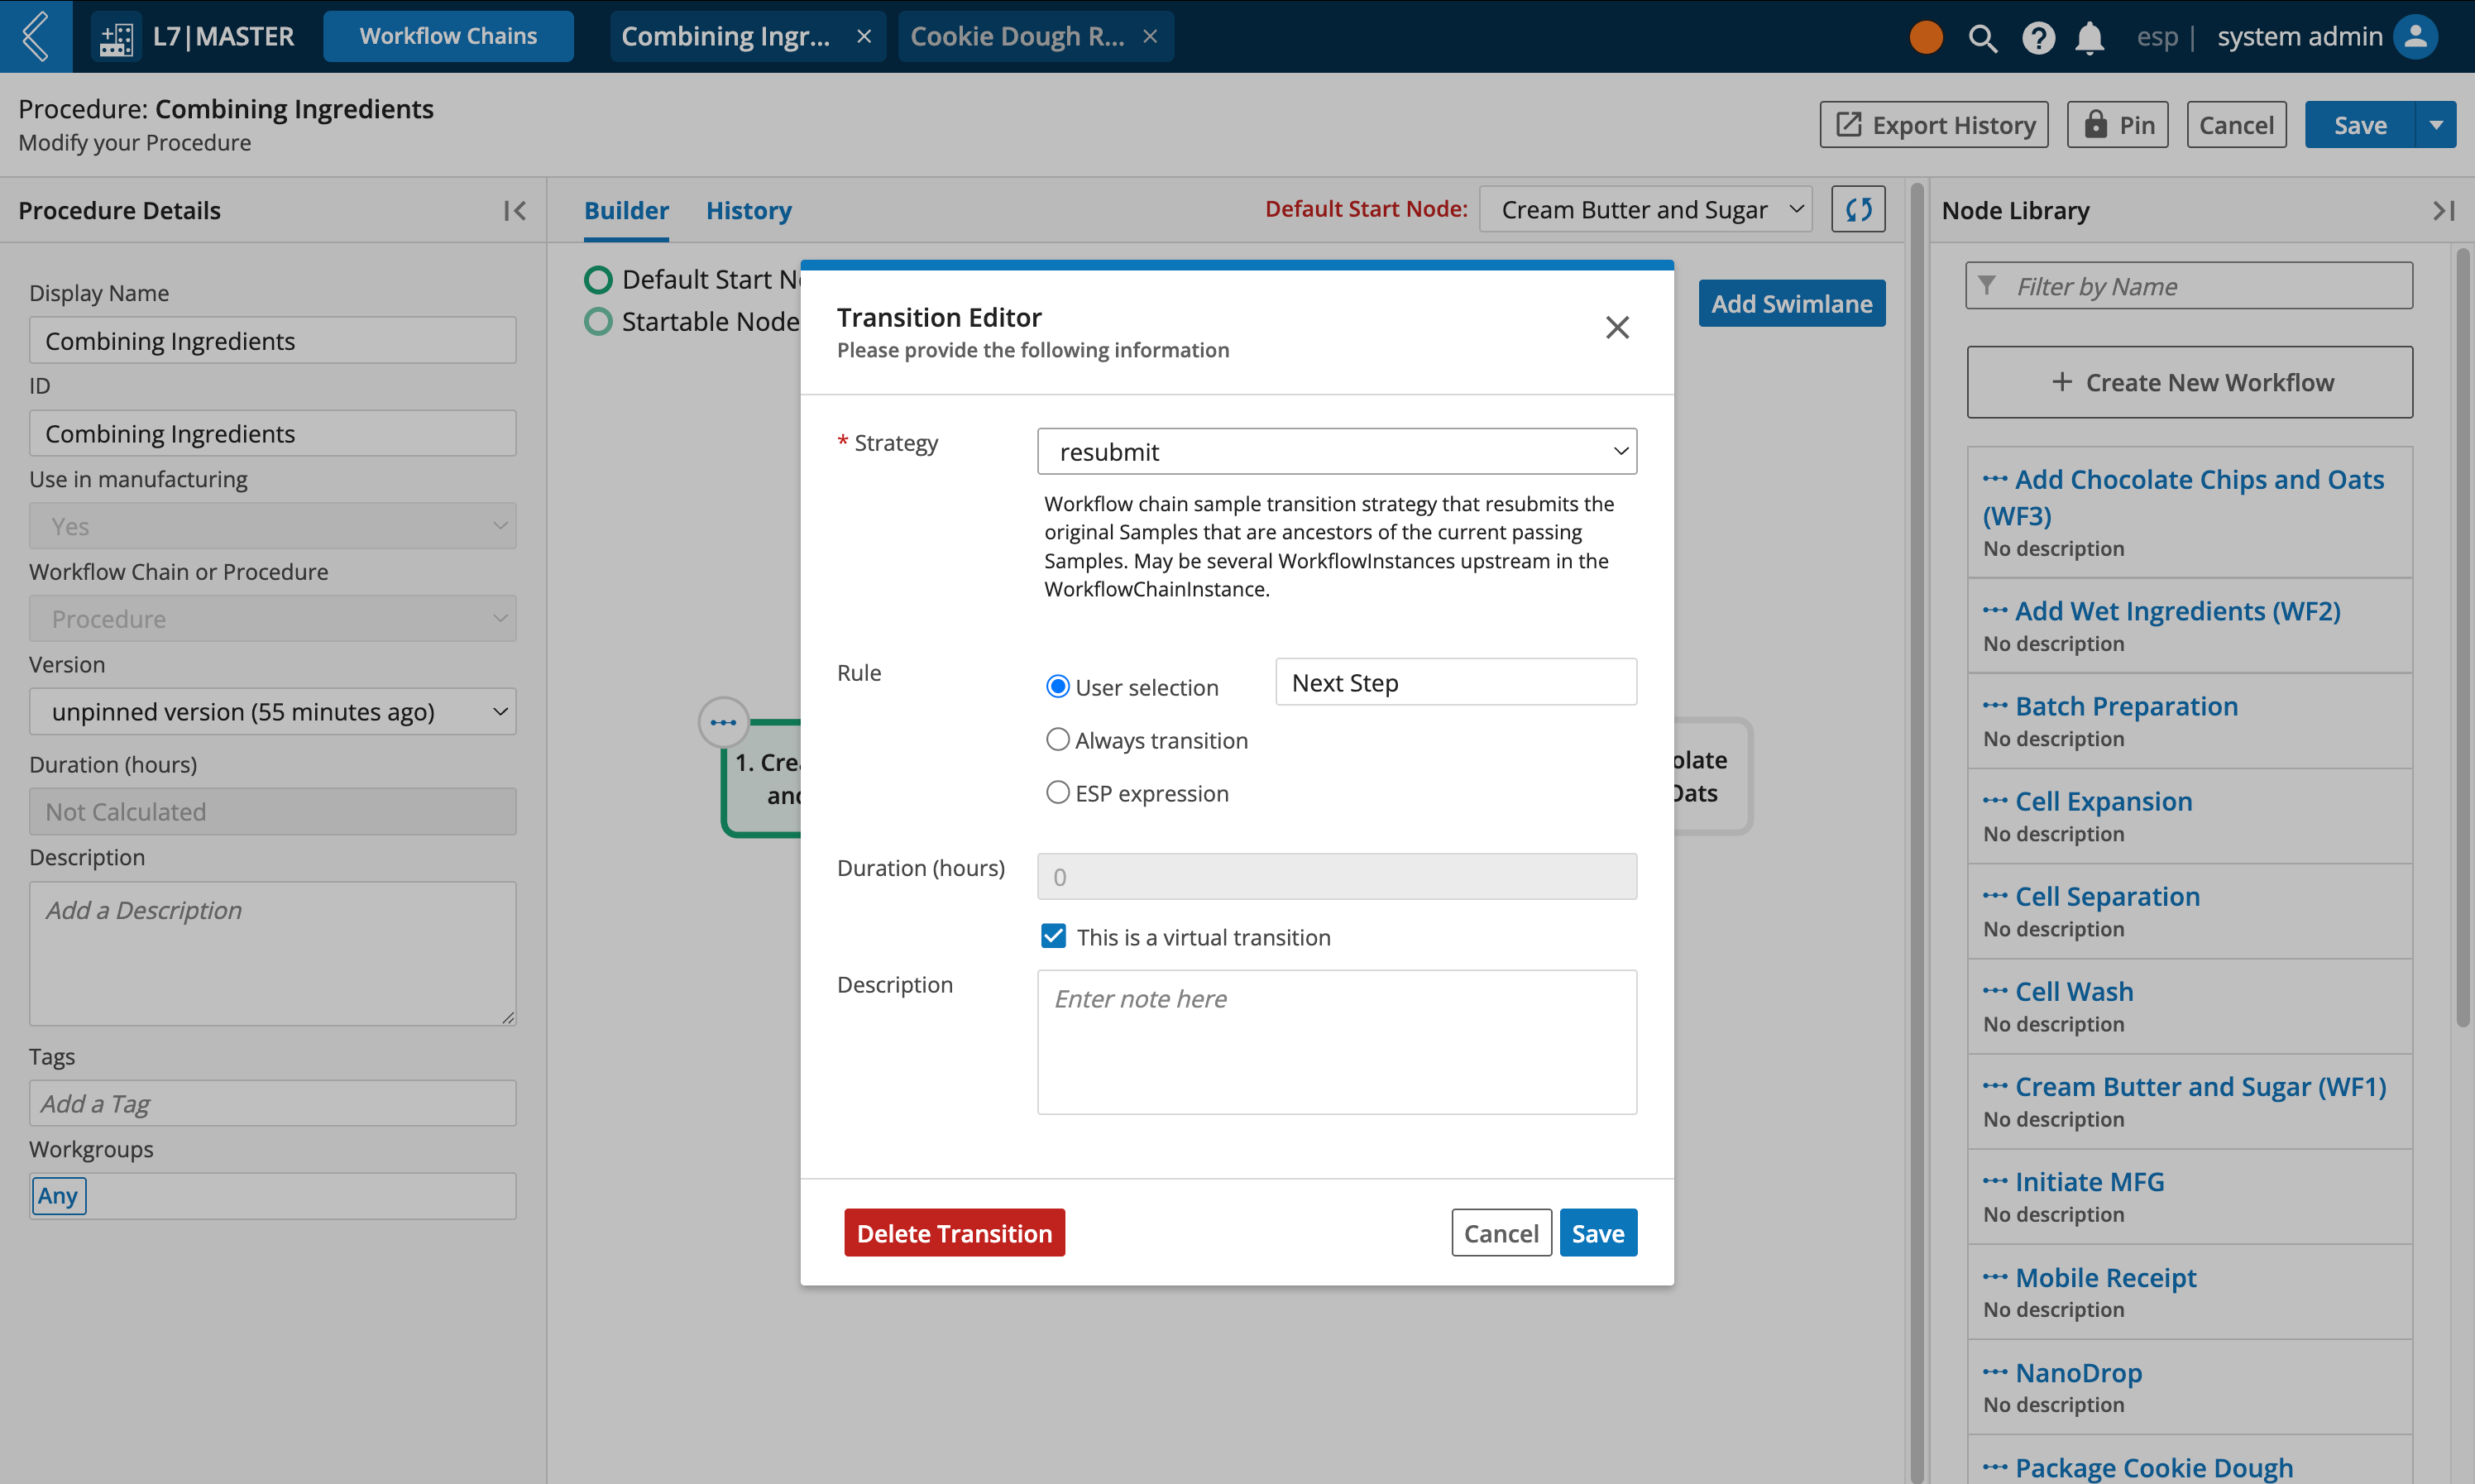
How to edit a Procedure
Right-click the node and select the appropriate action:
Edit node properties – opens the Node Editor, where you can change the Display Name, ID, Version, and select/deselect startability.
Edit Workflow – opens the Workflow builder, where both the Workflow and its Protocols can be edited (only applies to Workflow nodes).
Double-click a Protocol in the Workflow builder to edit its details in the Protocol builder.
Replace node content – opens the Replace Node modal displaying all registered Workflows and Procedures.
Select the desired node as a replacement.
Note
Replacing a Workflow in the Procedure will not update the node's Display Name or ID.
Double-click on the node to update these values.
Delete node – removes the node from the Procedure.
Alternatively, after selecting a node, you will see the Delete, Replace, and Edit buttons appear in the top-right corner of the screen.
Node numbering
L7|ESP uses the following rules for numbering Procedures and their corresponding Steps in L7 MES.
The start node is assigned the number one (1), with the following nodes assigned the next number in succession.
Numbering traverses each branch to the end, then travels back to the root before traversing the next branch in order.
The branch furtherest to the left is numbered first.
Nodes (which represent Protocols/Steps) are assigned the number “X”.
“X” is the number displayed in the Procedure builder.
If a node (meaning Protocol/Step) is repeated in L7 MES, their numbering will be updated to append a letter to the Step number each time the node is executed (i.e., 2 → 2A → 2B ).
Protocols (Steps) are assigned the number “N.X”.
"N" is the Unit Operation number
“X” is the order of the Protocols in the Procedure.
Below is a simple example showing the relationship between Protocols, Workflows, Procedures, and Workflow Chains, along with where their Display Names are reflected in L7 MES.
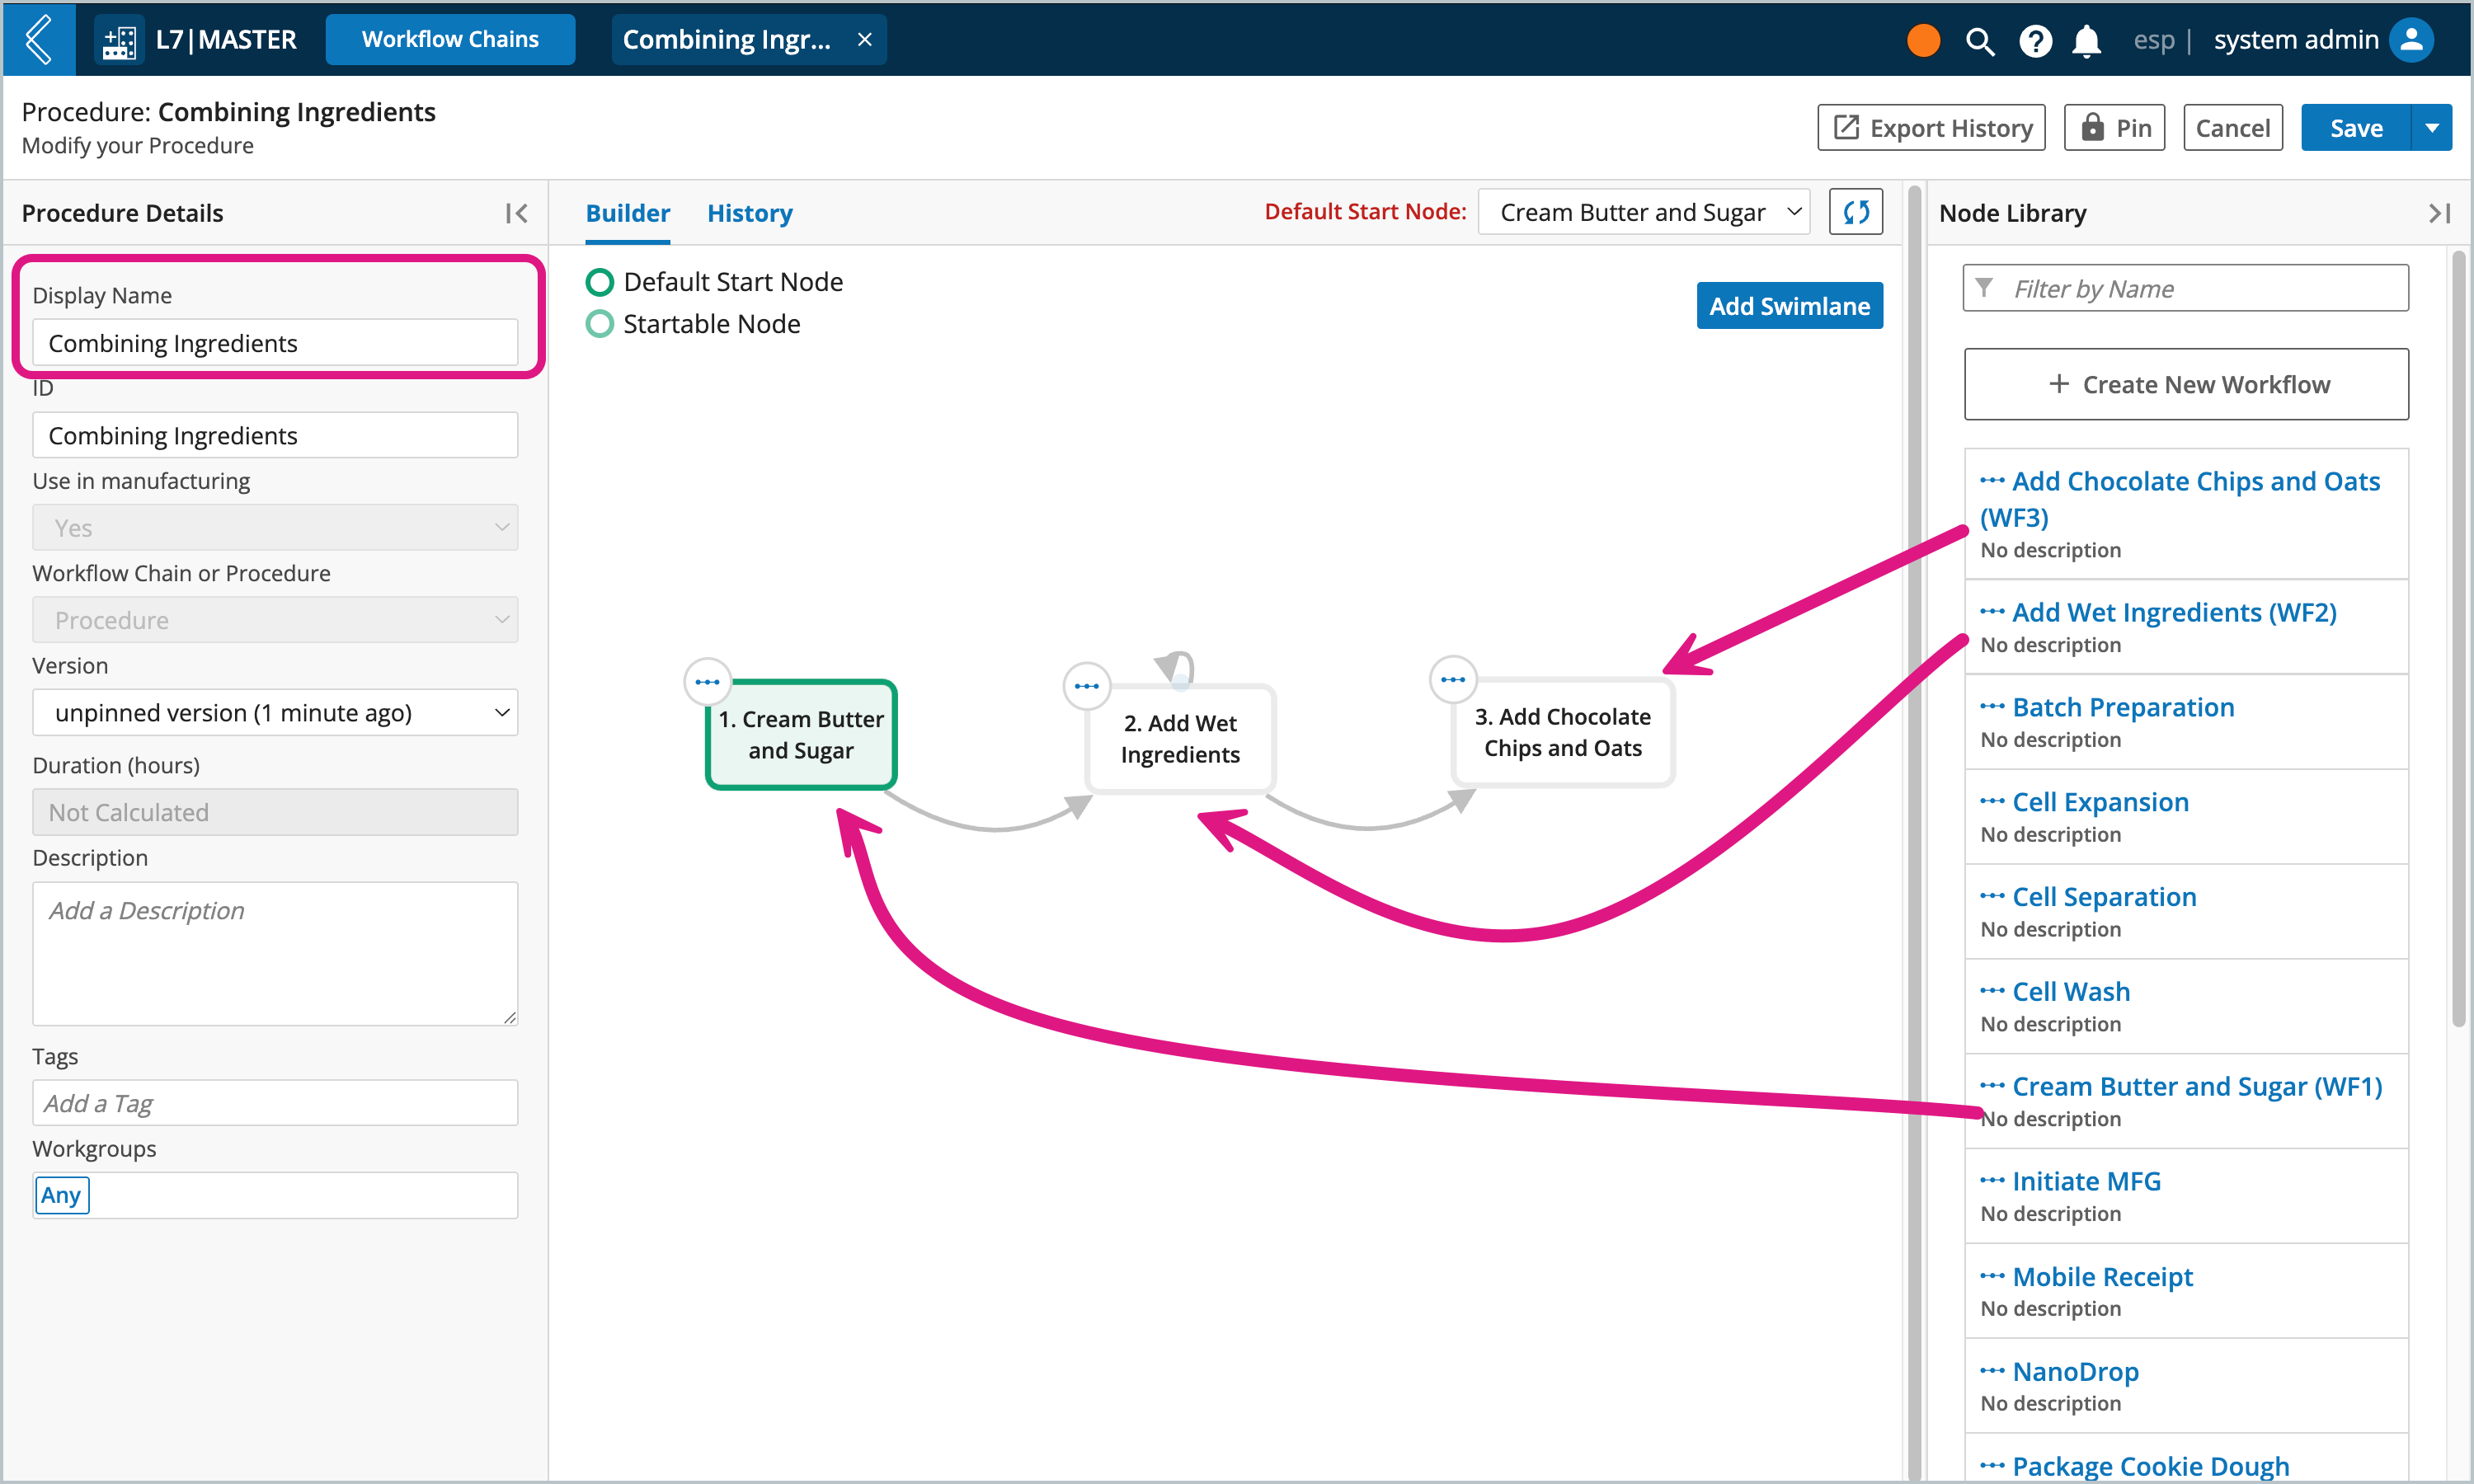
A simple Procedure named "Combining Ingredients" comprised of three nodes (AKA Workflows); with "Add Wet Ingredients" requiring the user to choose where to send the batch to next.
Tip
As best practice, the Procedure node names should match their respective Protocol names. Why? Because when using the User Selection transition rule the operators will see the node name displayed in the picklist options, not the Protocol (Step) name.
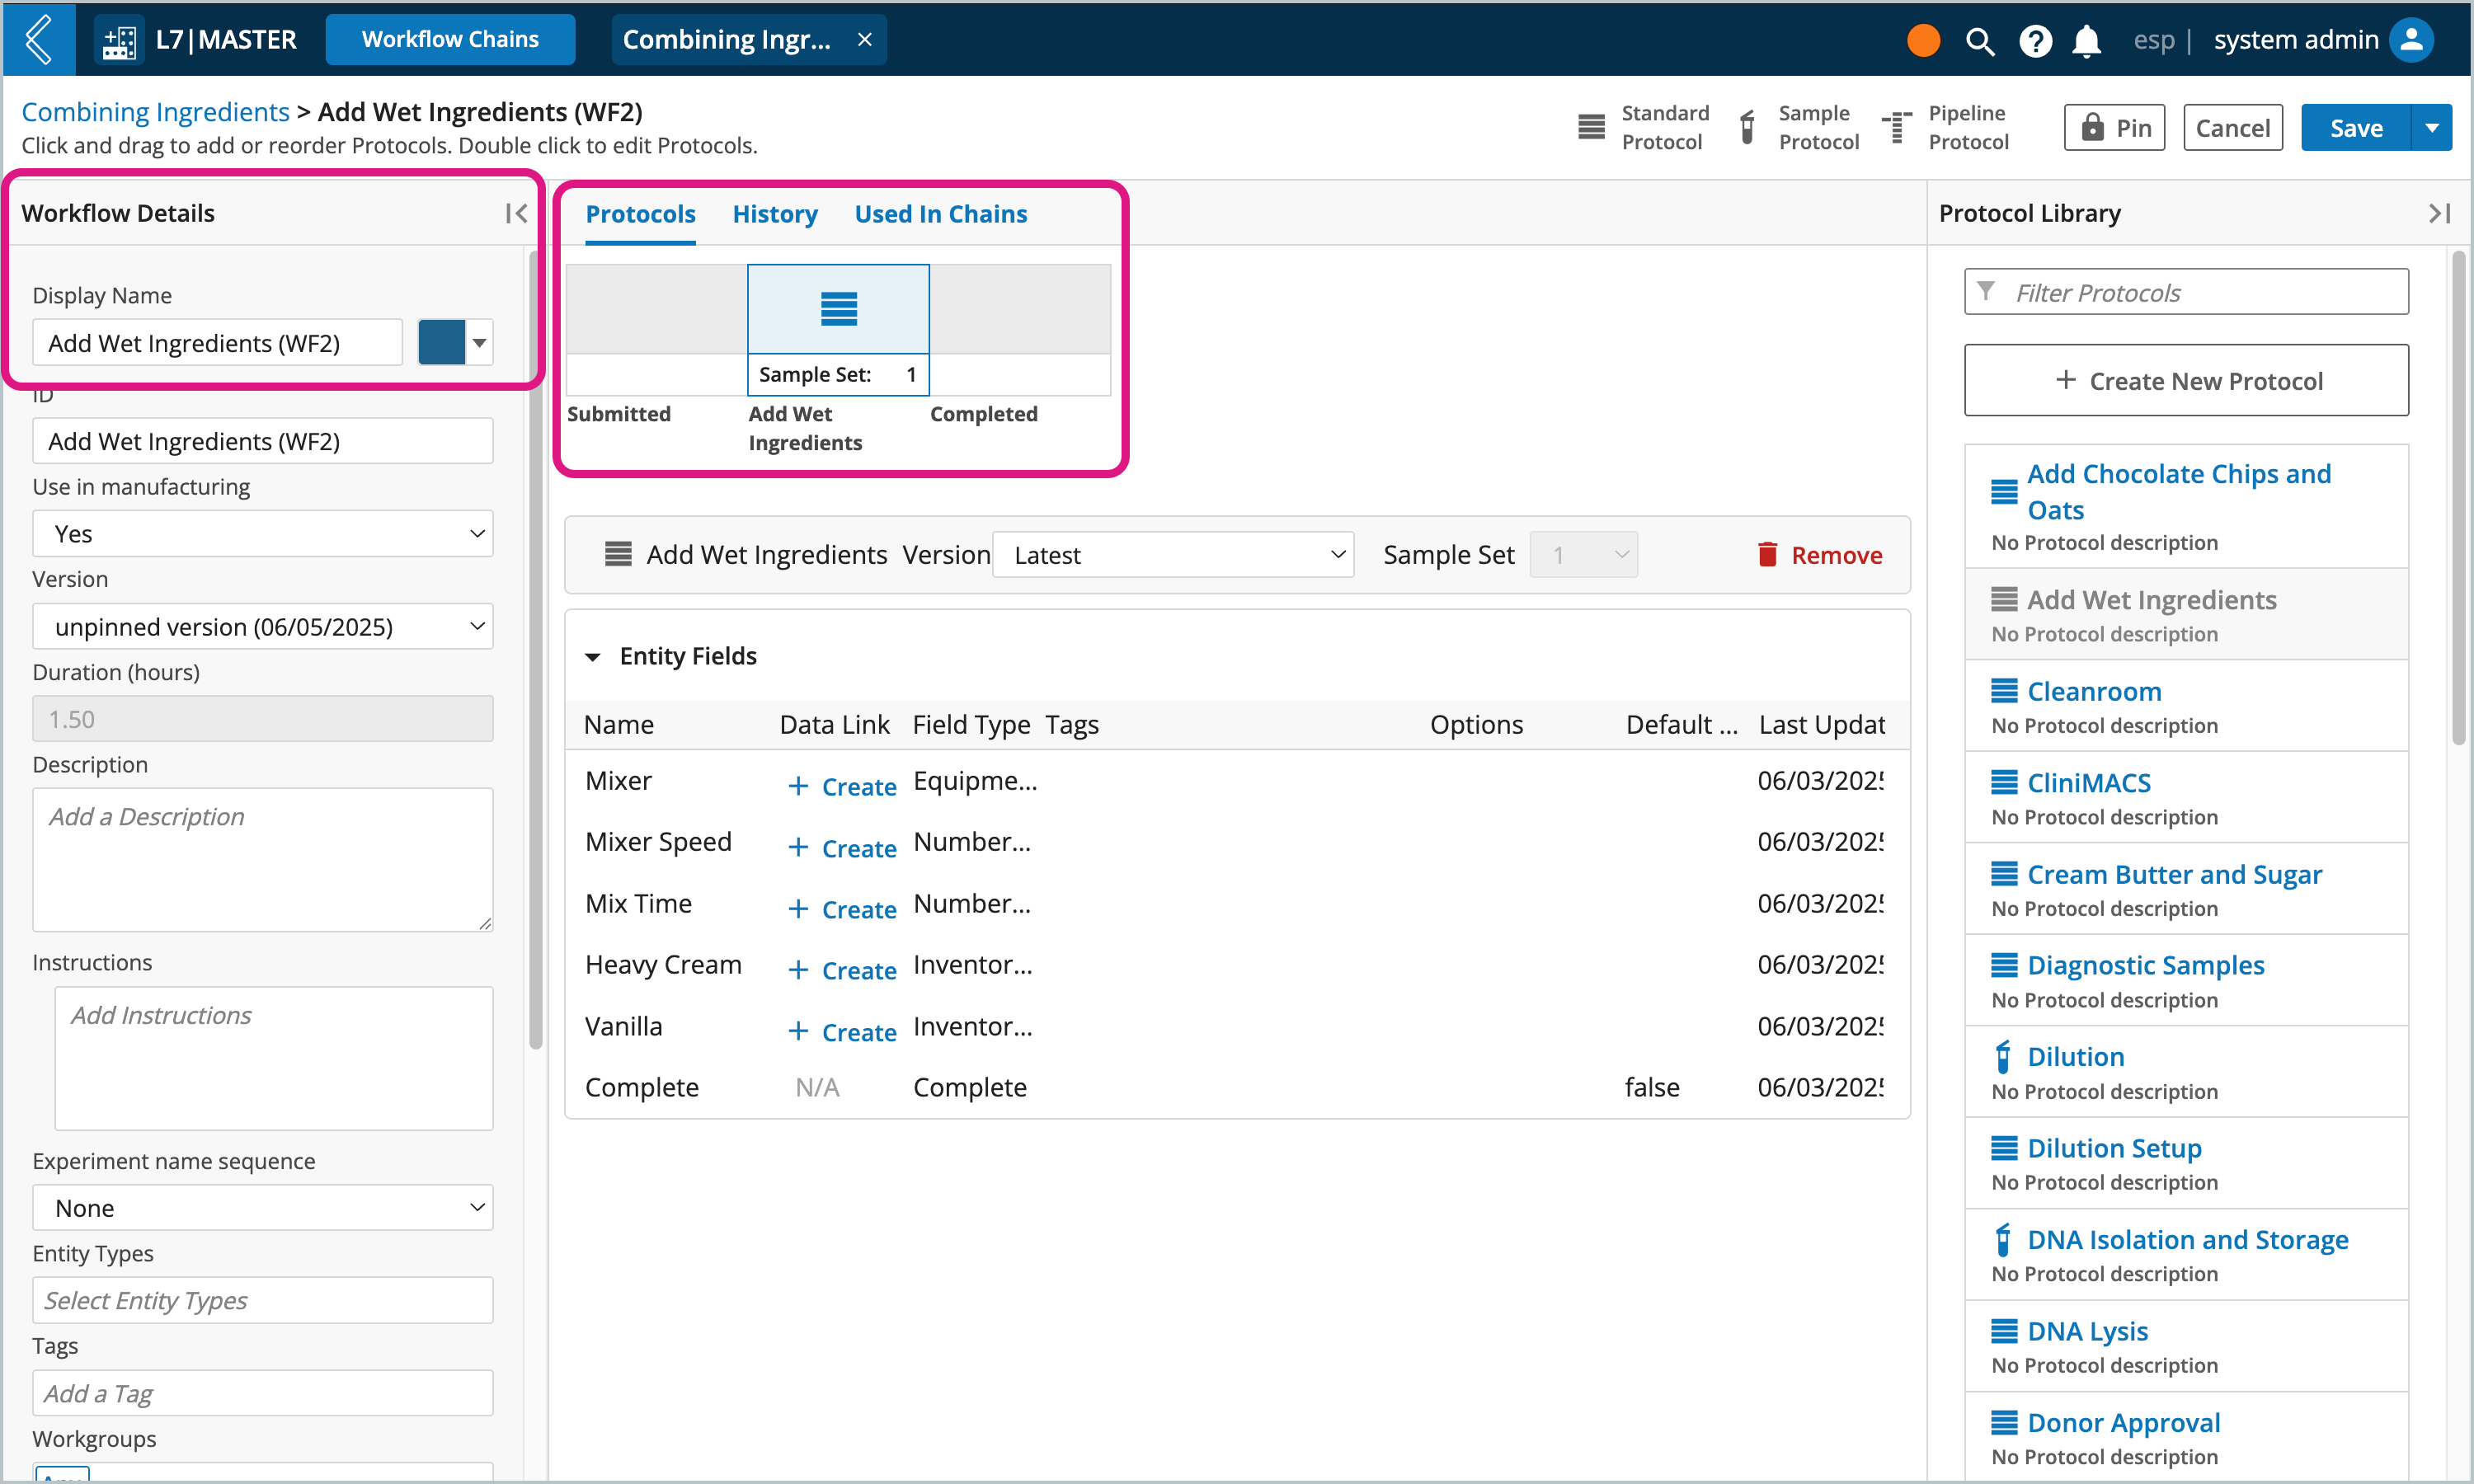
Looking closer at "Add Wet Ingredients (WF2)" Workflow, you can see it contains a single Protocol named "Add Wet Ingredients" and has several custom fields. A "Next Step" field will automatically get added when using the User Selection transition rule.
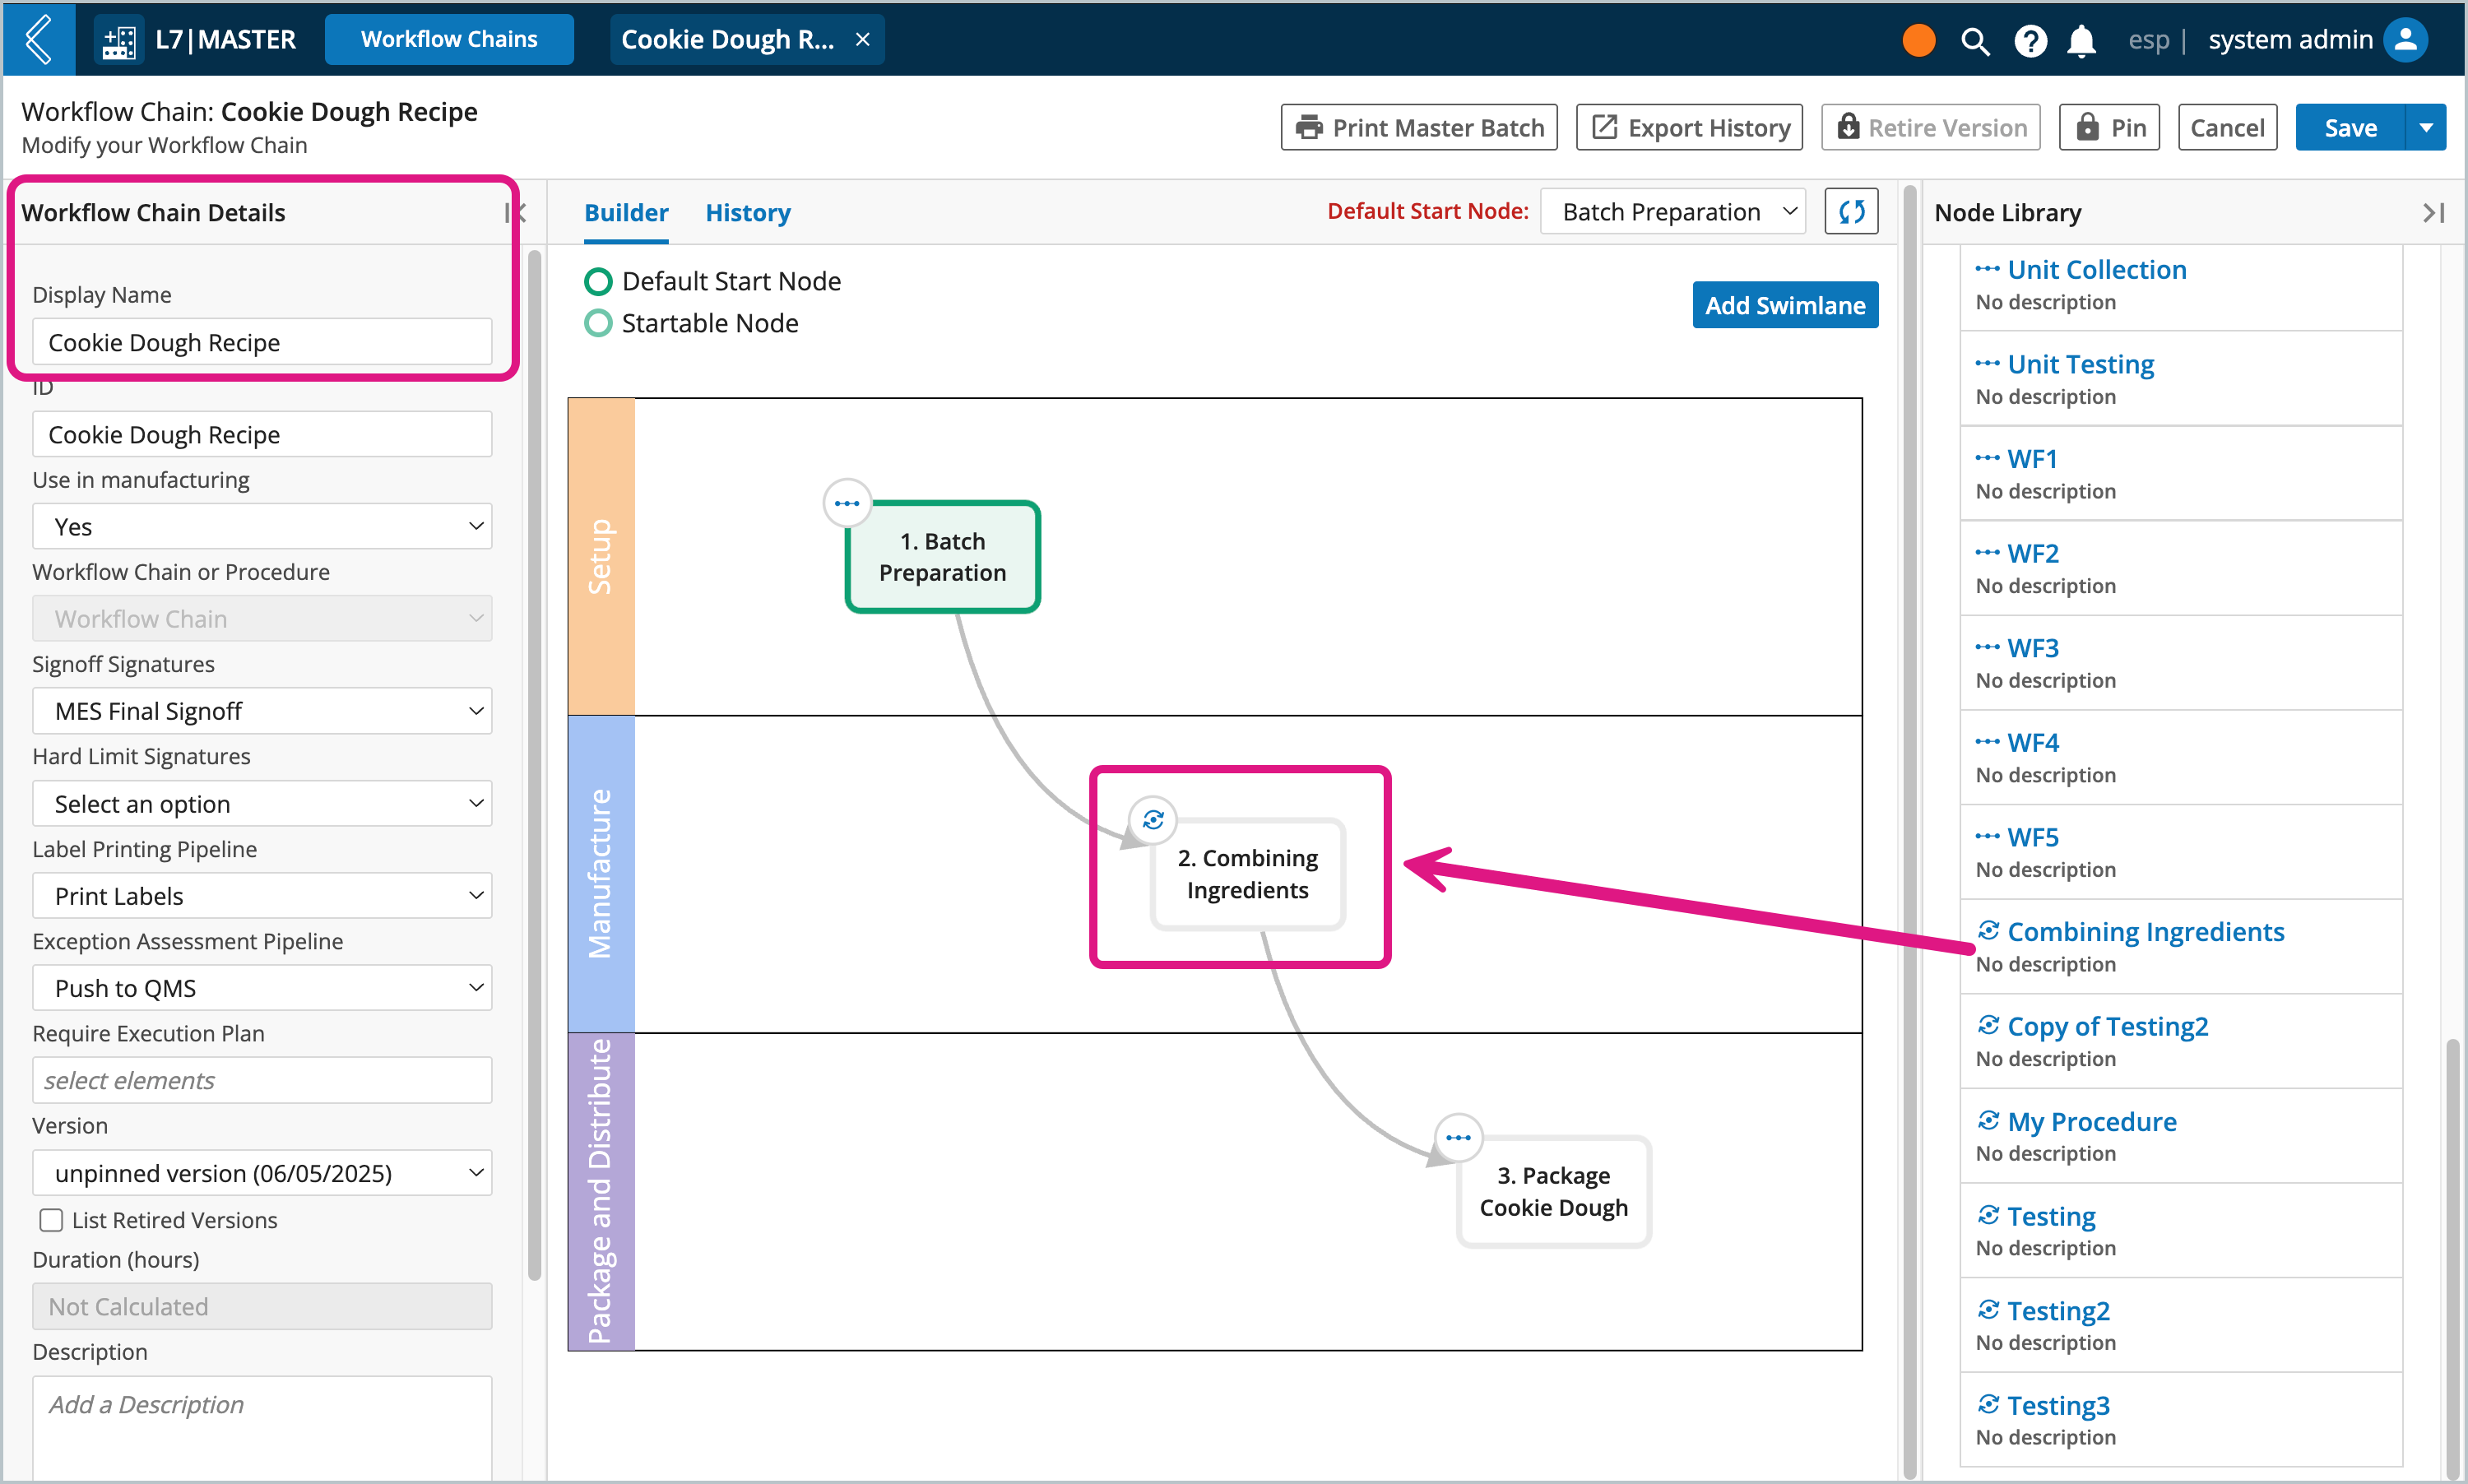
The "Combining Ingredients" Procedure has been added to a Workflow Chain (Recipe) and now appears as a single node.
In L7 MES, "Combining Ingredients" appears as the Unit Operation name and each Protocol appears as a Step. Next Step fields will display the name of the Procedure node's Display Name, not the Protocol's name.
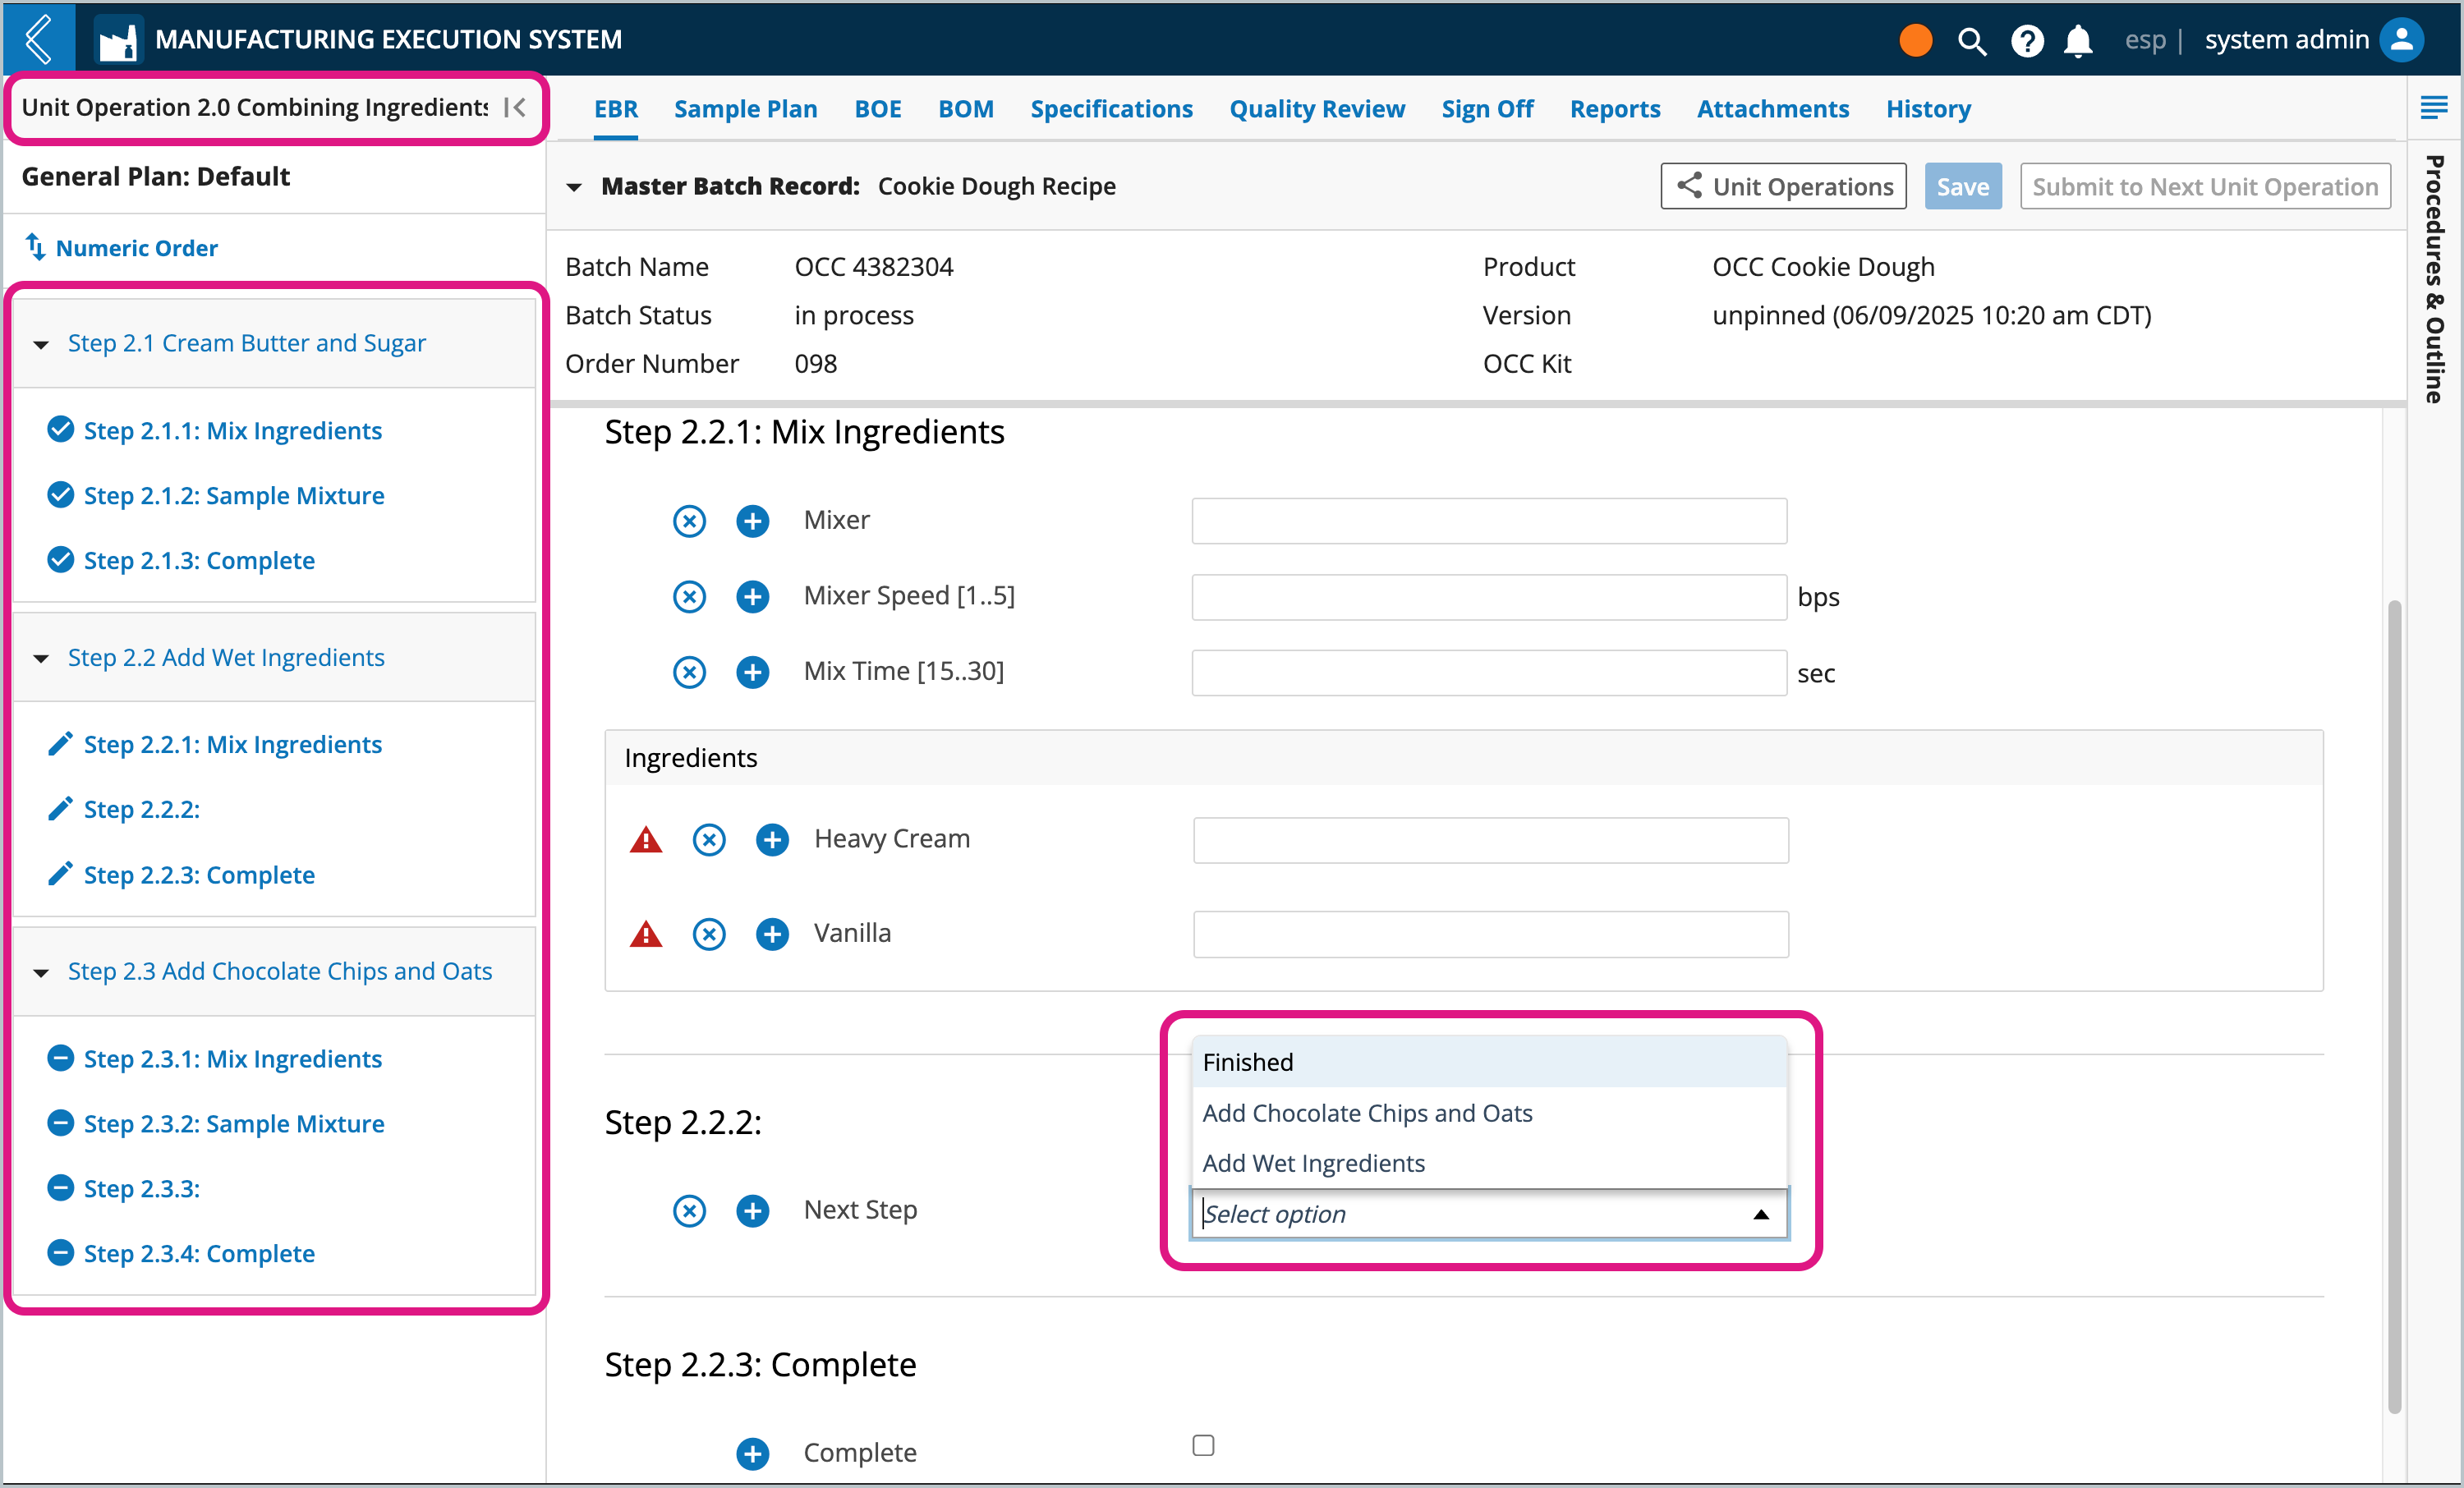
Repeated Protocols (Steps) will have a letter appended and incremented each time its repeated.
