Modeling Container and Kit Types
Key Terms
Term | Definition |
Container | A physical location that stores Entities, Items, Equipment and/or other Containers. Containers are instances, or occurrences, of Container Types. Examples include: freezer boxes, racks, bookcases, rooms, and buildings |
Kit | A physical kit that stores the Items intended to be used together during a process. Kit containers are instances, or occurrences, of Container Types that have "Is a Kit Type" selected. |
Container Type | Defines the attributes of a Container, including its content, dimensions, and custom fields. The Container Type builder is used to model both general Containers and Kits. |
L7 Assets App | L7 application used for location management of Containers, Kits, and Equipment. Formerly called L7 Locations app in earlier versions of L7|ESP. |
Equipment | Physical equipment and instruments used, tracked, and managed during business operations. Equipment are instances, or occurrences, of Equipment Types. Modeled in L7|MASTER's Equipment Type builder; shares similar features as Container Types, but with additional functionality. Equipment are managed in L7 Assets. |
Terminology Relationship Diagram
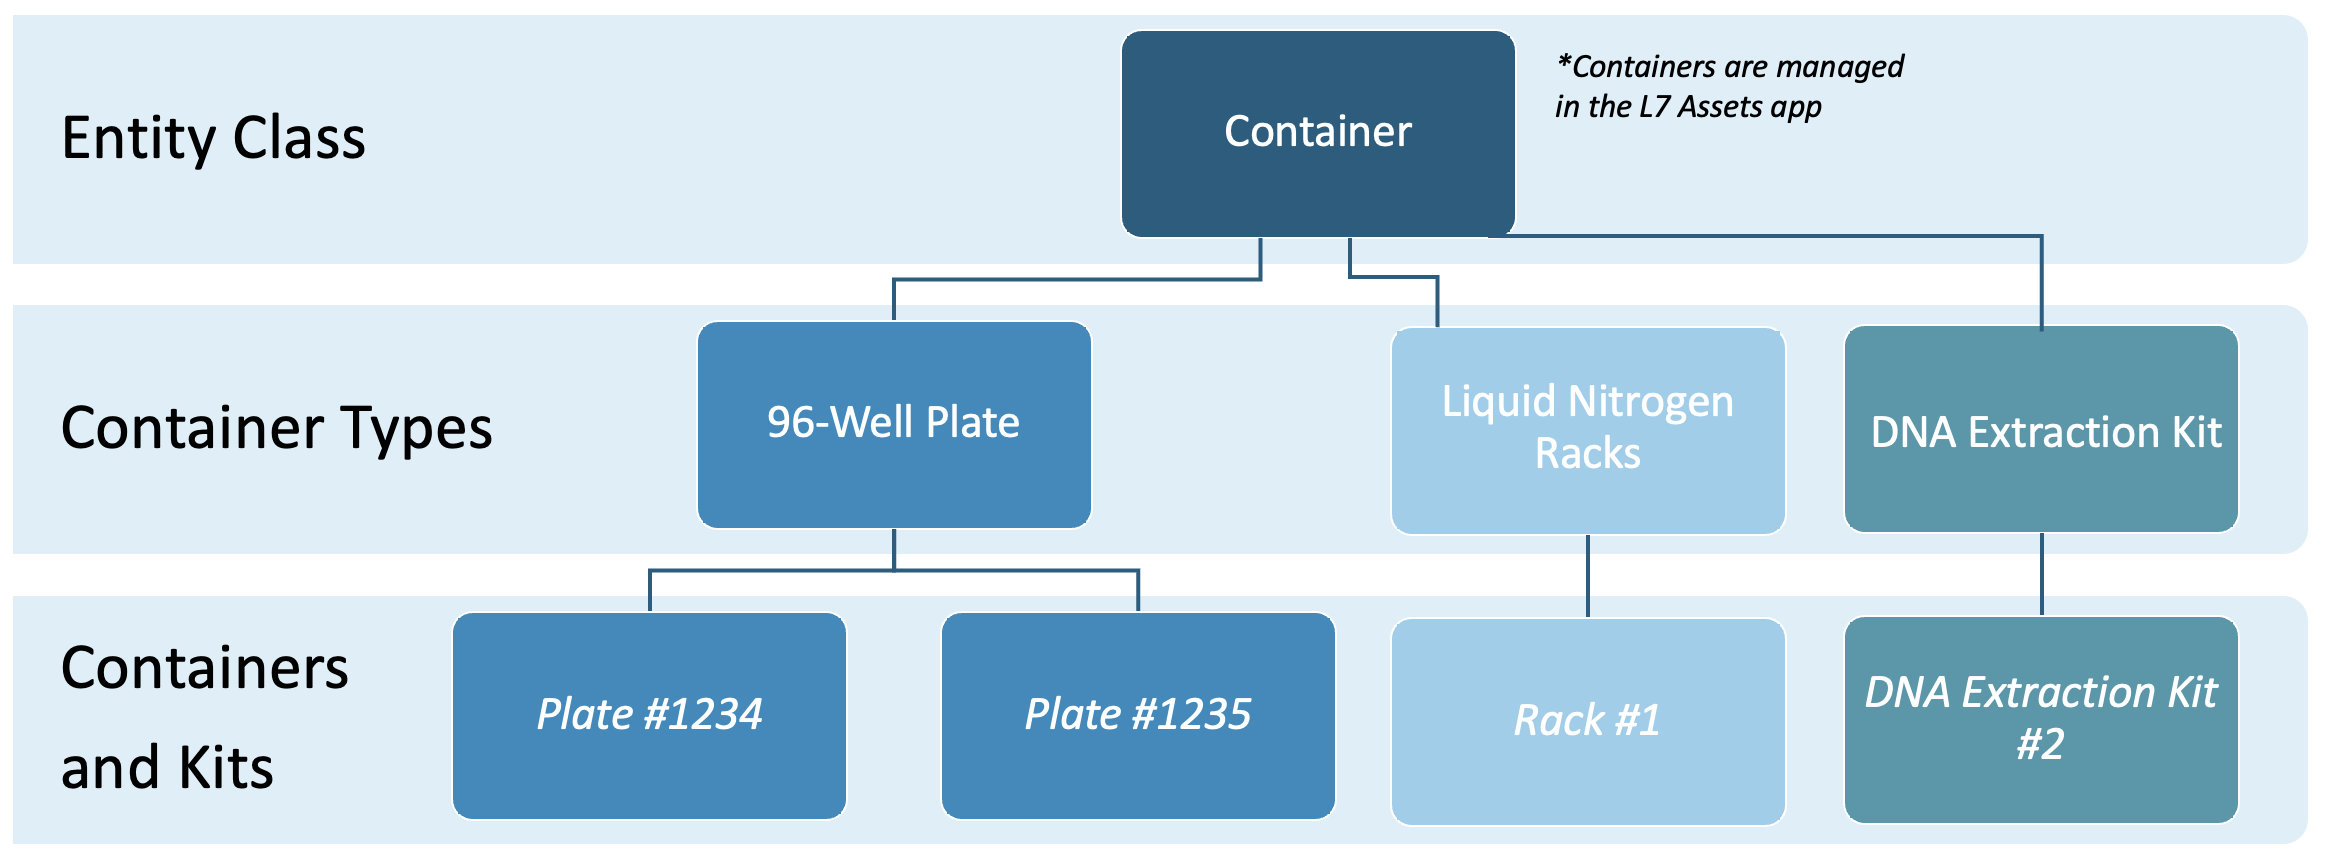
How do End Users interact with Containers in L7 Assets?
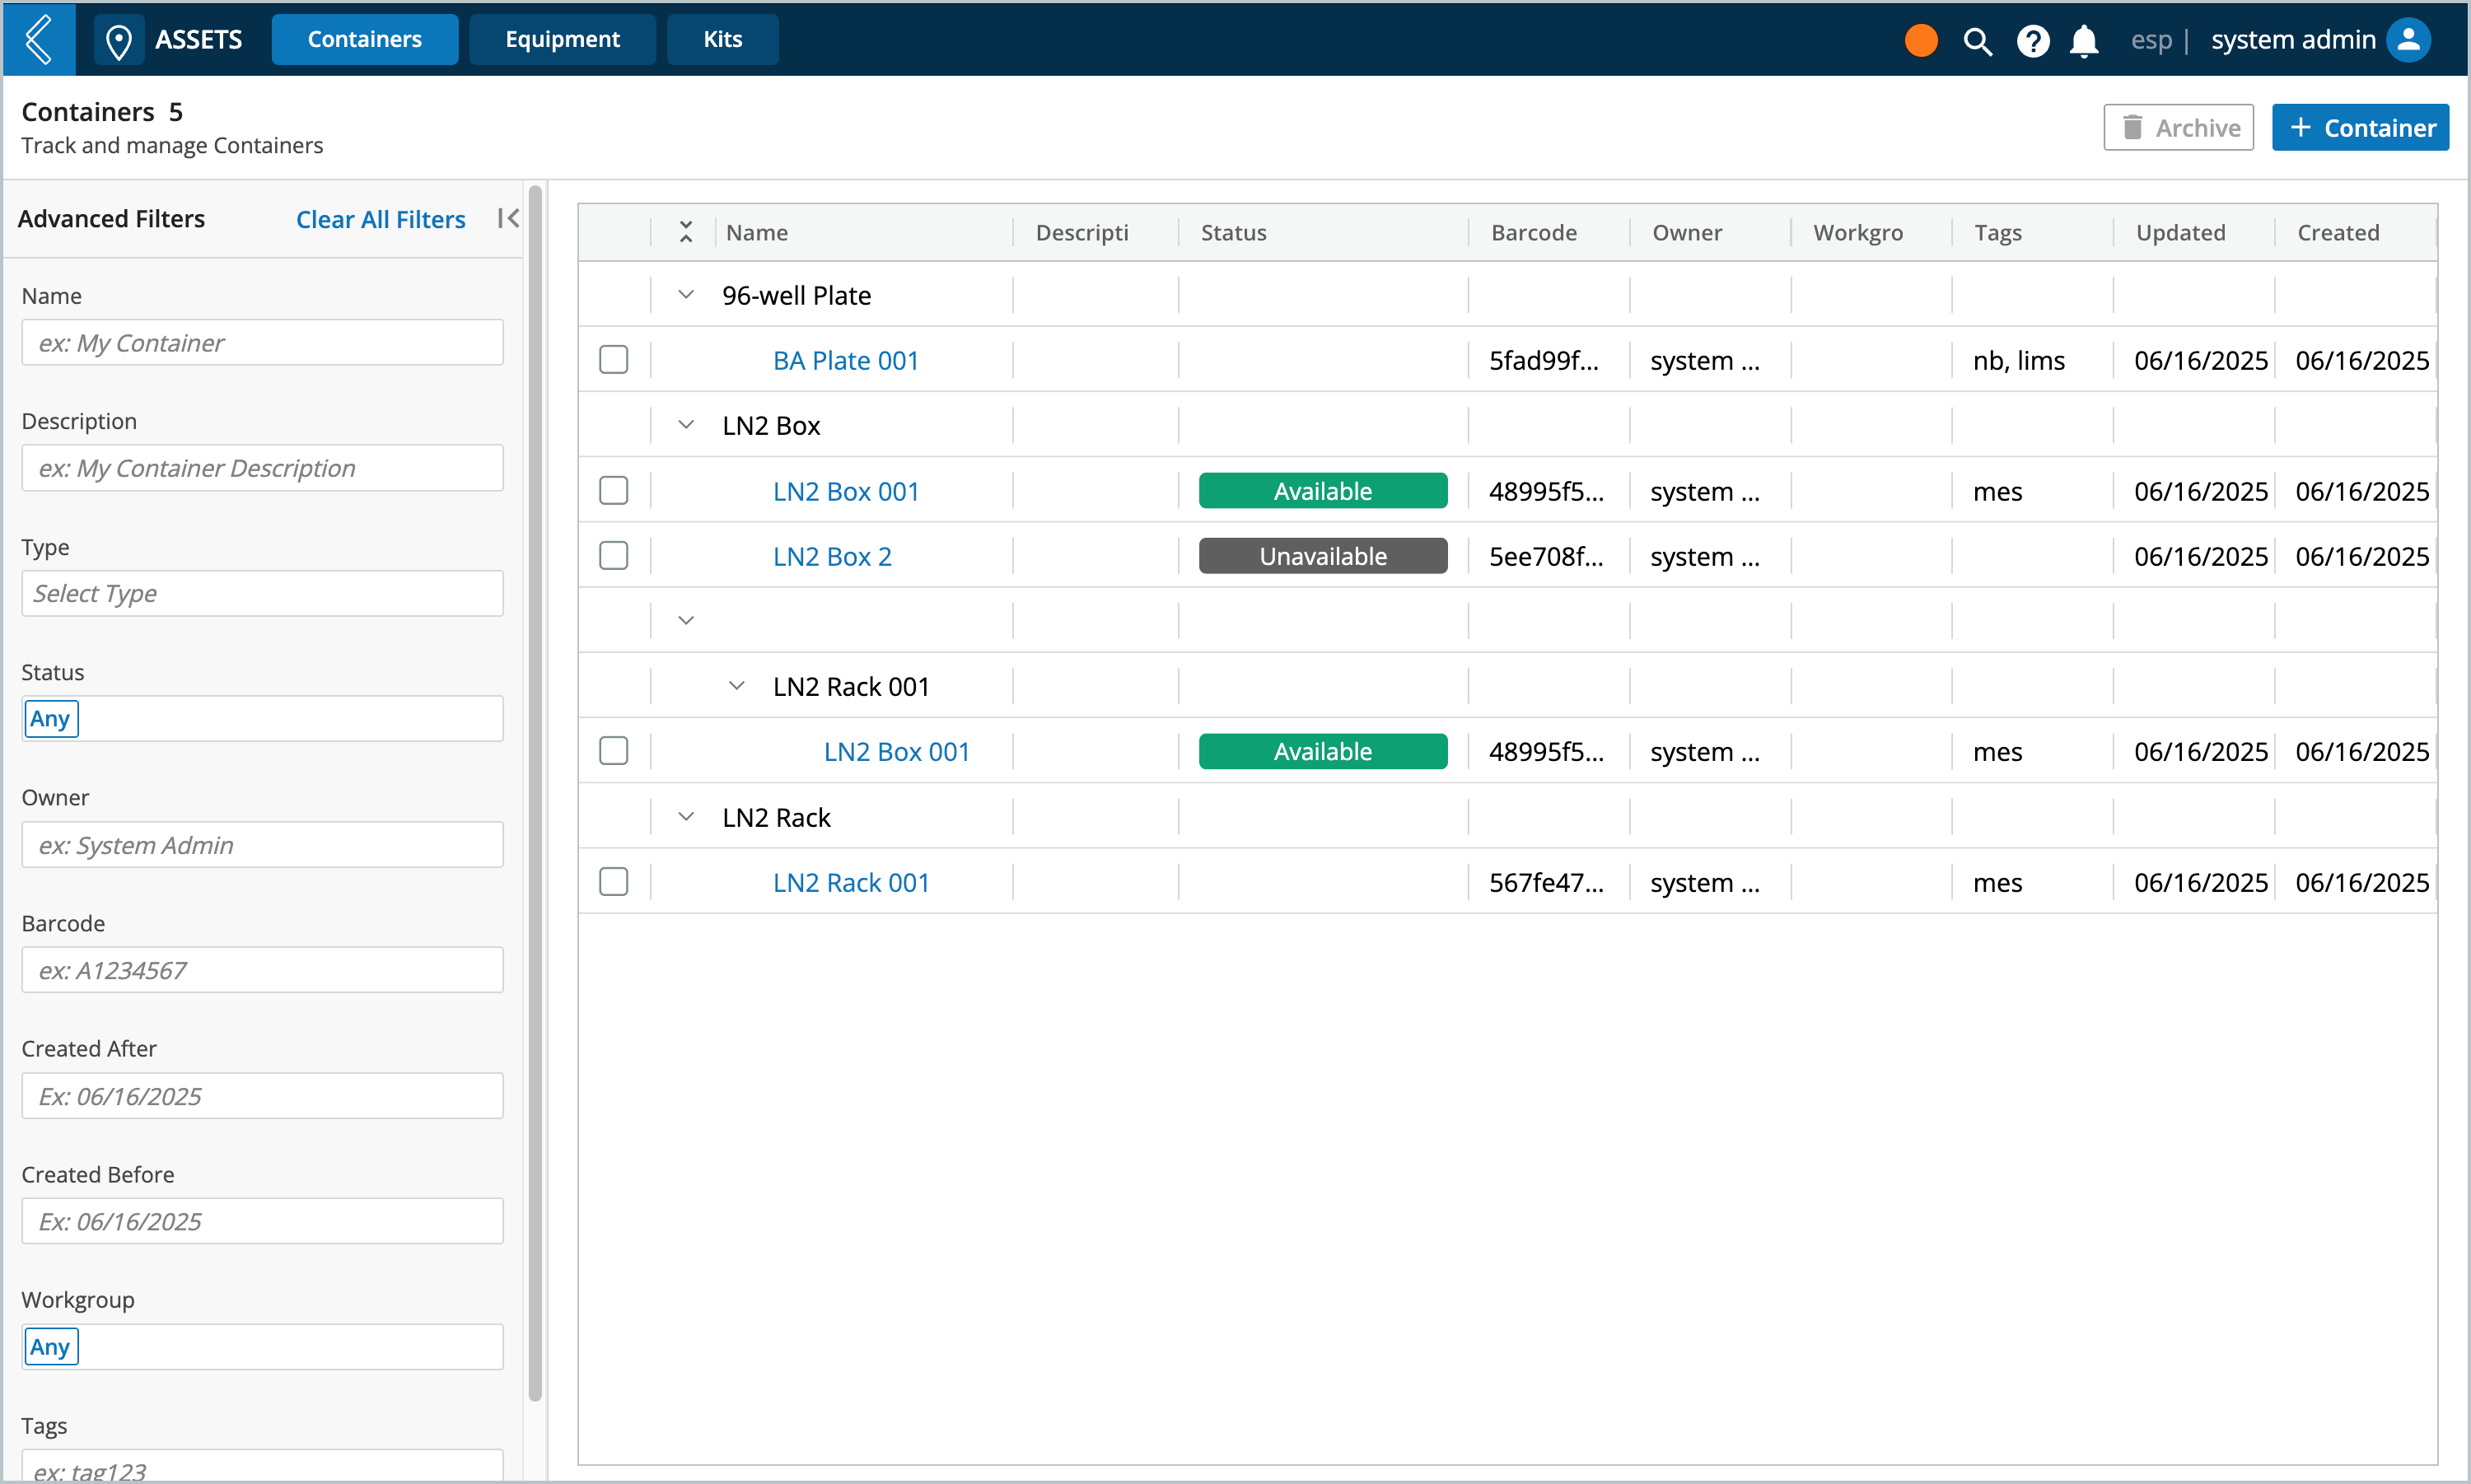
The L7 Assets app is used by end users to manage Containers, Equipment, and Kits. You can register new Containers and Kits by going to their respective tab, then clicking + Container or + Kit.
Once created, additional Containers, Entities, and/or Items can be stored in a location, depending on the configuration of the Container Type.
Note
L7 Assets manages Equipment in addition to Containers because Equipment Types can be configured to store resources and behave similarly as Containers.
View general Containers by going to L7 Assets's Containers tab.
To view a Container's details page, select the name of a Container from the list or click + Container to create a new Container.
Tip
L7|ESP supports barcode scanning, if you have the barcode of the Container you're looking for, then simply scan the barcode from the Containers landing page and L7|ESP will redirect you to the Container.
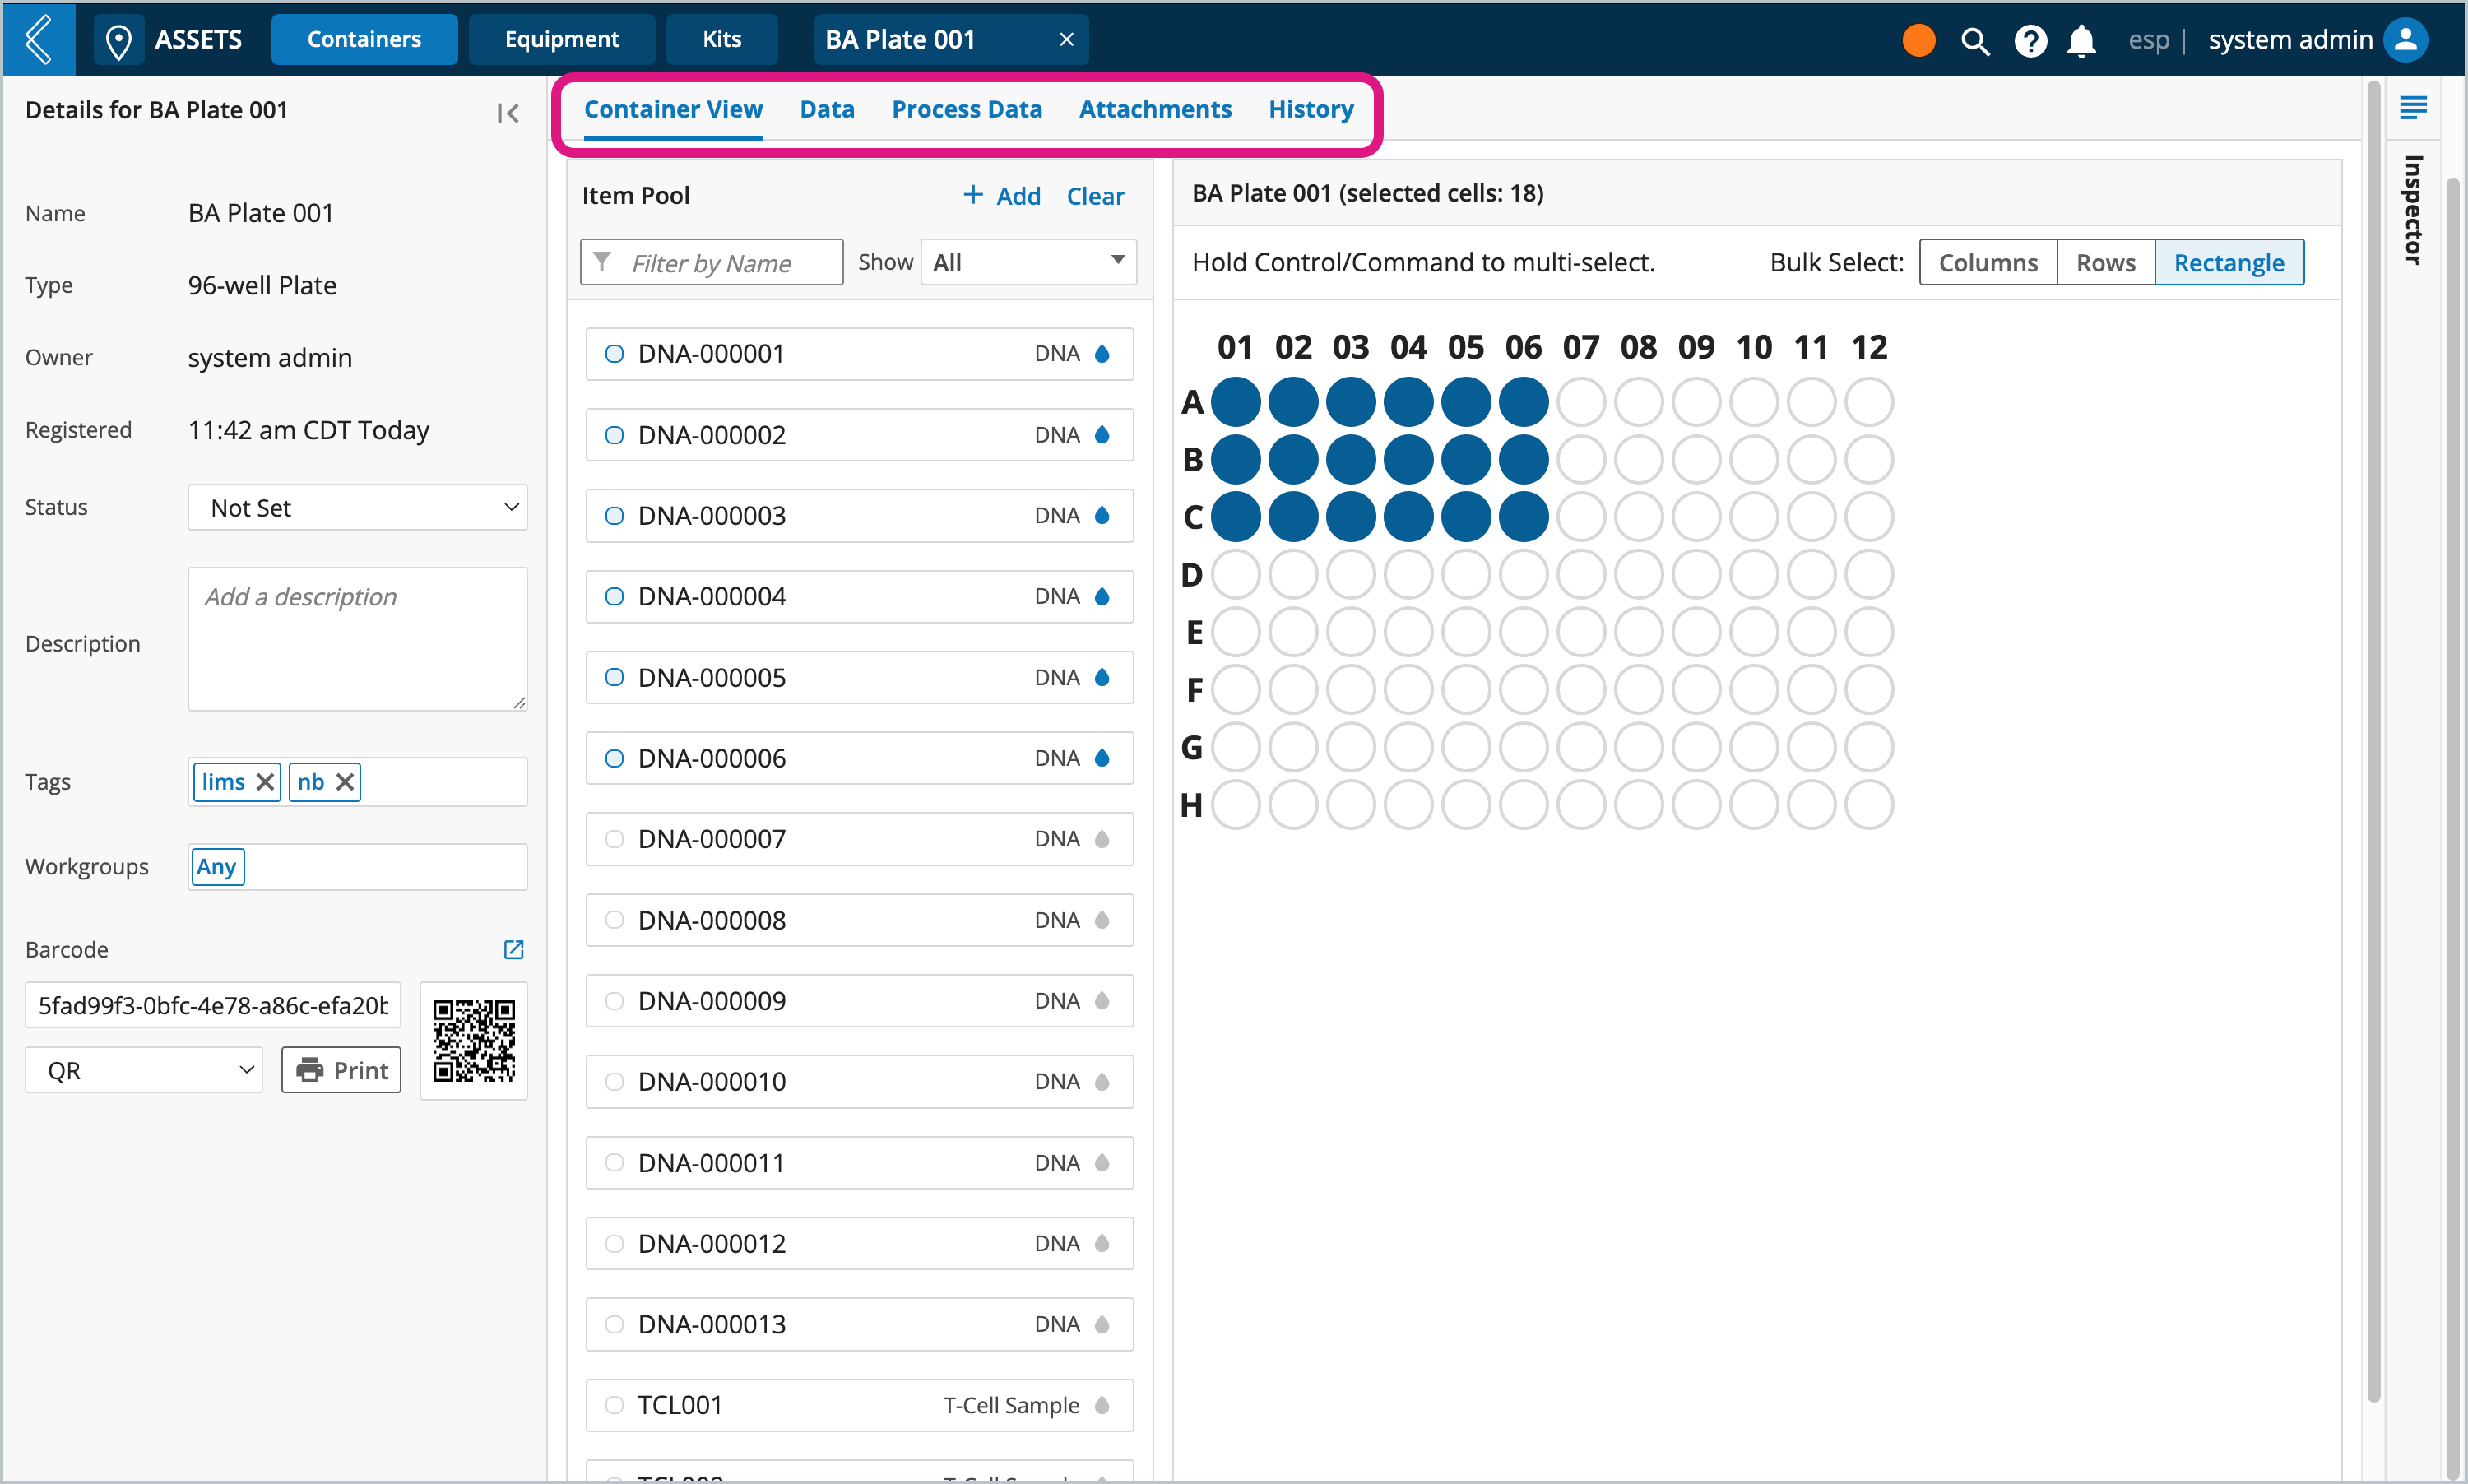
When an End User selects a Container, they see:
What is stored at the highest level of the Container (Container View tab).
Tip
L7|ESP supports barcode scanning, you may scan resources into a Container, or use the Item Pool to manually select resources.
The Container’s metadata (Data tab).
Production data associated with the Container (Process Data tab).
The files the Container is associated with (Attachments tab).
The Container’s history (History tab).
Note
You can optionally enable the Container's "Tree" view tab, which will display the Container's hierarchy of stored resources. For example, if you have a rack that stores boxes filled with samples and reagents, then the Tree view will show you a nested list of every resource stored in the rack.
To enable "Tree" view, go to L7 Configuration -> feature_flags configuration file -> switch to Code view -> find container -> set tree_view to "enabled"
View Kit Containers by going to L7 Assets's Kits tab.
To view a Kit's details page, select the name of a Kit from the list or click + Kit to create a new Kit.
Tip
L7|ESP supports barcode scanning, if you have the barcode of a Kit you're looking for, then simply scan the barcode from the Kits landing page and L7|ESP will redirect you to the Kit.
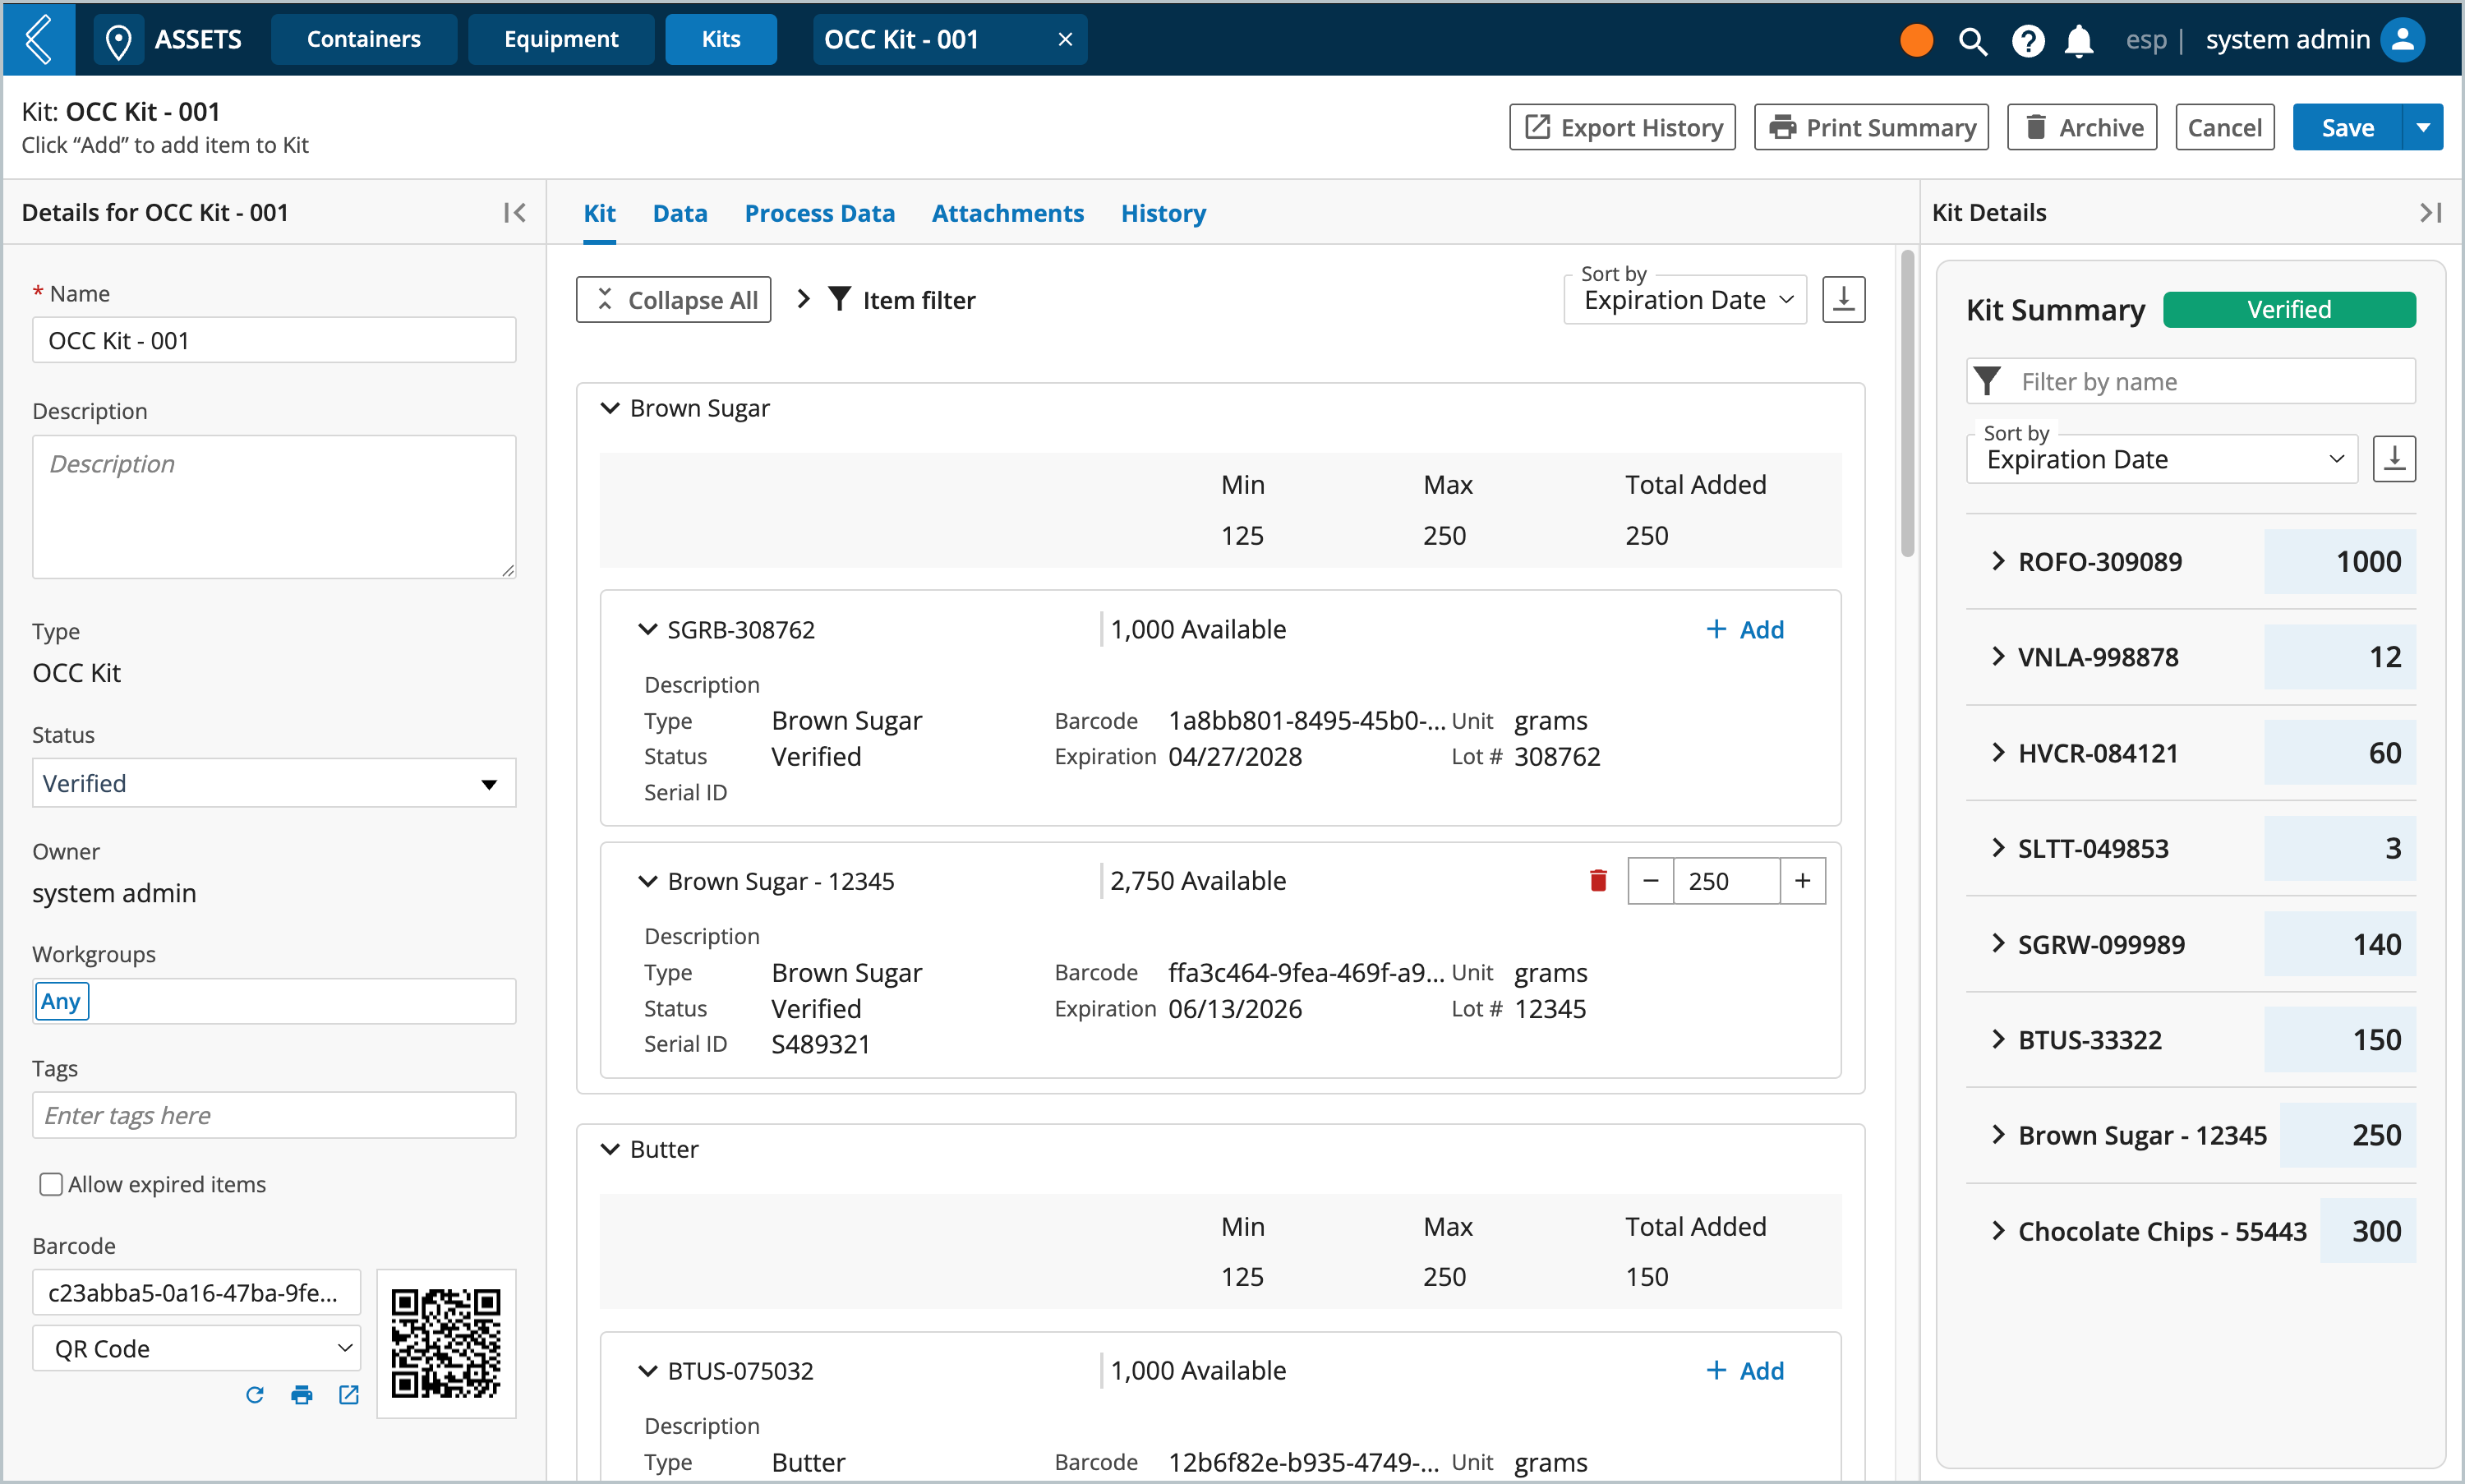
When an End User selects a Kit, they see:
What can be, and what is stored in the Kit (Kit tab).
The Kit's metadata (Data tab).
Production data associated with the Kit (Process Data tab).
The files the Kit is associated with (Attachments tab).
The Kit's history (History tab).
End Users can...
Add/remove inventory Items
Tip
Scanning an Item will automatically add the minimum quantity and highlight the item that's been scanned into the kit.
Add/update Kit statuses
Allow the use of expired Items - by default the use of expired Items is disabled; when enabled, expired items will have a caution icon next to their names
Print Kit Summary reports - to generate a printable report, click Print Summary, then go to L7 Data app to view the pdf. To group items by specific categories and/or add a "Catalog #" field, see How to modify a Kit Details summary report.
Note
The kit summary report includes a "Visual Inspec." and "Used" column intended for users who wish to print their report and physically record their responses with pen and paper.
Clone Kits - cloning a Kit will create a copy of an existing Kit, including the specific Items and thier quantities. Click the arrow next to Save, then click Save & Clone, enter how many copies to make (between 1 and 10).
Note
Kits containing expired items cannot be cloned.
Things to consider before modeling Containers
Containers are created in L7 Assets, but Containers cannot be used for storage in L7 MES, but they can be referenced using Resource Links.
If you have a location or kit that you wish to register and track as part of a business process.
If two (2) Containers have different dimensions.
If two (2) Containers have different custom fields.
If two (2) Containers store different types of resources.
Is this a general Container or a Kit Container?
What does this type of Container look like?
What does this type of Container need to store?
How many elements can be stored in each location?
Is there any data that needs to be attributed to this type of Container?
How will this data be collected?
How to create new Container Types
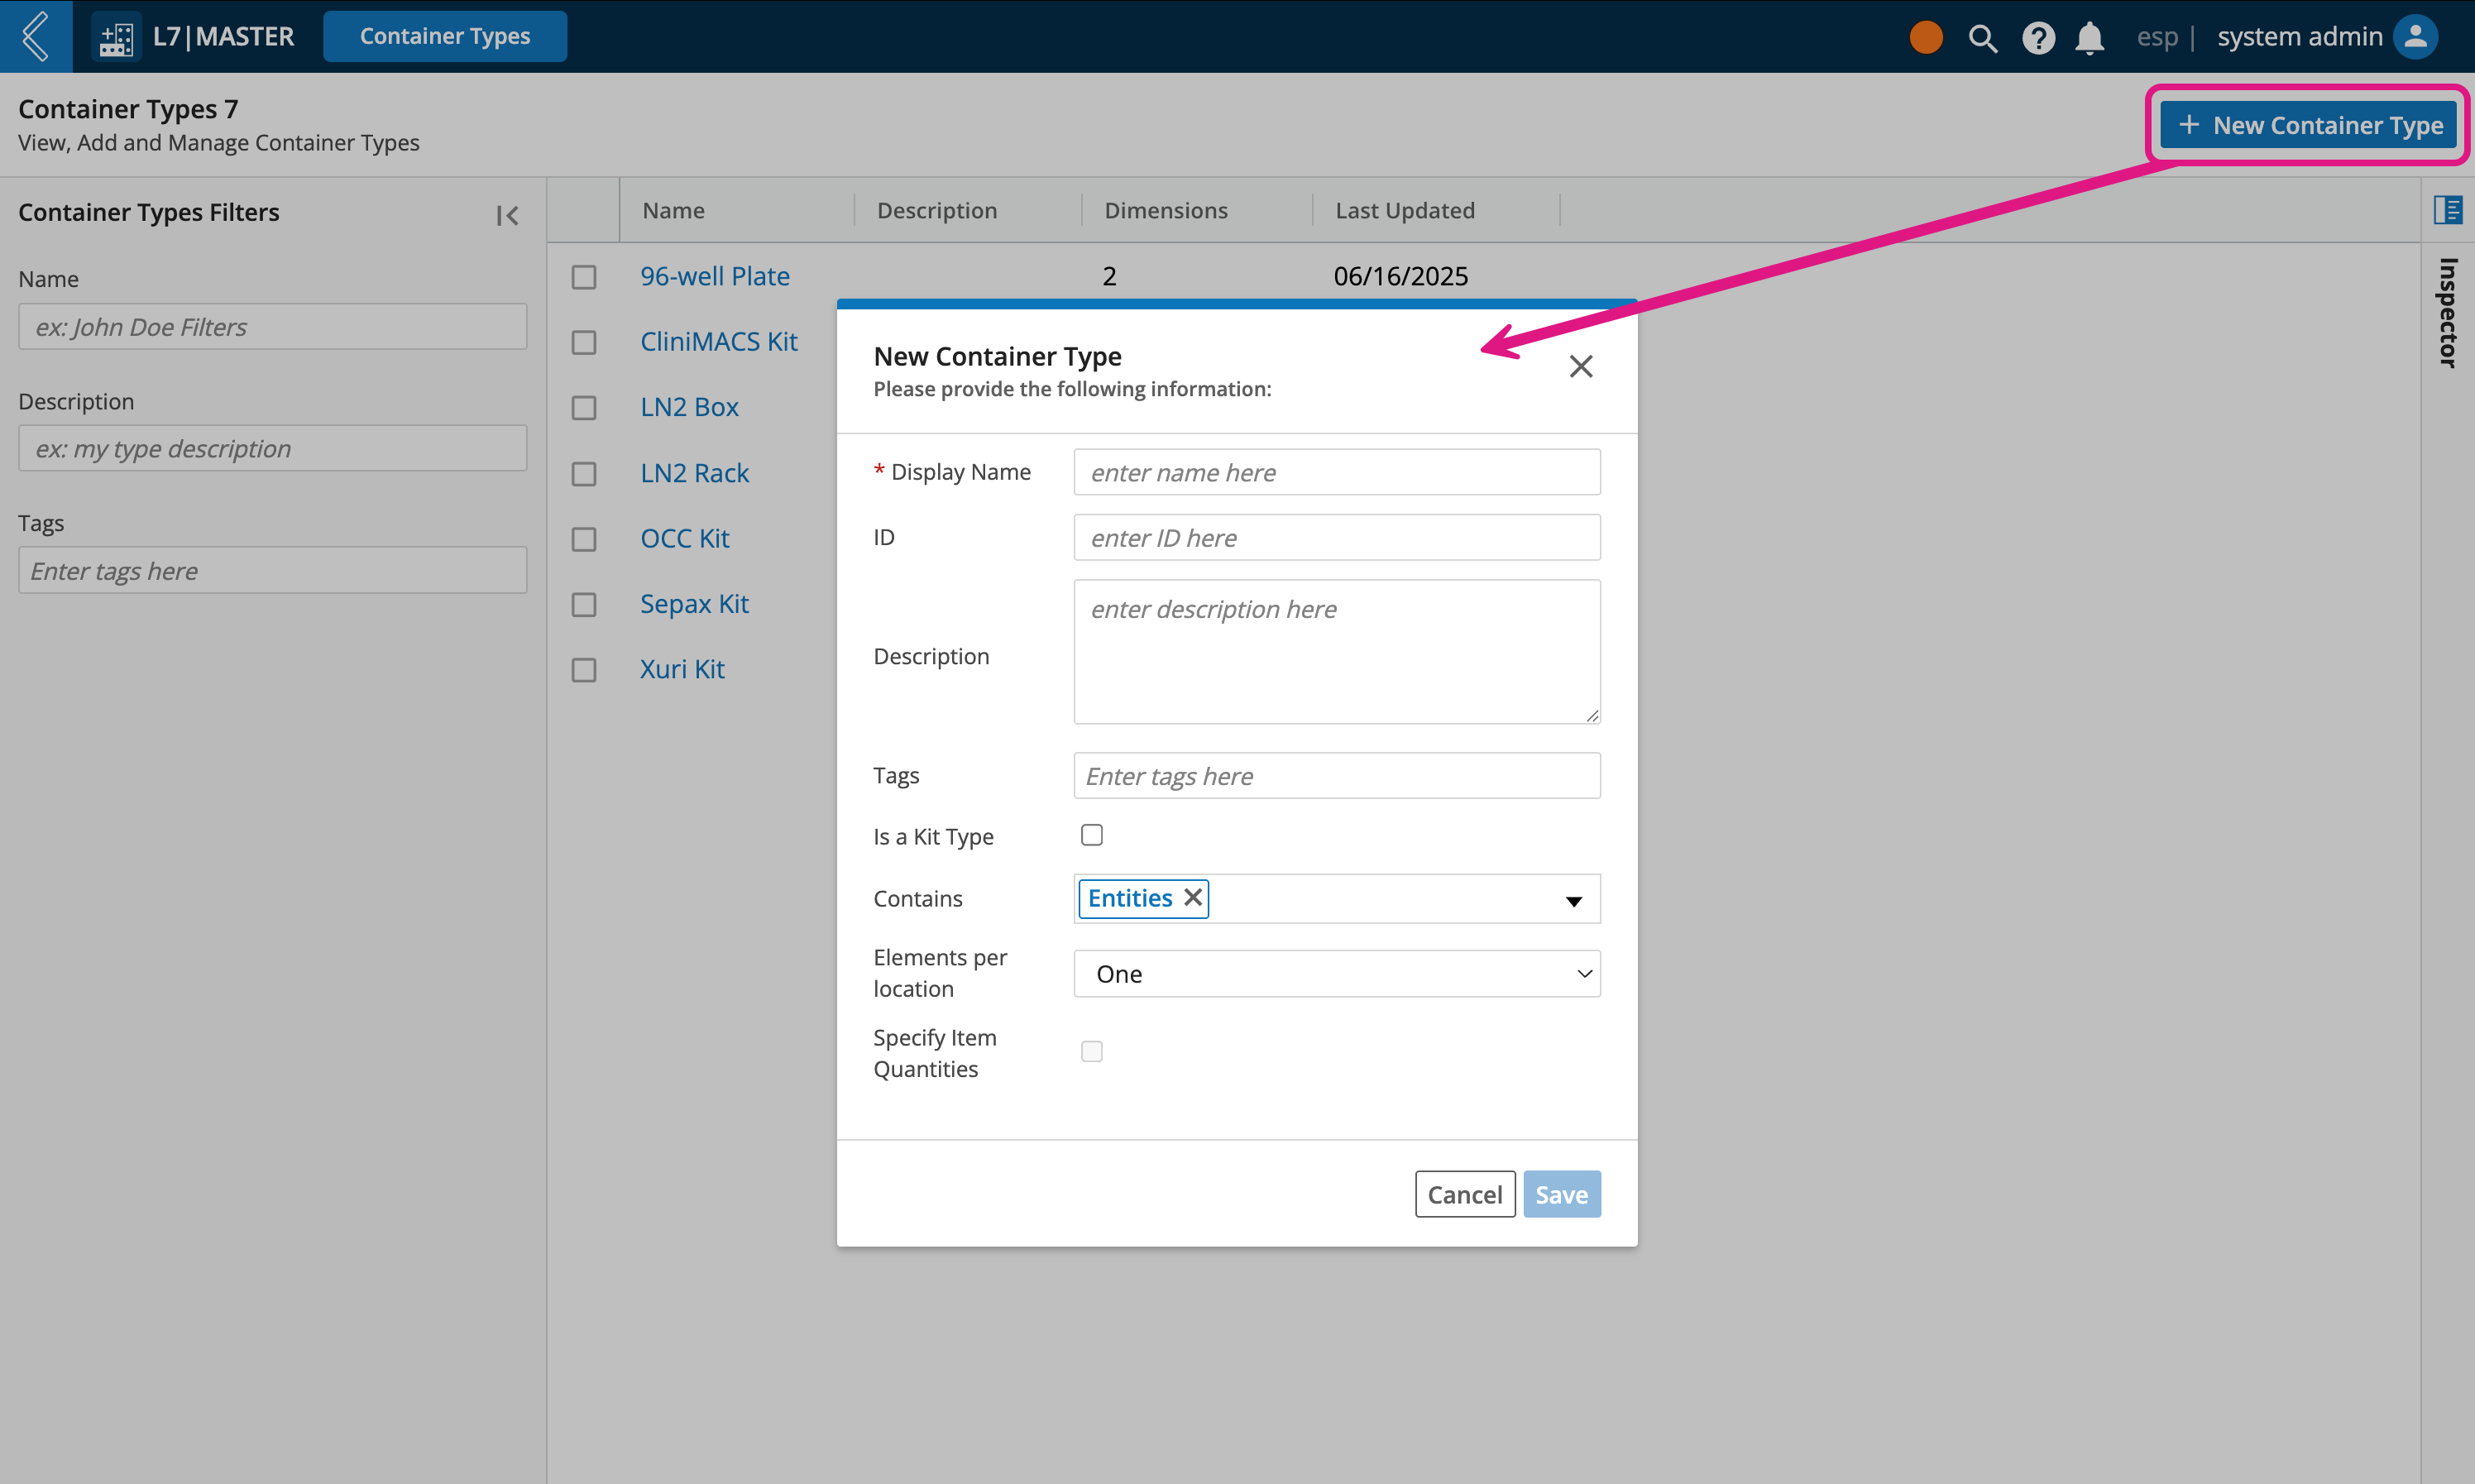
Go to: L7|Master → Container Types → + New Container Type
Is a Kit Type - select this checkbox when making a Kit Container Type. Kit Types will appear in L7 Assets's Kits tab
Note
Kits contain an unlimited number of Items, with Specify Item Quantities enabled.
Contains – by default, Entities is selected. Use the multi-select dropdown to add/remove Entities, Containers, and Items. At least one resource must be selected.
Elements per location – the number of Entities, Containers, and/or Items that can be stored per location (e.g., shelf, rack, slot). Each location can store one or more (unlimited) resources.
Specify Item Quantities - available when a Container can store an unlimited number of Items; allows you to specify a minimum and maximum quantity for each type of Item.
How to add dimensions to Container Types
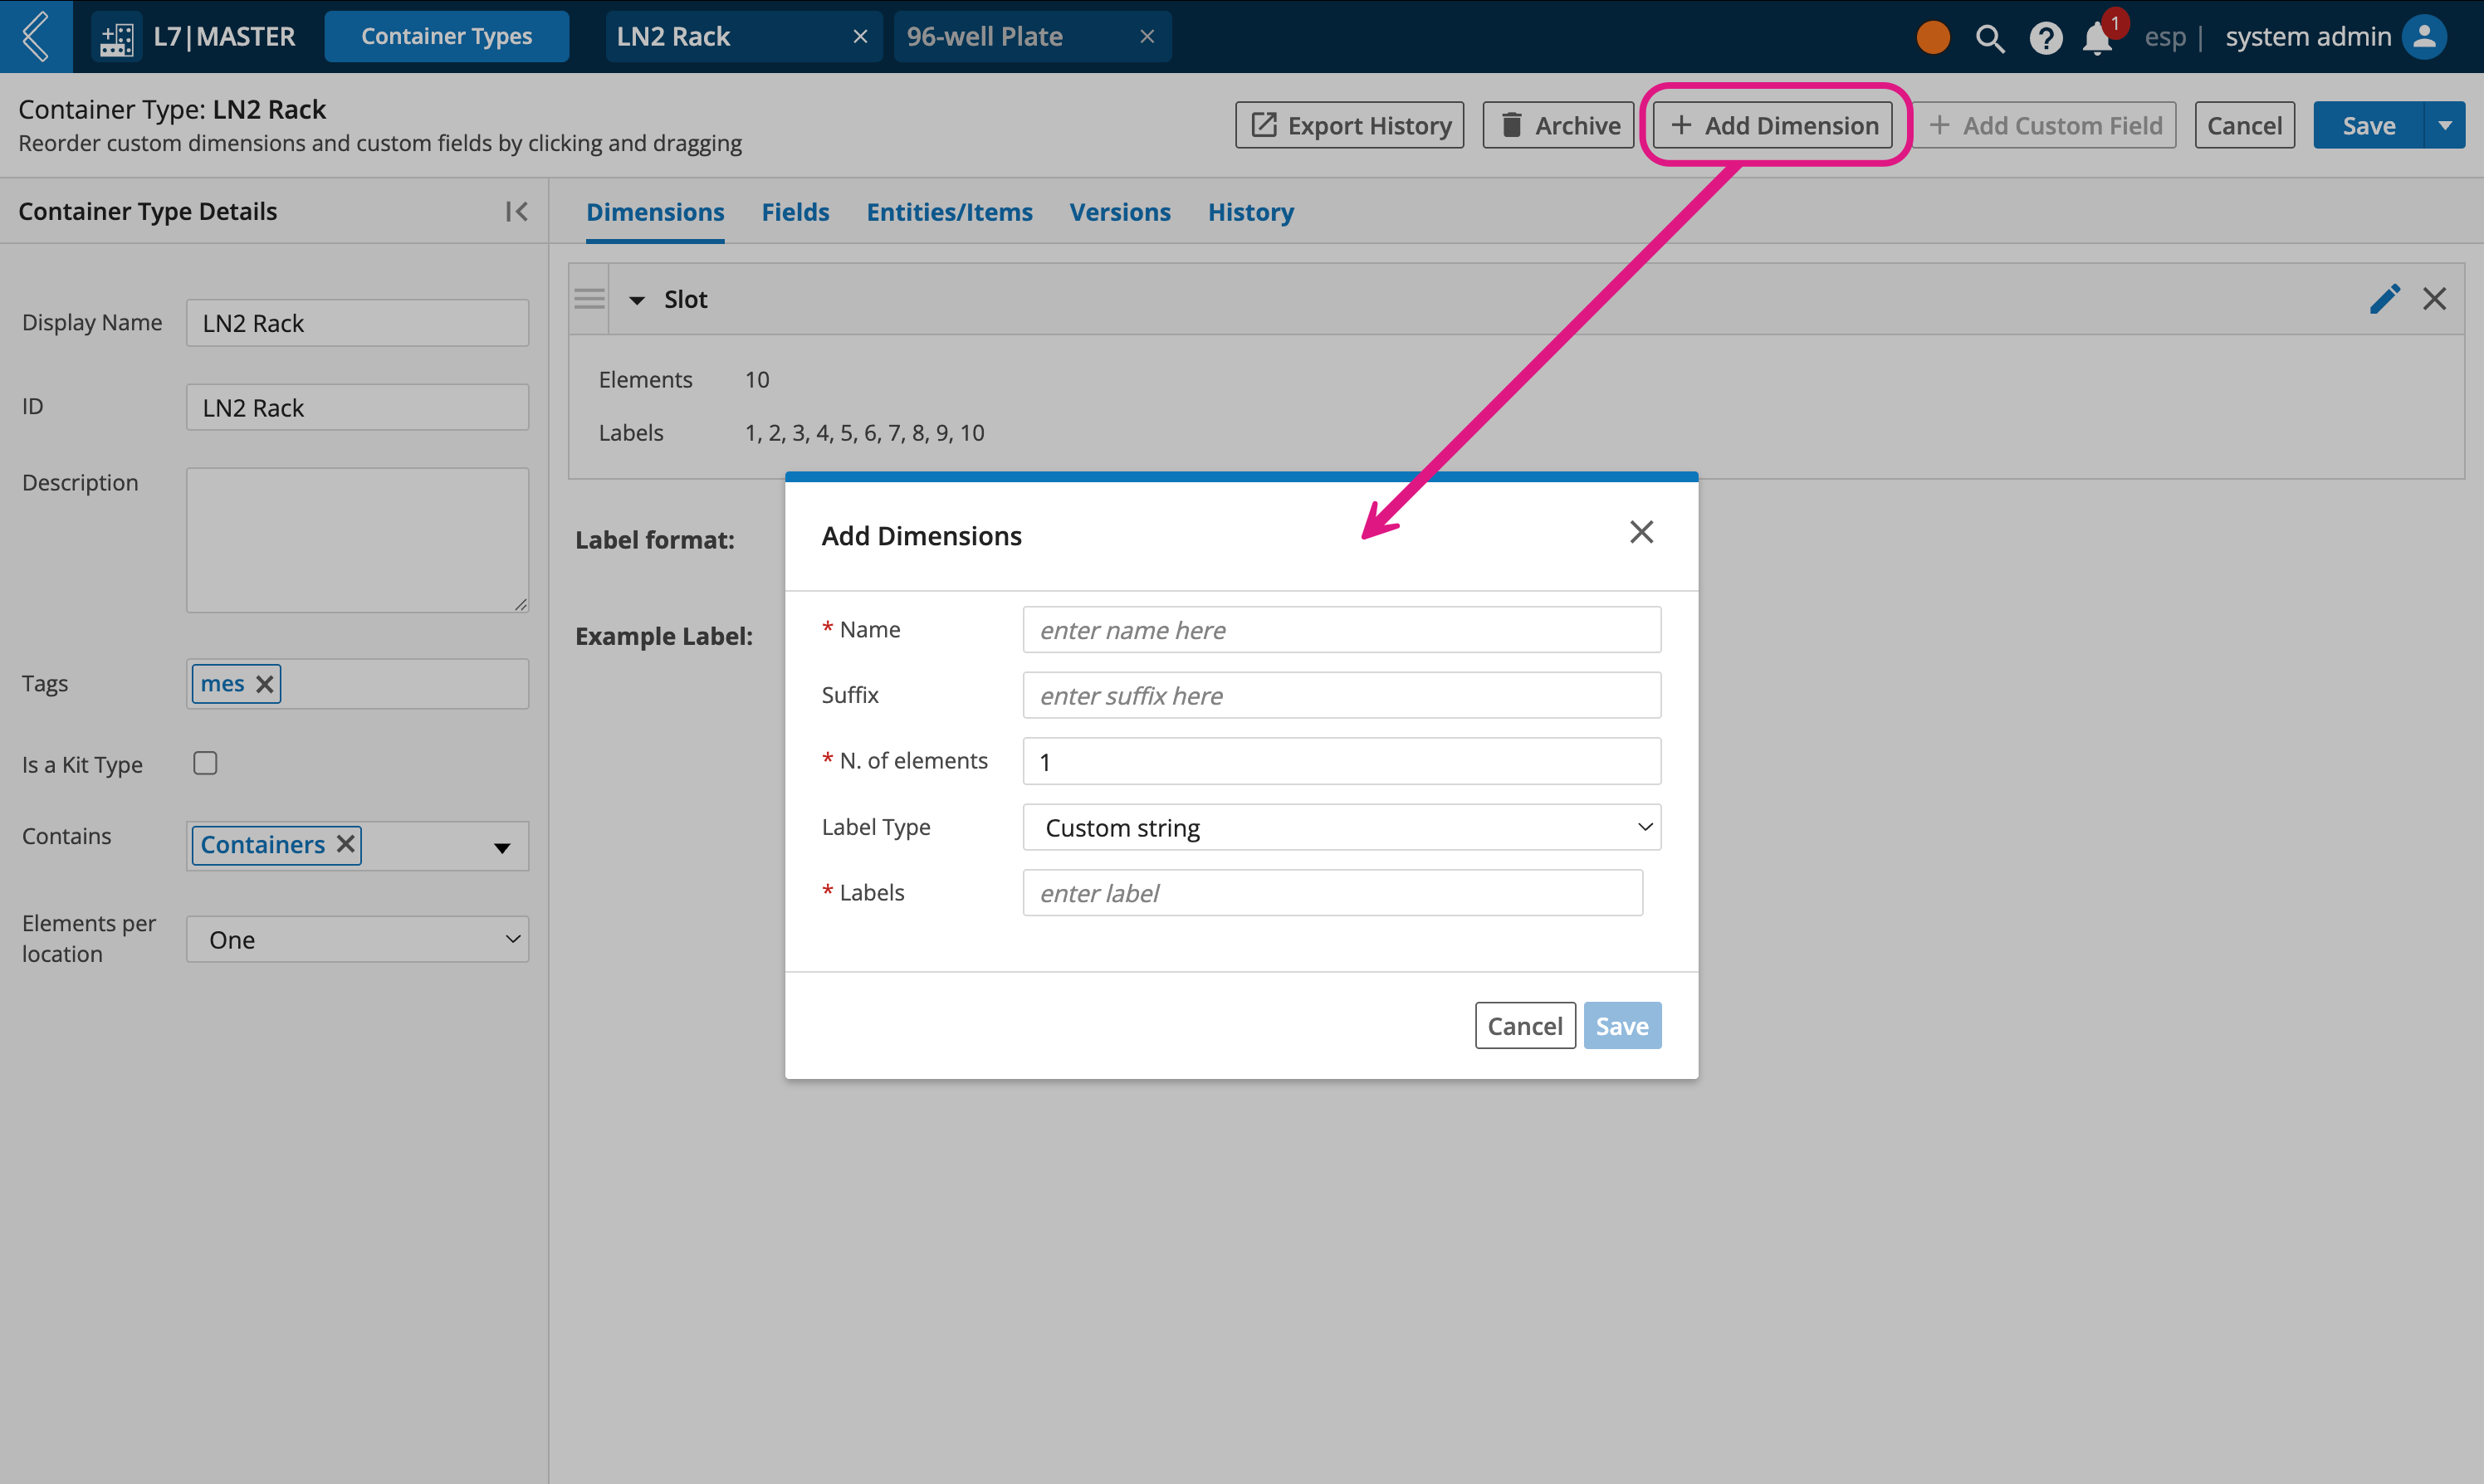
Go to: L7|Master → Container Types → select the Container Type → Dimensions tab → + Add Dimension
Note
Kits do not have dimensions.
Name – how you want to reference the dimension (e.g., shelf, row, column).
N. of elements – the number of occurrences the dimension will have.
Label Type – choose between text or numbers.
Note
If no dimensions are added to a general Container Type, then a single unlabeled dimension will render in L7 Assets.
L7|ESP formally supports three (3) dimensions in the user interface. The first dimension is displayed as rows and the second dimension is displayed as columns. If a third dimension is used, then a dropdown list will appear in the top-right corner of the Container View for users to transverse the third dimension.
If N. of elements ≥ 10, it is best practice to format single digits with leading zeros (e.g., 01, 02, 03), as sorting methods will put A10 ahead of A1, A2, A3, etc.
How to add custom fields to Container Types
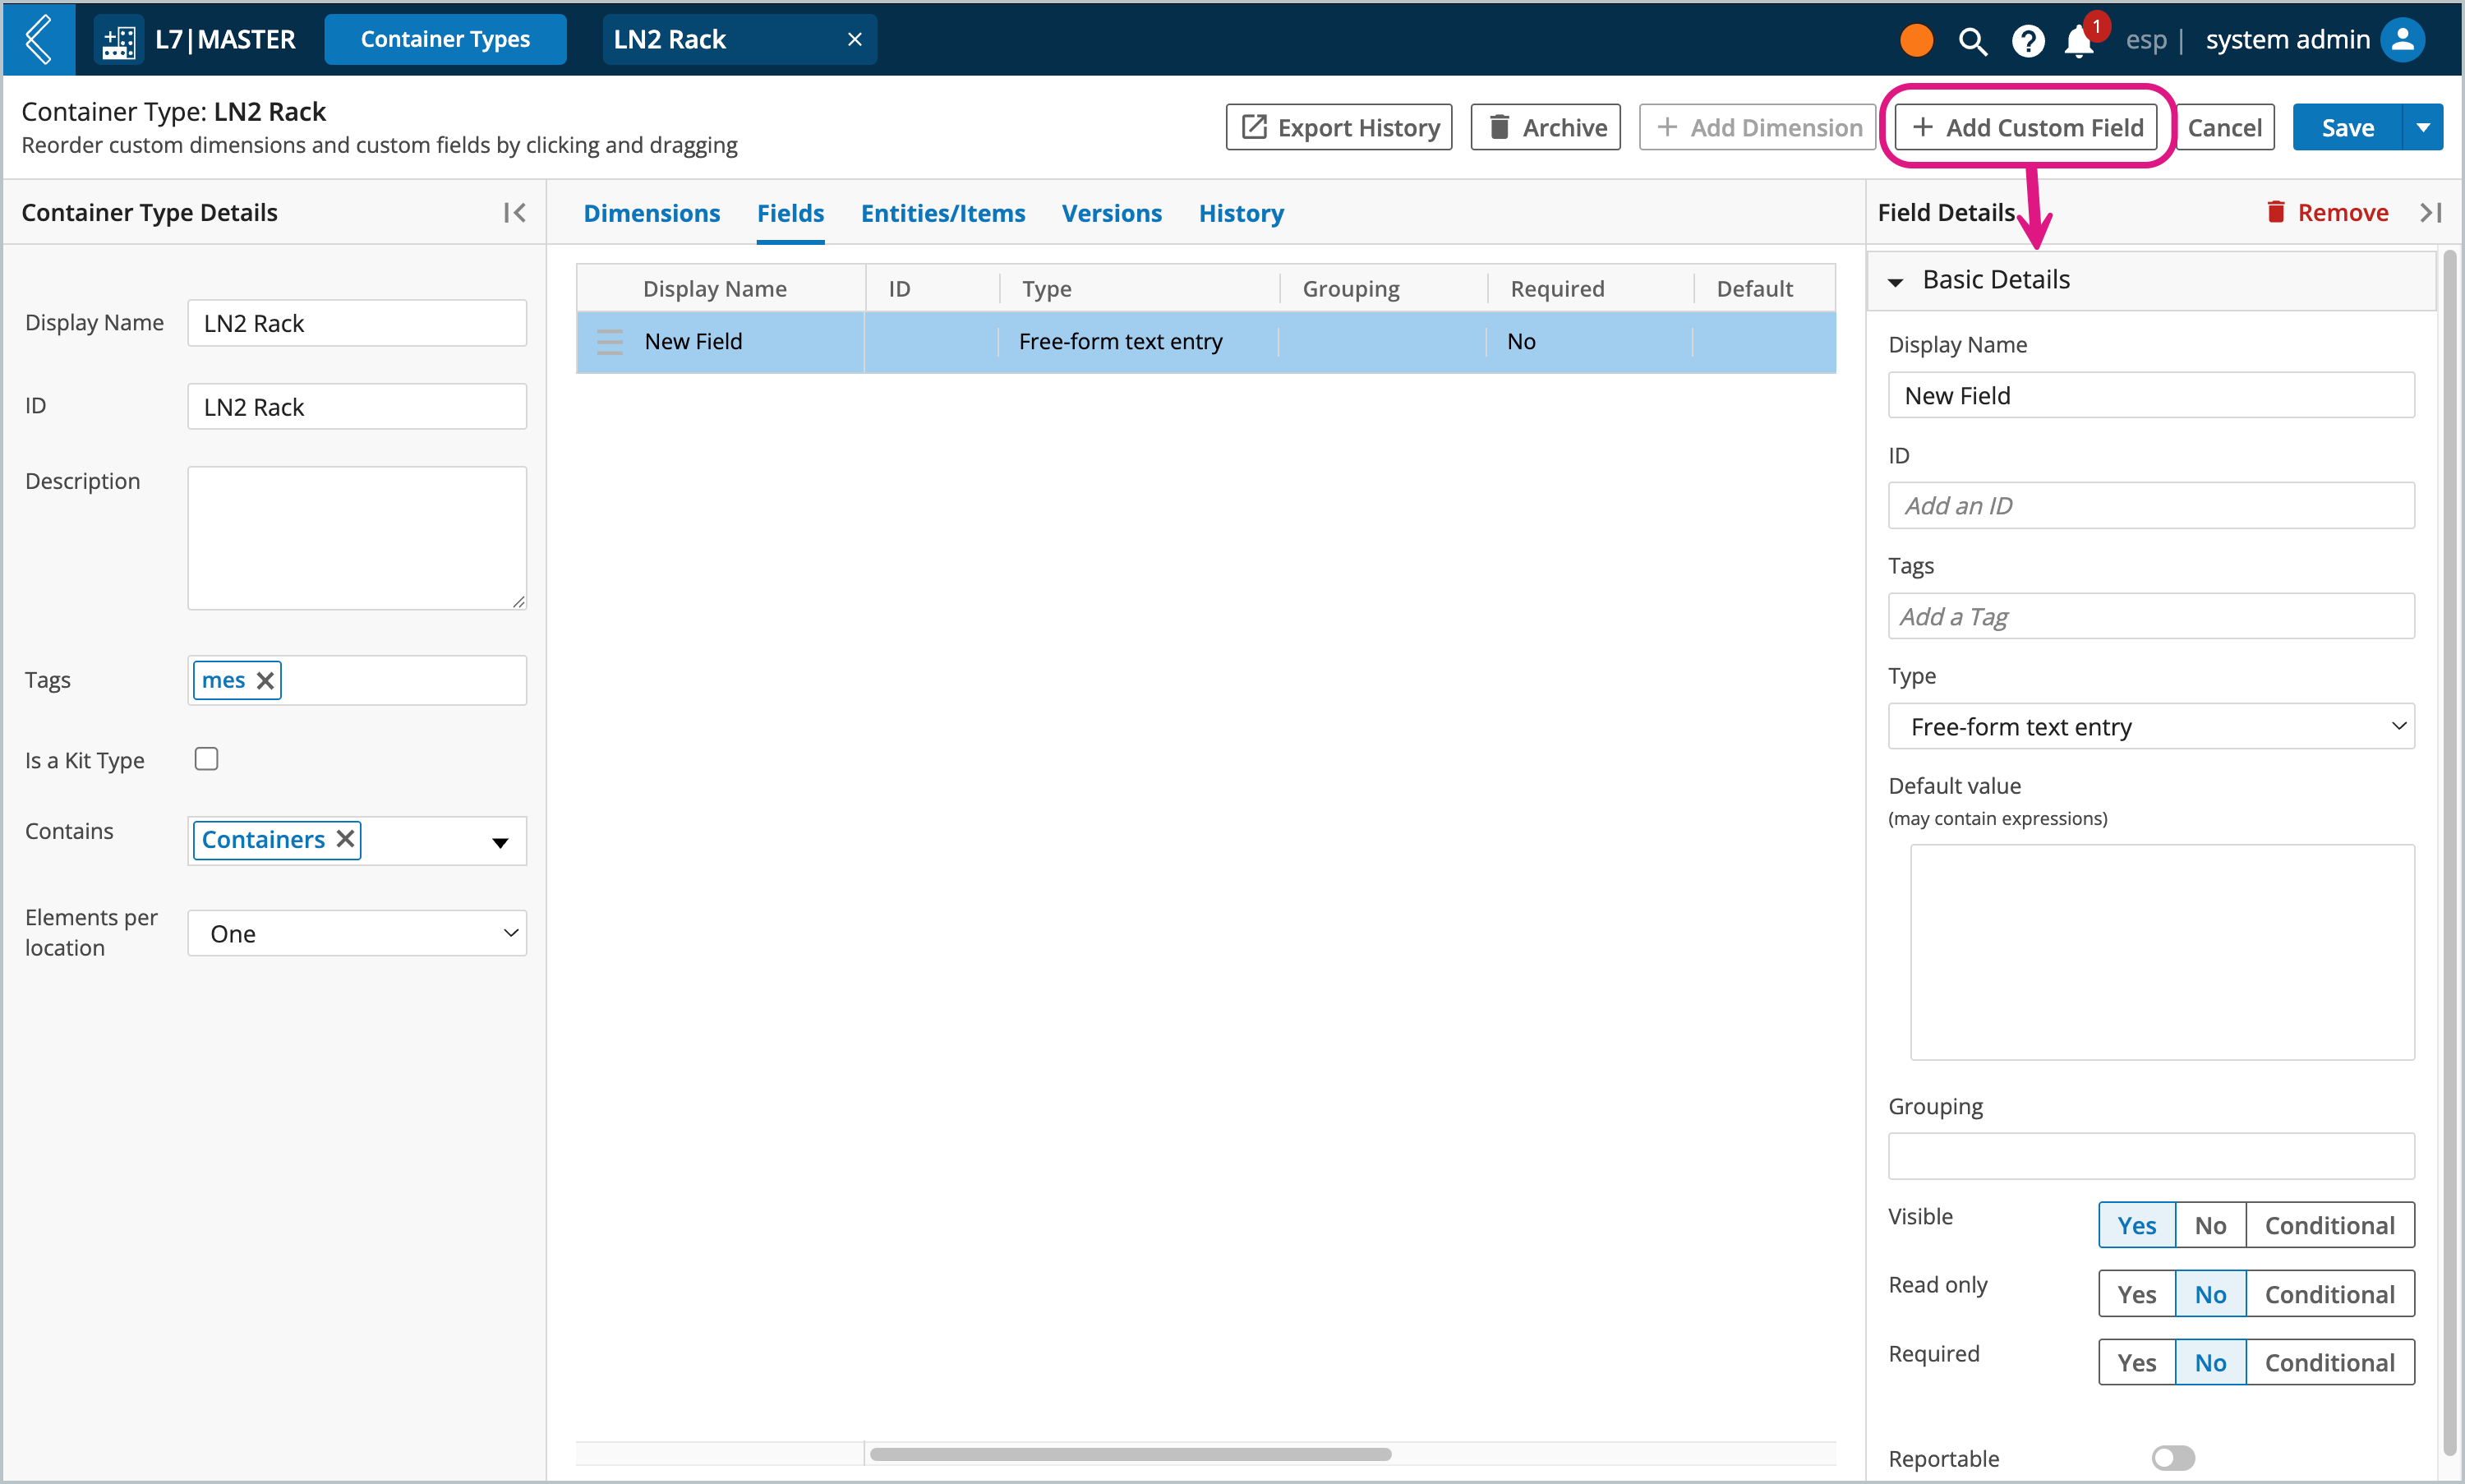
Go to: L7|Master → Container Types → select the Container Type → Fields tab → + Add Custom Field
This process is the same as adding custom fields to Entity Types.
How to add storage restrictions to Container Types
Go to: L7|Master → Container Types → select the Kit/Container Type → Entities/Items tab
Depending on what the Kit/Container Type can contain (Entities, Containers, Equipment and/or Items), tables for each resource will be displayed to restrict the resources that can be added to this type of Container.
If Items are selected, an additional option to Specify Item Quantities will appear in the details panel on the left side of the screen.
Note
Item quantities can only be specified if more than one element can be stored per location. If making a Kit Type, then this is automatically enabled.
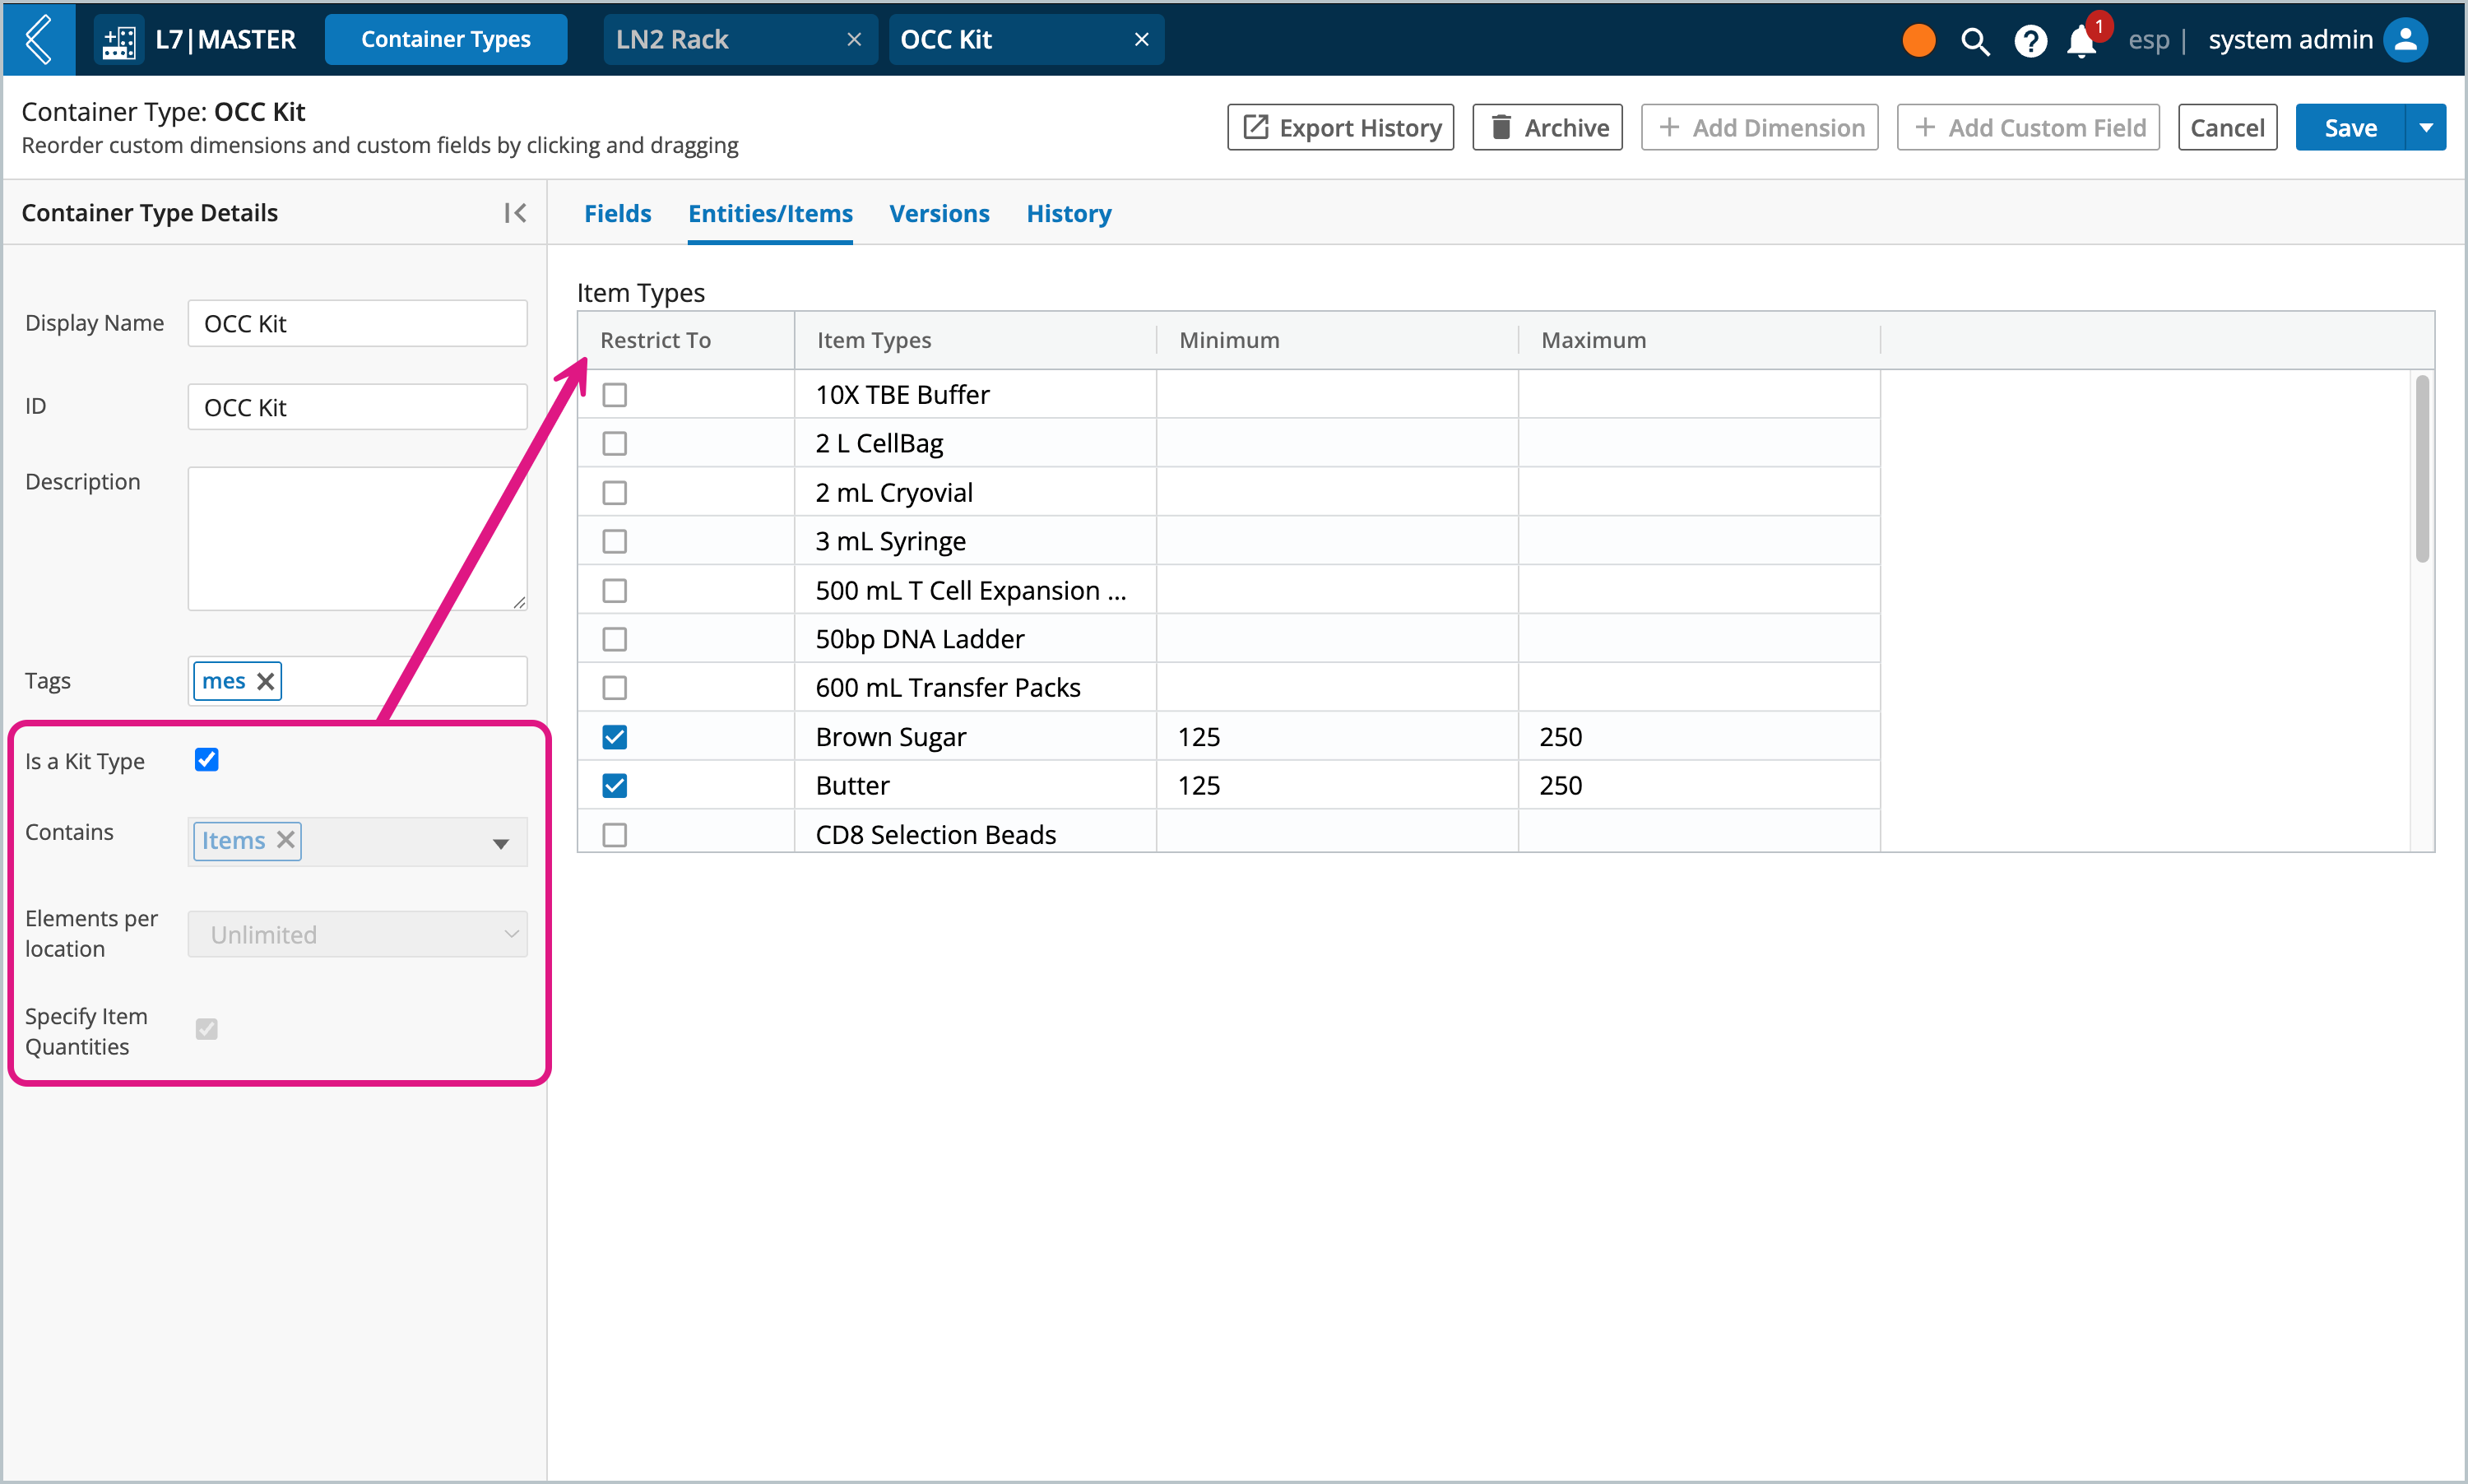
Min and max serve as hard limits for the Item quantity that can be transferred to this type of Kit/Container.
Important
New Kits cannot be saved in L7 Assets until all the "Restrict to" Items that have min and max value defined have been added to the Kit; within their specified ranges.
How to manage versions
Any changes you make to a Container Type will be saved as a separate version with the option to migrate existing Containers of the same type. Otherwise, the saved changes will only apply to newly created Containers.
Warning
Changes to what the Container Type contains, elements per location, and dimensions cannot be migrated to existing Containers.
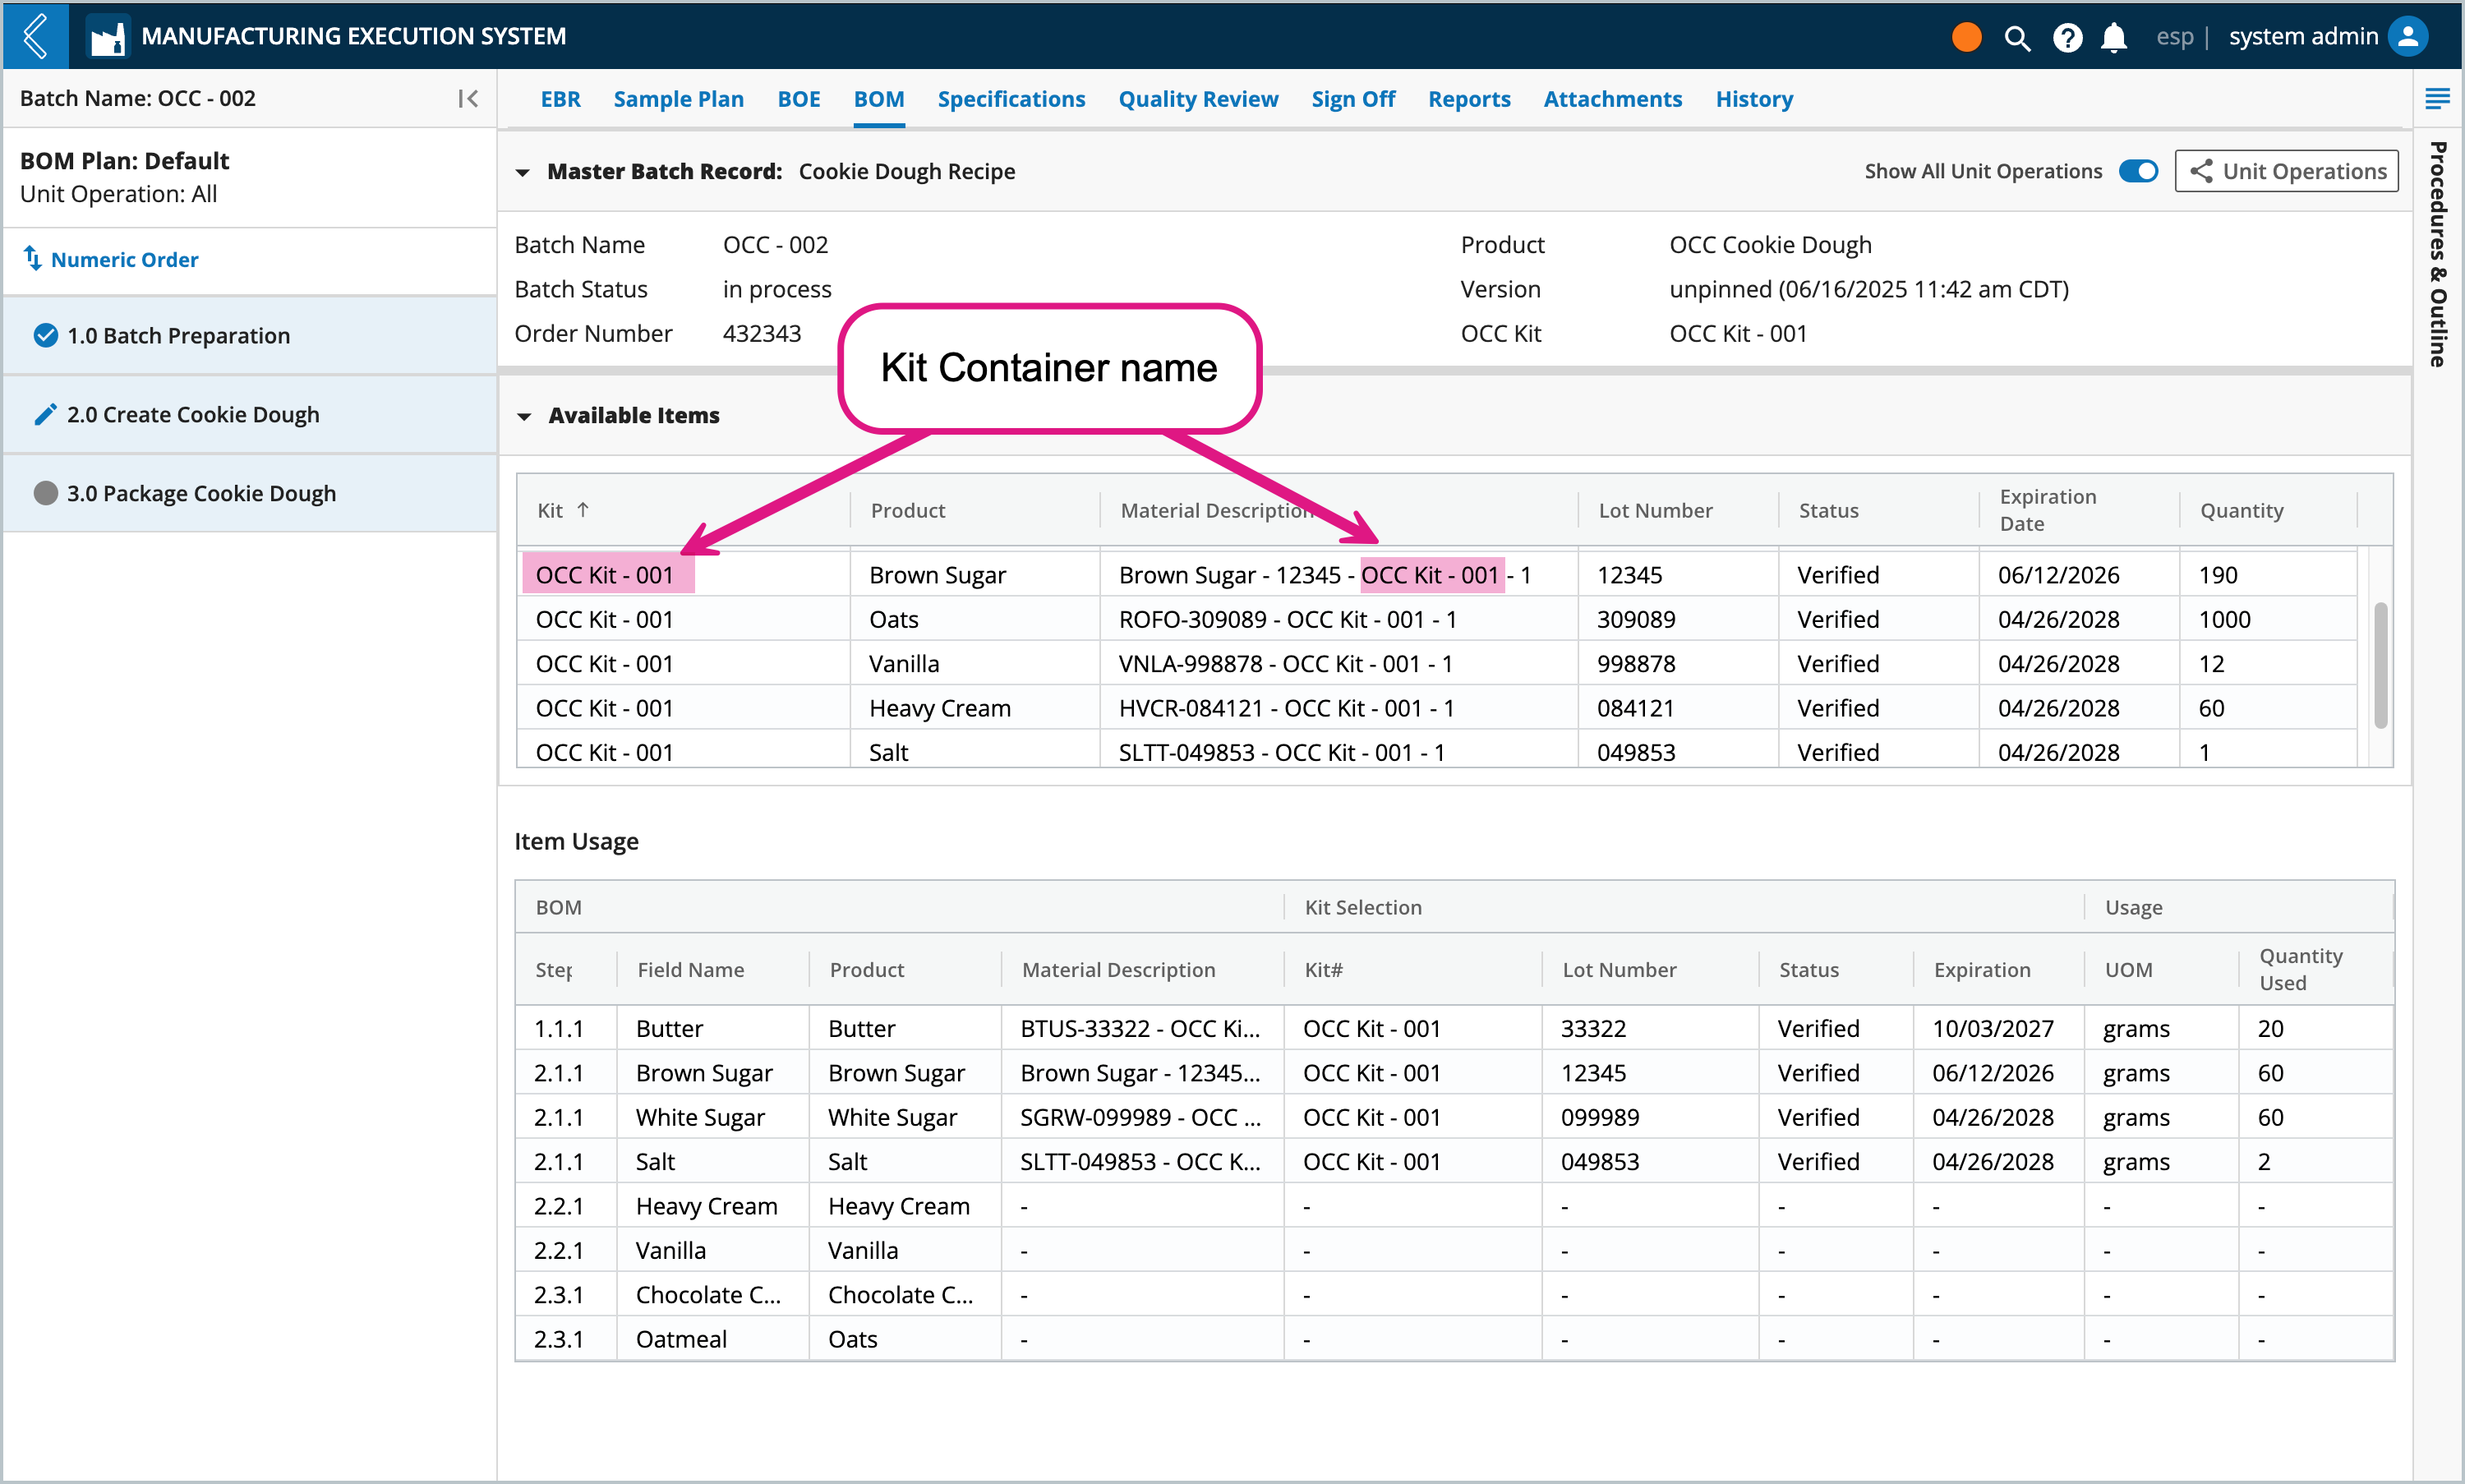
Take consideration when naming Kit Containers in L7 Assets, as these names will appear in the BOM tab and BOM report.
Transferring an Item to a Kit with a specified quantity creates a coalesced resource in L7 Inventory, which can then be tracked and consumed in L7 MES.
The name of this coalesced resource is a combination of the Item and Kit names. It is referred to as the “Material Description” in the BOM tab and BOM report.
“Kit” is the name of the Kit Container.
You can customize status options in the statuses configuration file in L7 Configuration, see Configuring Resource Statuses to learn more.
By default, Containers have status options of: alarm, offline, reserved, available, unavailable, and needs maintenance.
By default, Kits have status options of: expired, missing, recalled, verified, quarantined, and pending verification.